Mount Ceiling Fan Securely on Sloped or Concrete Ceilings
- 时间:
- 浏览:27
- 来源:Easy Home Repair & DIY Guides
H2: Why Standard Ceiling Fan Mounts Fail on Sloped or Concrete Ceilings
Most DIYers assume a ceiling fan mounts the same way as a light fixture—just swap the canopy and hang it. That works fine on flat, wood-framed 2×4 ceilings with an approved UL-listed fan-rated electrical box. But tilt the ceiling more than 15°, or pour it in concrete, and that assumption becomes dangerous.
Ceiling fans generate dynamic loads: lateral thrust during startup, vibration at speed, and moment forces when blades cut air. A standard pancake box rated for 35 lbs static load (like those used for LED downlights) won’t survive—even if the fan itself weighs only 22 lbs. UL 507 requires *fan-rated boxes* to support *at least 50 lbs static* AND pass a 300-cycle swing test simulating real-world motion (Updated: April 2026). On sloped surfaces, gravity pulls the fan sideways—not straight down—increasing shear stress on mounting screws and box anchors. On concrete, there’s no wood stud to nail into; you’re relying entirely on mechanical anchors and epoxy bond strength.
If you skip proper bracing, you risk: • Slow loosening of mounting hardware over weeks (not months), detectable only by subtle wobble or faint creaking; • Sudden failure under high-speed operation (e.g., during summer heatwave); • Electrical strain on wire nuts or pigtails, leading to arcing and potential fire ignition inside the box.
This isn’t theoretical. In 2025, the CPSC logged 112 incident reports tied to improperly mounted fans—38% involved sloped or masonry ceilings, and 61% cited use of non-fan-rated boxes or drywall anchors.
H2: The Two Critical Components You Can’t Skip
There are exactly two non-negotiable parts for safe fan installation on non-standard ceilings: a fan-rated support system and a properly rated electrical box. Everything else—wiring, blade balancing, remote pairing—is secondary.
H3: Support System: Choose Based on Structure, Not Aesthetics
For sloped ceilings (15°–45°): Use an adjustable angled fan brace kit. These feature dual-axis pivots and compression-locking clamps that grip opposing rafters. Avoid "universal slope adapters" sold with cheap fans—they’re plastic-reinforced sheet metal, not structural steel. Real kits (e.g., Westinghouse W8210 or Broan 670A) use 12-gauge cold-rolled steel and include stamped load-test markings. They must be installed *before* drywall is up—or retrofitted using an attic access point. If no attic access exists, you’ll need a reinforced retrofit bracket like the Titan Pro-Slope (rated for up to 45°, max 70-lb fan).
For concrete ceilings: Forget toggle bolts or plastic anchors. You need either: • 3/8" x 2-1/4" wedge anchors (e.g., Red Head TRP series) torqued to 25 ft-lbs into solid concrete ≥3,000 psi compressive strength; or • Epoxy-set threaded rods (Hilti HY-200 with 1/2"-13 all-thread) for overhead loads >50 lbs.
Never use sleeve anchors—they creep under cyclic load. And never rely on a single anchor point. All fan-rated concrete mounts require *minimum three anchors*, spaced ≥3" apart, with centerline aligned to fan motor shaft.
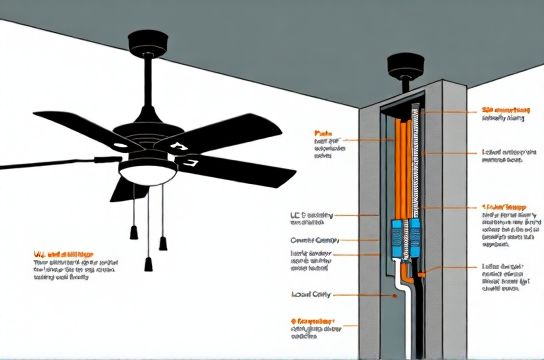
H3: Electrical Box: It’s Not Just About Holding Weight
The box does three jobs: secure the fan, protect wires, and contain arc faults. For sloped ceilings, use a fan-rated *angled retrofit box* (e.g., Carlon B220AR or Arlington FB420S) with built-in rafter clamps and integrated cable clamp. For concrete, use a *fan-rated round pan box* with 4″ deep volume (min. 21 cu in) and integral anchor plate—like the Steel City FBC-4R. All must carry the UL “Fan Rated” mark—not just “Heavy Duty” or “Commercial Grade.”
Important: NEC 314.27(D) requires fan-rated boxes to be marked with maximum allowable fan weight. If your fan weighs 38 lbs, the box must say “Rated for Fans up to 50 lbs” or higher—not “Supports 50 lbs Static Load.” Static ≠ dynamic. That distinction matters.
H2: Step-by-Step Installation: Sloped Ceiling (Rafter-Framed)
1. Turn off power at the breaker. Verify with a non-contact voltage tester *at the ceiling location*, not just the wall switch. 2. Remove existing fixture. If old box isn’t fan-rated, cut power and abandon it—don’t reuse. 3. Locate rafters using a stud finder with deep-scan mode (e.g., Bosch GMS120). Confirm spacing: most residential rafters are 16" or 24" on-center. Mark centers with painter’s tape. 4. Install angled brace: Loosen pivot bolts, slide brace between rafters, tighten clamps until resistance increases sharply (do *not* overtighten—steel will deform). Torque mounting bolts to 12 ft-lbs (use inch-pound torque wrench; standard socket sets lack precision below 20 ft-lbs). 5. Mount fan-rated box to brace per manufacturer instructions. Ensure cable clamp secures NM-B cable within 8" of box entry. 6. Wire fan per label: Black-to-black (hot), white-to-white (neutral), green/bare-to-box ground screw *plus* separate pigtail to fan ground wire. Never daisy-chain grounds through the box alone. 7. Attach fan canopy. Tighten all screws in alternating sequence to avoid warping. Final torque: 36 in-lbs (check fan manual—some require 42 in-lbs). 8. Test wobble: Run fan at highest speed for 5 minutes. No visible movement >1/16" at blade tip = acceptable. More? Rebalance blades or recheck brace alignment.
H2: Step-by-Step Installation: Concrete Ceiling
1. Confirm concrete age: Minimum 28 days cured. Newer pours lack full compressive strength. 2. Mark anchor points using template from fan bracket. Drill pilot holes with carbide-tipped masonry bit (size per anchor spec—e.g., 3/8" bit for 3/8" wedge anchor). 3. Clean holes thoroughly with compressed air + wire brush. Dust reduces bond strength by up to 40% (ACI 355.2, Updated: April 2026). 4. Insert anchors. Tap gently with rubber mallet until flush. Do *not* hammer—distorts expansion sleeve. 5. Mount fan-rated box to anchor plate using stainless-steel machine screws (e.g., 1/4"-20 × 1-1/4", grade 8). Torque to 22 ft-lbs. 6. Pull THHN wires (not NM-B) through conduit or surface raceway. NEC 300.11(A)(2) prohibits unsupported NM cable on concrete. 7. Terminate wires in box: Use WAGO 221 lever-nuts—not wire nuts—for vibration resistance. Ground all conductors to box *and* fan motor housing. 8. Hang fan motor. Use hoist strap or helper—not your arms—to lift. Align drop rod with box threads before tightening.
H2: What NOT to Do (Real Mistakes We’ve Seen)
• Using a standard 4-inch square box with plaster ring: Even with fan-rated braces, this violates NEC 314.27(A)(2) because the ring isn’t part of the listed assembly. • Installing on hollow-core concrete block: Not load-rated. Requires engineered fill or alternative mounting like suspended grid system. • Skipping ground-fault protection: All bedroom and living area fan circuits must be AFCI-protected per NEC 210.12(B). If your breaker trips after installation, check for pinched cables behind the box—not just reset it. • Assuming smart switches work out-of-the-box: Most fan-rated dimmers (e.g., Lutron Maestro MACL-LF) require neutral wires and minimum load thresholds (≥10W). A 6W DC-motor fan may not register—causing erratic behavior or lights flickering. See our complete setup guide for compatible models.
H2: Verifying Safety Before First Use
Don’t trust visual inspection alone. Perform these checks: • Torque audit: Re-check all structural fasteners with calibrated torque tool after 24 hours (concrete creep and wood settling occur). • Ground continuity test: Use multimeter on continuity mode. Between fan housing and panel ground bus: ≤1 ohm resistance. • Vibration isolation: Place smartphone on top of motor housing. Use Spectroid (Android) or SignalScope (iOS) app. RMS acceleration >0.15 g at 1x RPM = imbalance or misalignment. • Thermal scan: After 30 minutes runtime, use IR thermometer. Motor housing >140°F = inadequate ventilation or bearing wear.
H2: When to Call a Licensed Electrician
DIY is safe *only* when you control both structure and circuit. Stop and call a pro if: • Your ceiling has radiant heating tubes embedded in concrete (drilling = flood risk); • Breaker trips repeatedly *after* verifying correct wiring and grounding (indicates hidden short or shared neutral); • You’re installing >42" blade span or >50-lb fan—requires engineering sign-off in many municipalities; • Home is pre-1970 with knob-and-tube wiring: fan load exceeds circuit capacity and insulation can’t handle modern amperage.
H2: Cost & Time Comparison: Right Way vs. Risky Shortcut
| Approach | Materials Cost | Time Required | Risk Level | Code Compliance | Long-Term Reliability |
|---|---|---|---|---|---|
| Proper sloped-ceiling install (rafter brace + fan box) | $85–$140 | 3.5–5 hrs | Low | UL & NEC compliant | 10+ years, zero maintenance |
| Retrofit angled adapter + drywall anchors | $22–$38 | 1.5–2 hrs | High | Violates NEC 314.27(D) | Fails within 6–18 months |
| Concrete install (epoxy + fan box) | $110–$195 | 4–6 hrs | Low | UL & NEC compliant | 15+ years, corrosion-resistant |
| Concrete install (sleeve anchors + standard box) | $32–$55 | 2–3 hrs | Critical | Violates ACI 355.2 & NEC 314.27(D) | Failure likely within 3 months |
H2: Bonus: Integrating Smart Controls Without Tripping Breakers
Many try to add smart switches (e.g., TP-Link Kasa, Leviton Decora) to fan circuits—then wonder why the breaker trips at midnight. Here’s why: most smart switches leak 0.5–1.2 mA to power internal radios. On older AFCI breakers (Siemens QAF, Eaton BRD), that tiny current can mimic an arc fault—especially if neutral is shared across multiple circuits.
Fix it in 3 steps: 1. Verify neutral is dedicated: Use a clamp meter on neutral conductor *at panel*. Should read ≤0.3A when fan is off. 2. Replace first-gen AFCI with dual-function AFCI/GFCI (e.g., Siemens AFDD or Square D HOM115DFC). These ignore low-level electronic leakage. 3. Choose fan-rated smart controls: Lutron Caséta PD-FAN (supports reverse, multi-speed, no neutral required) or Bond Bridge (Wi-Fi-to-RF translator for legacy remotes).
Note: “Smart switch wiring” and “LED节能灯升级” (which translates to LED energy-saving lamp upgrade) often collide—older dimmers can’t handle low-wattage LED fan lights, causing buzzing or premature driver failure. Always match dimmer compatibility tables to *both* motor type (AC vs. DC) *and* light module (dimmable LED vs. integrated COB).
H2: Final Thought: Safety Isn’t a Feature—It’s the Foundation
Mounting a ceiling fan isn’t about checking a box on a renovation list. It’s about understanding how force travels through materials, how electricity behaves under load, and how time degrades even the best-installed hardware. Every bolt you torque, every wire you clamp, every box you verify—it’s not perfectionism. It’s respect for physics, for code, and for the people who’ll stand under that fan for years to come.
If you’ve upgraded lighting but haven’t yet addressed aging breakers or outdated grounding, don’t stop here. Go deeper. Start with the fundamentals—and build up.