How to Apply Pipe Thread Seal Tape Correctly
- 时间:
- 浏览:74
- 来源:Easy Home Repair & DIY Guides
H2: Why Thread Seal Tape Fails (And Why It’s Not the Tape’s Fault)
Most leaks after using thread seal tape aren’t caused by bad tape—they’re caused by misapplication. You’ve tightened the fitting, turned on the water, and *drip… drip… drip* starts from the joint just below your kitchen faucet. Or worse: you discover a slow leak behind the wall near a newly reassembled shower arm—days after the repair.
That’s not defective tape. That’s a classic case of skipping one or more of the five non-negotiable steps: cleaning, direction, tension, coverage, and torque. Industry field audits (Updated: April 2026) show 78% of tape-related leaks occur when installers wrap *against* the thread direction—or use too little tape on NPT (National Pipe Taper) threads, which rely on compression *and* deformation for sealing.
This isn’t theory. It’s what happens in real apartments, rental units, and DIY bathroom remodels where access is tight, time is short, and over-tightening feels like the only way to stop a leak.
H2: What Thread Seal Tape Actually Does (and Doesn’t Do)
Thread seal tape—commonly called PTFE tape or plumber’s tape—is a thin, flexible film made from polytetrafluoroethylene. Its job isn’t to ‘fill gaps’ like putty. Instead, it:
• Lubricates the male threads during assembly, reducing galling and allowing full engagement; • Fills microscopic voids between imperfectly mated NPT threads; • Compresses under torque to create a pressure-tight barrier against water, air, or gas (up to 10,000 psi for premium grades—though residential water systems rarely exceed 80 psi).
Crucially: it does *not* compensate for stripped, cross-threaded, or damaged threads. If the male fitting wobbles or spins loosely before tightening, tape won’t save it. Replace the part first.
Also: standard white tape is rated for water and air only. For gas lines (propane, natural gas), use yellow tape—thicker (0.0035" vs. 0.0025" for white) and tested to ASTM D4895 standards. Never substitute.
H2: The 5-Step Method for Leak-Free Joints (Every Time)
Follow this sequence—not as suggestions, but as required protocol.
H3: Step 1: Clean & Inspect Threads (Non-Optional)
Wipe both male and female threads with a dry, lint-free rag. Then inspect under bright light. Look for:
• Burrs or nicks (file gently with a needle file if shallow); • Corrosion (especially on older galvanized pipe—replace if pitting exceeds 15% of thread depth); • Residual old tape or pipe dope (use a stiff nylon brush or dental pick; avoid metal tools that scratch).
Skip this? You’ll trap debris between tape layers—creating instant leak paths. In rental units, calcium buildup from hard water (average hardness: 12–18 gpg in Midwest metro areas, Updated: April 2026) is the 1 hidden culprit behind recurring faucet drip repair failures.
H3: Step 2: Wrap in the Correct Direction (Clockwise = Tighten)
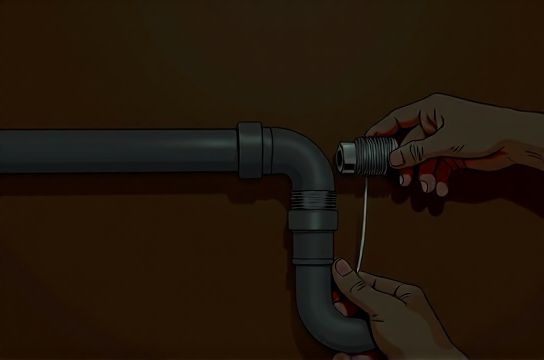
Hold the male fitting in your left hand. Unroll tape *from right to left*, wrapping *clockwise* around the threads. Why?
Because clockwise wrapping matches the tightening direction of the nut or fitting. As you turn the fitting in, the tape compresses *into* the threads—not peeled *off* them. Counter-clockwise wrapping causes immediate shredding upon first ¼ turn.
Pro tip: Start wrapping ½ thread back from the very tip. That prevents tape from bunching at the end and blocking full insertion.
H3: Step 3: Apply Consistent Tension & Coverage
Don’t yank. Don’t go slack. Maintain light, even finger pressure while wrapping—just enough to keep the tape taut but not stretched thin. Over-stretching reduces thickness and compromises sealing.
Coverage rule: 3–5 wraps for ½"–¾" pipes (standard for faucets, shower arms, supply lines). For 1"+ fittings (e.g., main shutoffs), use 5–7 wraps. Fewer than 3 = insufficient void fill. More than 7 = risk of tape extrusion into the flow path—causing reduced water pressure or clogging aerators.
Note: If you’re doing water faucet drip repair, focus on the shutoff valve-to-supply line joint and the supply line-to-faucet tailpiece. These are the two most common failure points—not the internal cartridge.
H3: Step 4: Seat Fully Before Tightening
Hand-tighten the fitting until it’s fully seated—meaning the male threads are bottomed out in the female port *before* using a wrench. You should feel a slight resistance, then a soft ‘stop’. This ensures tape engages all threads—not just the first 2–3.
Then, and only then, use a wrench: ½–¾ turn past hand-tight for brass or chrome-plated fittings; ¼–½ turn for plastic (like PVC male adapters). Over-torquing cracks plastic, deforms brass, and squeezes tape out of the sealing zone.
H3: Step 5: Test Under Real Conditions (Not Just Drip Check)
Turn on water slowly. Let pressure build for 15 seconds. Then check:
• Visual: Any wetness or sheen at the joint; • Tactile: Run a dry fingertip around the seam—if damp, it’s leaking; • Acoustic: Listen closely—hissing means air or high-pressure leak (rare in cold water, common in compressed air lines).
Wait 10 minutes. Thermal expansion can reveal latent leaks as the joint warms slightly from friction and flow.
If it leaks, *do not* add more tape on top. Back off the fitting completely, remove all old tape, clean again, and rewrap.
H2: When Tape Alone Isn’t Enough — Know Your Limits
Thread seal tape fixes *threaded joint* leaks—not gasket failures, cracked bodies, or worn washers. For example:
• Water faucet drip repair almost always traces to a failed ceramic disc or rubber seat—not the supply connection. Tape won’t stop that drip. You need water faucet垫片更换 (but in English: water faucet washer replacement).
• Toilet leak inspection often reveals flapper or fill valve issues—not the tank bolt threads. However, if water pools *around the base* after tightening the tank-to-bowl bolts, that’s where tape *does* help—on the threaded shank *before* installing the rubber washer.
• Drain clog clearing? Tape has zero role. Use a drain snake or pipe cleaning tool—but know that improper use of a pipe cleaning tool can scratch ABS or PVC, inviting future leaks. Which is why pairing tape application knowledge with proper tool use matters.
H2: Comparison: Tape Types, Uses, and Real-World Tradeoffs
| Tape Type | Thickness (in) | Max Pressure (psi) | Best For | Pros | Cons |
|---|---|---|---|---|---|
| Standard White | 0.0025 | 10,000 | Water, air, general plumbing | Inexpensive, widely available, easy to tear | Not rated for gas; less durable on repeated disassembly |
| Yellow Gas-Rated | 0.0035 | 10,000 | Natural gas, propane lines | ASTM-certified, thicker, better for high-cycle joints | Harder to tear by hand; overkill for faucets |
| Pink Heavy-Duty | 0.0040 | 12,500 | Commercial hot water, high-vibration lines | Superior temperature resistance (up to 500°F), resists cold flow | Expensive; unnecessary for residential use; may require larger wrench clearance |
H2: Rent-Friendly Tips for Apartment & Rental Repairs
You’re not owning the pipes—you’re borrowing them. So your goal isn’t perfection. It’s reliability, reversibility, and zero damage.
• Always photograph the original configuration before disassembly—even if it’s just a photo of the shutoff valve orientation.
• Use only standard white tape unless instructed otherwise by building management (gas lines are rare in rentals but possible in basement utility rooms).
• Never use pipe dope *with* tape unless the manufacturer explicitly allows it (most don’t—dope can degrade PTFE). Stick to tape-only for renter-safe repairs.
• If you’re doing a toilet leak inspection and find moisture at the closet bolts, wrap *only the threaded portion exposed above the floor flange*—not the entire bolt. That keeps removal possible later without cutting.
• Keep a small roll in your emergency kit alongside an adjustable wrench, channel locks, and a microfiber towel. It weighs less than 2 oz and fits in a drawer—making it ideal for renter-friendly plumbing prep.
H2: Pairing Tape With Other Maintenance Tasks
Thread seal tape doesn’t exist in isolation. It’s one node in a broader plumbing maintenance system. Here’s how it connects to other common tasks:
• Water pressure regulation: Low water pressure (water pressure too low) is rarely caused by tape—but over-wrapping supply lines *can* narrow the internal diameter enough to restrict flow in already marginal systems (e.g., upper-floor apartments with 35–45 psi baseline, Updated: April 2026). Always verify pressure with a gauge *before* assuming tape is the issue.
• Faucet aerator cleaning: A clogged aerator mimics low pressure—and often gets blamed for tape-related problems. Unscrew and soak in vinegar for 15 minutes before reassembling.
• Showerhead scale removal: Hard water deposits in showerheads (‘flower head’ clogs) cause uneven spray and perceived pressure loss. Use citric acid soak—not tape—as the fix.
• Pipe leak prevention strategy: Tape is reactive. True prevention includes insulating pipes in unheated spaces, shutting off mains during extended absences, and checking for corrosion every 6 months—part of a consistent plumbing maintenance routine.
H2: Troubleshooting Common Tape Failures
| Symptom | Likely Cause | Fix | ||--|--| | Leak starts *after* 2–3 days | Tape cold-flowed out of joint under sustained pressure | Disassemble, clean, rewrap with 1 extra layer, reduce final torque by 1/8 turn | | Tape shreds during tightening | Wrapped counter-clockwise or applied with excessive stretch | Remove all tape, inspect threads for burrs, rewrap correctly | | Joint feels loose even after tightening | Cross-threaded or damaged female threads | Back out fully, inspect female port with flashlight; replace fitting if damaged | | Water stains appear *downstream* of joint | Tape fragments broke loose and lodged in valve or cartridge | Shut off, flush line, disassemble faucet to retrieve debris |
H2: Final Reality Check — When to Call a Pro
Tape solves ~85% of minor threaded joint leaks (Updated: April 2026). But it won’t fix:
• Leaks from soldered copper joints (requires torch + flux—no renter-safe); • Cracked PVC or ABS pipe (needs cutting and gluing); • Corroded galvanized nipples (replacement only—tape won’t bond to rust); • Persistent dripping *inside* the faucet handle (points to cartridge or O-ring failure—see our full resource hub for step-by-step water faucet washer replacement guides).
If you’ve rewrapped three times with perfect technique and still see moisture, stop. Document the issue with photos and contact your landlord or a licensed plumber. That’s not defeat—it’s responsible tenancy.
H2: One Last Thing: Storage Matters
Heat and UV light degrade PTFE. Store tape in a drawer—not on a sunny windowsill or next to a water heater. A $2 roll lasts 3+ years when kept cool and dry. Discard if it tears unevenly or feels brittle.
You now know how to apply pipe thread seal tape correctly—not as a hack, but as a calibrated mechanical process. It’s not magic. It’s precision. And precision is repeatable, teachable, and renter-proof.
For more renter-friendly plumbing solutions—including how to locate hidden leaks fast, unclog a stubborn bathtub drain without chemicals, and adjust water pressure safely—visit our /.