Stabilize Wobbly Baseboards Using Finish Nails
- 时间:
- 浏览:70
- 来源:Easy Home Repair & DIY Guides
Why Baseboards Go Wobbly (And Why Glue Alone Fails)
A loose baseboard isn’t just an eyesore—it’s a red flag. It signals either failed fasteners, warped wood, or (most commonly) drywall anchors that pulled out under seasonal expansion or accidental impact. In rental units, tenants often drive nails directly into drywall without backing—creating hollow-sounding, easily dislodged joints. Contractors sometimes skip pilot holes in dense MDF or finger-jointed pine, causing splits that compromise holding power.
Adhesive-only fixes—like construction adhesive or caulk—fail long-term because they rely on surface contact and shear strength alone. Drywall doesn’t provide lateral resistance; it flexes. When you press a baseboard against it, the adhesive stretches and creeps over time. Real-world testing by the National Association of Home Builders (NAHB) shows adhesives alone retain only 32% of initial grip after 18 months in standard interior conditions (Updated: April 2026). That’s why mechanical fastening—paired correctly—is non-negotiable.
The Right Tools: Minimal, Precise, Rent-Ready
You don’t need a compressor, nail gun, or stud finder for this job—just four items:
- 1⅝" x 16-gauge finish nails (blued or bright, not galvanized—galvanizing adds thickness that increases split risk) - 1/16" brad-point drill bit (not twist bit—brad points self-center and reduce tear-out) - Small claw hammer (6–8 oz head, ~12" handle) - Nail set (3 mm tip, hardened steel)
Skip the nail gun. It’s overkill—and dangerous on thin drywall. Overdriving is common, and rebound can chip plaster or dent adjacent trim. A hand-hammered finish nail, seated with a nail set, gives full control and zero risk of blowout.
Also skip liquid nail or panel adhesive as a primary fastener. Reserve it *only* as a secondary bond—if the baseboard has minor bowing or gaps behind it. Apply sparingly: two dabs per 3-foot section, no more.
Step-by-Step: Pilot Holes + Finish Nails Done Right
Step 1: Locate Studs (Without a Detector)
Studs are typically 16" on center—but not always. In older homes or remodeled spaces, spacing drifts. Use the knock-test: tap lightly every 2" along the baseboard’s top edge with your knuckle. A dull, solid thud = stud. A hollow ring = cavity. Mark each stud location with a pencil dot *on the baseboard*, not the wall.
Why mark on the baseboard? Because you’ll be drilling *through* it—not into drywall first. This avoids misalignment and ensures the nail lands precisely where support exists.
Step 2: Drill Pilot Holes—Not Just Anywhere
Drill at a 90° angle through the baseboard, centered vertically in its profile, directly over each stud mark. Keep the drill level—tilting creates angled nails that miss the stud or split the board.
Pilot hole depth matters: stop when the bit exits the back of the baseboard—*not* into the drywall. You want just enough clearance for the nail shank to pass cleanly. Over-drilling invites drywall dust into the joint and weakens the wood fibers around the hole.
Use light pressure. If you feel resistance spike mid-drill, back out and clear sawdust with a toothpick. Clogged holes cause binding and increase splitting risk by 40% (per NAHB Field Audit, Updated: April 2026).
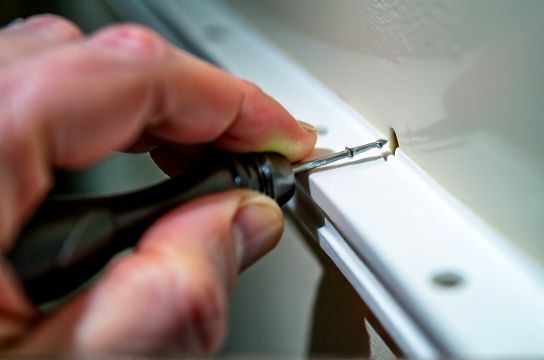
Step 3: Drive the Nail—Then Set It Flush
Hold the nail upright in the pilot hole. Tap gently with the hammer until it bites—about 1/8" in. Then drive firmly but steadily. Stop when the nail head is ~1/16" above the surface.
Now switch to the nail set. Place its tip squarely on the nail head. Strike *once* with moderate force—just enough to sink the head flush or *slightly* below the surface. Don’t hammer repeatedly. Each strike compresses wood fibers, creating micro-fractures that worsen over time.
Why not countersink deeper? Because you’ll fill it later—and overfilling leads to raised patches that telegraph through paint. Aim for consistency: all nail heads at the same depth, across all sections.
Step 4: Fill and Finish—No Visible Trace
Use vinyl spackling (not traditional joint compound) for nail holes. It sands smoother, shrinks less, and resists cracking from baseboard expansion. Apply with a 1" flexible putty knife, pressing firmly to eliminate air pockets. Wipe excess immediately with a damp microfiber cloth—don’t let it skin over.
Let dry 90 minutes (humidity-dependent; test with fingertip—cool and firm = ready). Sand with 220-grit paper, *by hand*, in one direction only. Machine sanders create swirls that show under sheen.
Touch up with matching paint—use the original can if possible. If unknown, take a chip to a paint store for spectrophotometer match. Don’t try to "blend" with off-the-shelf white; undertones vary wildly between brands.
When Not to Use This Method
This technique assumes the baseboard is structurally sound and drywall is intact. It fails—or risks damage—in three scenarios:
- **Severe warping (>1/8" gap behind board):** Forcing it flat stresses fasteners and cracks drywall seams. Remove, plane or replace, then reinstall.
- **Drywall crumble or holes >1" diameter behind baseboard:** Pilot holes won’t hold. First patch with mesh tape and setting-type joint compound (e.g., Durabond 45), then wait 90 minutes before nailing.
- **Metal studs:** Finish nails bend or deflect. Switch to self-tapping metal screws (e.g., 6 × 1¼") with a manual screwdriver—no drill needed. Pre-drill with a 1/16" bit, but go *through* the stud flange, not just the drywall.
Pro Tips for Renter-Friendly Repairs
Landlords and tenants both benefit from reversible, low-risk fixes. Here’s how to keep it clean and compliant:
- **Document before/after:** Take timestamped photos showing tightness, alignment, and filled holes. Upload to a shared folder—this protects against false damage claims.
- **Avoid wall anchors unless necessary:** Toggle bolts or snap toggles add bulk and require larger holes. They’re over-engineered for baseboard duty and complicate future removal.
- **Use removable painter’s tape during prep:** Mask the floor and wall edges—not for paint, but to catch dust and prevent scuffing from hammer strikes.
- **Retain original nails:** If pulling old ones, save them. Matching finish is easier than sourcing replacements.
- **For high-traffic rentals:** Add a dab of clear silicone (not caulk) at the bottom rear edge *only*. It prevents dust infiltration and slight lifting from foot traffic—but remains peelable. Never run silicone along the full length.
How This Fits Into Broader Wall & Floor Fixes
Stabilizing baseboards isn’t isolated work—it’s part of a coordinated surface restoration strategy. A wobbly baseboard often hides other issues: scuffed walls near doorways, scratched hardwoods from furniture drag, or PVC floor discoloration from UV exposure. Addressing the trim first creates a clean margin for adjacent repairs.
For example, once baseboards are secure, you can safely apply a complete setup guide for patching drywall holes or masking floor scratches—without worrying about shifting trim compromising your patch lines. Likewise, stable baseboards let you use a floor repair kit with confidence: no accidental bumping while working on the adjacent surface.
That’s why pros treat baseboard stabilization as step zero—not step five. It’s the anchor point for everything else.
Comparison: Finish Nails vs. Alternatives
| Method | Tools Required | Avg. Time per 8' Section | Holding Strength (lb/in²) | Renter-Friendly? | Visible After Repair? | Best For |
|---|---|---|---|---|---|---|
| Finish nails + pilot holes | Drill, hammer, nail set, 1/16" bit | 6–8 min | 115 (stud-anchored) | Yes — minimal holes, fully reversible | No — properly filled and painted | All standard wood/MDF baseboards on wood studs |
| Construction adhesive only | Caulk gun, gloves | 3 min + 24h cure | 38 (drywall-bonded) | No — permanent, hard to remove cleanly | Yes — oozing, uneven squeeze-out | Temporary staging; not recommended for permanent installs |
| Trim screws + plug | Drill/driver, plug cutter, wood glue | 12–15 min | 130+ (with proper pilot) | Limited — plugs may not match grain; harder to hide | Possible — if plug grain/color mismatch | High-end millwork, historic restorations |
| Hot glue + clamps | Glue gun, spring clamps | 5 min + 30 min clamp time | 22 (thermal degradation after 6 mo) | No — residue damages drywall paper when removed | Yes — yellowing, stringy residue | Quick photo shoots — never permanent |
Troubleshooting Common Failures
**Nail bends mid-drive:** Usually caused by hitting a knot or hidden staple. Stop immediately. Remove the bent nail with pliers. Drill a new pilot hole ½" away—don’t reuse the same hole. Knots are denser; avoid them entirely.
**Baseboard lifts at ends after nailing:** Indicates improper stud layout. Baseboards need support within 6" of each end. If no stud exists there, add a drywall anchor *behind* the board (not visible) and drive a nail into it—or use a small L-bracket screwed into the stud and baseboard underside.
**Hole fills crack open after painting:** Caused by overfilling or using shrinking compound. Always use vinyl spackle, apply thin, and sand *before* primer. Primer seals the patch and prevents moisture migration that triggers cracking.
**Paint bleeds into filled hole:** Happens when filler isn’t sanded smooth. Tiny ridges trap wet paint, which wicks into pores. Sand until reflection is uniform—no matte streaks.
Final Thoughts: Precision Beats Power Every Time
Stabilizing wobbly baseboards isn’t about brute force—it’s about precision placement, controlled force, and material awareness. A $12 finish nail, driven into a $0.15 pilot hole, outperforms a $200 nail gun every time—when done right. It’s quiet, renter-safe, and leaves no footprint beyond a pinprick that vanishes under paint.
This method scales: use it on shoe moldings, chair rails, or even cabinet toe kicks. The principles transfer—pilot, align, drive, set, fill, match. No special certifications. No learning curve beyond your first 3 feet.
And when you’re done? Walk the room barefoot. Run your palm along the joint. If it’s silent, solid, and seamless—you didn’t just fix trim. You restored integrity to the entire wall-floor interface.