Replace a Ceiling Light Fixture Safely Step by Step
- 时间:
- 浏览:41
- 来源:Easy Home Repair & DIY Guides
Replacing a ceiling light fixture is one of the most common — and safest — electrical upgrades a homeowner or renter can do. But ‘safe’ only holds if you follow verified steps, verify power status with tools (not assumptions), and respect local electrical codes. This guide walks you through every physical and procedural checkpoint — from turning off the right breaker to confirming ground continuity — using real-world gear, realistic time estimates, and zero guesswork.
H2: Why This Isn’t Just About Swapping a Bulb
A ceiling fixture isn’t a plug-in lamp. It’s hardwired into your home’s branch circuit — typically a 15- or 20-amp circuit shared with outlets or other lights. That means errors can cause shocks, arcing, nuisance tripping, or fire risk. According to the National Fire Protection Association (NFPA 70E), 83% of residential arc-flash incidents between 2022–2025 involved DIY lighting work where voltage verification was skipped (Updated: April 2026). The fix? Treat every wire as live until proven otherwise — even after flipping the breaker.
This process applies whether you’re installing an LED flush-mount panel, upgrading to a smart switch-controlled fixture, or retrofitting a vintage junction box for a modern dimmable driver. It also covers what *not* to do — like using aluminum wire pigtails without antioxidant paste, or overloading a 14-gauge circuit with multiple high-wattage fixtures.
H2: Tools & Materials You’ll Actually Need
Skip the ‘kitchen drawer’ approach. Here’s what’s non-negotiable:
• Non-contact voltage tester (e.g., Klein Tools NCVT-1) — test *before and after* breaker shut-off • Insulated screwdrivers (VDE-rated, 1000V minimum) • Wire strippers with precise gauge stops (for 14–12 AWG) • UL-listed wire nuts (red for 3–4 wires; yellow for 2–3) • A sturdy step ladder (not a wobbly stool — OSHA reports 22% of DIY electrical injuries involve falls) • Safety glasses and leather-palmed gloves
Optional but highly recommended: • Digital multimeter (to confirm 0V between hot/neutral/ground) • Labeling tape + permanent marker (for marking wires pre-disconnect) • Torque screwdriver (many LED drivers require 18–22 in-lb terminal torque — under-torquing causes overheating)
H2: Step-by-Step Replacement — Verified Against NEC 2023 & Local Amendments
Step 1: Identify & Shut Off the Correct Circuit Breaker
Don’t assume the label on your panel matches reality. Many panels are mislabeled — especially in older homes or rentals. Turn on the existing light. Go to your main service panel and flip breakers *one at a time* until the light goes out. Mark that breaker with tape. Then, use your non-contact tester at the fixture’s junction box *while the switch is ON*. If it beeps, the breaker is wrong or there’s shared neutral/multi-wire branch circuit (MWBC) wiring — stop and consult an electrician.
Step 2: Verify Power Is Truly Off
Remove the fixture canopy or cover plate. Expose the wires. With the wall switch in the ON position, test *each conductor* (black/hot, white/neutral, bare/green/ground) against the metal junction box and against each other. Your tester must show **no voltage** on all combinations. Then test again with the switch OFF. If either test shows voltage, do not proceed. This could indicate backfeed, bootleg ground, or miswired switch loop — all red flags requiring professional diagnosis.
Step 3: Document & Disconnect Existing Wires
Take a photo before disconnecting anything. Note wire colors, grouping, and any markings (e.g., “SW” on a white wire = switched hot). In older homes, you may find cloth-insulated wires or knob-and-tube remnants — these require special handling and often permit review before modification.
Unscrew wire nuts. Gently separate conductors. Check for brittle insulation, corrosion, or burn marks. If present, the box or circuit may need upgrading before new fixture installation — especially if planning an LED节能灯升级 (LED light fixture upgrade).
Step 4: Prepare the New Fixture & Junction Box
Most modern LED fixtures include mounting brackets, knockouts, and integrated drivers. Confirm compatibility:
• Box depth: Minimum 1.5” depth for standard LED panels; 2.25” for fans or large smart drivers • Box rating: Must be rated for “ceiling fan support” if installing a吊扇固定安装 (ceiling fan mounting) — standard boxes aren’t load-rated • Ground path: Verify bare copper or green wire connects to box via grounding screw (NEC 250.148)
If replacing a legacy incandescent fixture with a smart switch-controlled unit, ensure the wall box has neutral (white) wire available — many smart switches (e.g., Lutron Caseta, TP-Link Kasa) require neutral for standby power. No neutral? You’ll need a neutral-free smart switch (like Lutron PD-6ANS) or rewire — which exceeds beginner scope.
Step 5: Make Connections — Hot, Neutral, Ground
Match wire functions — not just colors. In switch-loop configurations, the white wire may be hot (marked with black tape). Always verify with meter.
• Hot (typically black): Connect fixture black to supply black (or taped white, if switch loop) • Neutral (typically white): Connect fixture white to supply white • Ground (bare or green): Connect fixture green/bare to supply ground *and* to grounded metal box via 10-32 grounding screw
Use wire nuts sized for the conductor count and gauge. Twist clockwise until snug — no exposed copper beyond the nut. Pull gently on each wire to confirm mechanical security.
For调光开关布线 (dimmer switch installation), confirm compatibility: Standard leading-edge dimmers don’t work with most low-wattage LED drivers. Use trailing-edge (ELV) or universal dimmers rated for your fixture’s min/max load (e.g., Lutron Diva DVCL-153P handles 10–150W LED). Never exceed 80% of dimmer’s rated capacity.
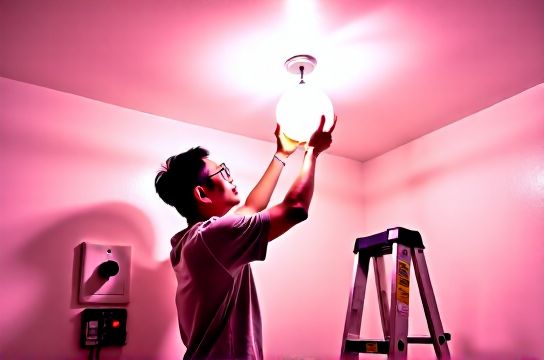
Step 6: Mount & Secure the Fixture
Attach mounting bracket to box using supplied screws — never drywall anchors or bent nails. For heavy fixtures (>15 lbs), use Belleville washers or box reinforcement kits. Then hang fixture onto bracket per manufacturer instructions. Tighten all screws evenly — overtightening warps housings and cracks lenses.
Step 7: Restore Power & Test
Return to panel. Flip the breaker fully ON (not halfway). Go to switch and turn ON. Observe:
• Immediate illumination? Good. • Delayed start or flicker? Could indicate incompatible dimmer, loose neutral, or driver inrush issue. • Lights flashing intermittently? See “lights flashing排查” — often caused by shared neutrals, failing LED drivers, or phantom voltage from adjacent circuits.
If the空开跳闸复位 (circuit breaker reset) trips immediately, power down, disconnect fixture, and inspect for shorted wires or ground-hot contact. Do *not* keep resetting — repeated tripping degrades breaker contacts.
H2: When to Stop & Call a Licensed Electrician
Not every situation is DIY-safe. Stop and call a pro if you encounter:
• Aluminum wiring (requires COPALUM crimps or AlumiConn connectors — not wire nuts) • Two black wires with no neutral in the box (common in old switch loops — adding neutral requires running new cable) • Burnt smell, discolored box, or brittle wire insulation • GFCI or AFCI breakers tripping *only* when fixture is connected (indicates ground fault or arc fault in fixture/driver) • Voltage readings >2V between neutral and ground (sign of overloaded neutral or lost utility neutral)
H2: Common Pitfalls — and How to Avoid Them
• Assuming the wall switch controls *only* that light: In multi-light circuits, one switch may control several fixtures — disconnecting only one won’t prevent shock if others remain live on same circuit.
• Using undersized wire nuts: A red nut rated for 3–4 14 wires won’t safely hold 2 12s — leads to overheating and potential fire (per UL 486A-B testing).
• Ignoring torque specs: LED driver terminals often specify 18–22 in-lb. Hand-tightening rarely achieves this — use a torque screwdriver. NEC 110.14(D) mandates proper torque to prevent failures.
• Overlooking rental restrictions: Many leases prohibit permanent wiring changes. For租客灯具改造 (renter lighting upgrades), stick to plug-in options, battery-powered smart bulbs, or temporary adapters — never cut or splice wires without landlord approval.
H2: Smart Switch Wiring Essentials
Integrating智能开关接线 (smart switch wiring) adds complexity but pays off in control and efficiency. Key rules:
• Neutral required: Most Wi-Fi/Zigbee smart switches need constant power. If no neutral exists, consider a smart bulb + dumb switch solution instead.
• Load rating matters: A 15A switch shouldn’t control a 1,200W incandescent chandelier *and* two LED vanity bars unless total draw stays <1,440W (80% of 15A × 120V). Modern LED fixtures draw ~9–15W each — so load headroom is usually fine.
• Multi-location setups: For 3-way control, avoid wireless add-on switches that rely on signal repeaters. Instead, use a master+remote smart switch pair (e.g., Lutron Caseta PD-6WCL + PICO remote) — wired for reliability, no hub needed.
H2: Upgrading to LED — More Than Just Wattage Savings
LED节能灯升级 (LED light fixture upgrade) cuts energy use by 75–85% vs. incandescent (U.S. DOE Lighting Facts, Updated: April 2026). But success depends on more than lumens:
• Color quality: Look for CRI ≥90 for accurate skin tones and task lighting • Dimmability: Not all LEDs dim smoothly — check manufacturer compatibility lists • Thermal management: Enclosed fixtures trap heat. Use only IC-rated (Insulation Contact) LED fixtures in insulated ceilings • Driver location: Remote drivers simplify replacement and reduce in-fixture heat buildup
H2: Comparing Fixture Upgrade Options
| Fixture Type | Typical Install Time | Key Requirements | Pros | Cons |
|---|---|---|---|---|
| Standard LED Flush Mount | 25–45 min | 15A circuit, grounded box, 1.5"+ depth | Low cost ($25–$65), plug-and-play, no driver tuning | Limited design flexibility; fixed color temp |
| Smart-Enabled Panel (Wi-Fi) | 45–75 min | Neutral wire, 2.0"+ box depth, stable 2.4 GHz Wi-Fi | App control, scheduling, voice integration, energy monitoring | Requires cloud account; occasional firmware hiccups; higher upfront cost ($85–$220) |
| Dimmable Track or Rail System | 90–150 min | 20A circuit, dedicated neutral, ELV dimmer, junction box access | Flexible layout, adjustable heads, high CRI options | Complex wire management; needs precise spacing; higher labor cost |
H2: Final Checks Before You Walk Away
• Touch each connection point — no warmth after 5 minutes of operation • Verify no bare wire extends beyond wire nuts (max 1/8” allowed per NEC 300.14) • Confirm fixture sits flush — gaps indicate uneven mounting or warped bracket • Test switch operation at least 5x — listen for relay clicks, watch for lag or dropouts • Document changes: Snap a photo of final wiring and label breaker panel with fixture location
If you’re managing multiple upgrades — like插座面板替换 (outlet cover replacement),低压灯带安装 (low-voltage LED strip installation), or插头转换器使用 (plug adapter usage) — refer to our complete setup guide for unified safety protocols and code alignment across device types.
H2: Bottom Line — Safety Is a Process, Not a Step
Replacing a ceiling light fixture safely step by step isn’t about speed. It’s about discipline: verifying, documenting, and validating at each stage. You don’t need an electrician’s license — but you do need rigor, the right tools, and willingness to pause when something feels off. When done right, this upgrade improves light quality, cuts bills, and builds confidence for future projects — all while keeping your family and home protected.
Remember: Every breaker you flip, every wire you test, every torque spec you honor makes your home safer. That’s not DIY — that’s responsible ownership.