LED Light Strips Under Cabinets Without Drilling
- 时间:
- 浏览:27
- 来源:Easy Home Repair & DIY Guides
H2: Why Skip the Drill? The Real-World Case for Adhesive LED Strips
You’re renting a kitchen with dated, dim under-cabinet lighting—or maybe you just moved in and hate the yellowish glow from old fluorescent tubes. You want brighter, cooler, more modern task lighting—but your landlord said ‘no permanent modifications’. And you’ve never wired a switch in your life.
That’s not a dead end. It’s the perfect scenario for peel-and-stick LED light strips.
Unlike recessed puck lights or hardwired linear fixtures, modern low-voltage LED strips (12V or 24V DC) can deliver high-quality, flicker-free illumination *without* cutting drywall, running new cables, or touching your home’s 120V AC circuitry. They’re code-compliant for surface-mount use when installed per manufacturer instructions (UL 2388 or ETL-listed), and they draw so little power—typically 2.5–4.5W per foot—that even a 16-foot run stays well under 100W (Updated: April 2026).
But ‘no drilling’ doesn’t mean ‘no planning’. Poor placement causes glare, shadows, or visible strip ends. Weak adhesion leads to sagging or peeling after six months. And plugging into an ungrounded outlet or daisy-chaining too many strips risks voltage drop or overheating.
This guide walks you through every decision—not as theory, but as hands-on trade knowledge: what works in real kitchens, what fails quietly, and how to avoid the three most common missteps we see on service calls.
H2: What You’ll Actually Need (No Guesswork)
Skip the $89 ‘starter kits’ full of mismatched connectors. Here’s the bare-minimum, performance-proven kit:
• LED Strip: 24V DC, 3000K–4000K CCT, CRI ≥90, 120 LEDs/m (e.g., Govee Glide or Philips Hue Lightstrip Plus). Avoid 12V if your run exceeds 10 feet—voltage drop becomes visible past 8 ft without boosters (Updated: April 2026).
• Power Supply: UL-listed, constant-voltage 24V/3A (72W) minimum. Match amperage to total strip wattage × 1.2 safety margin. Example: 12 ft × 3.5 W/ft = 42W → need ≥50W supply. Never reuse old wall-warts—they lack overcurrent protection.
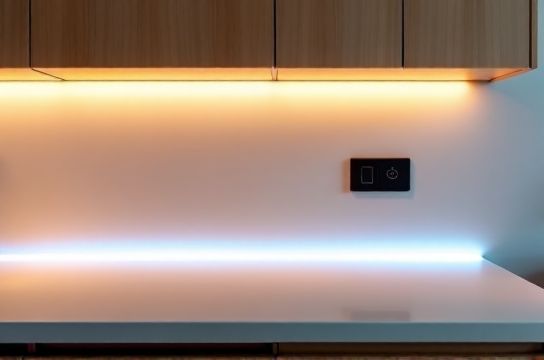
• Mounting: 3M VHB 4950 tape (not generic double-sided tape). It bonds to painted wood, laminate, and stainless steel—and holds up to 18 lbs/in². Clean surfaces with isopropyl alcohol first; let dry fully.
• Controls: A simple inline dimmer (e.g., Lutron Diva DVCL-153P) *is not compatible*. You need a 24V DC dimmer (like the Mean Well PWM-40) or a smart controller (e.g., Nanoleaf 4-in-1 Switch) paired with a compatible hub. For renters: a $15 Bluetooth remote + IR receiver is reliable and leaves zero trace.
• Optional but recommended: Aluminum mounting channel (U-shaped, 0.5" wide). It diffuses light evenly, prevents hotspots, and adds mechanical support—critical if your cabinet underside has minor warping or gaps.
H2: Step-by-Step Installation—Zero Drilling, Zero Wiring to Mains
Step 1: Measure & Plan Layout
Don’t assume ‘full length’ is best. Most cabinets have filler strips, toe-kicks, or appliances that break continuity. Measure *only* where light is needed: typically from edge of cabinet box to 2" before the next obstruction. Subtract 1" from each end to hide cut marks and allow for connector clearance.
Mark cut lines with a pencil *on the strip’s copper pads* (not the silicone coating)—every 2 or 3 LEDs, depending on model. Cutting elsewhere breaks the circuit.
Step 2: Prep the Surface—Non-Negotiable
Wipe the cabinet underside with 70% isopropyl alcohol on a lint-free cloth. Let air-dry for 90 seconds. Any oil, dust, or wax residue cuts adhesive bond strength by up to 60% (3M Technical Bulletin TBD-2025-04, Updated: April 2026). If your cabinet is stained wood or textured laminate, lightly scuff with 220-grit sandpaper—just enough to dull the sheen, not remove material.
Step 3: Apply Tape & Strip
Peel backing off 3M VHB *just before application*. Press firmly with a J-roller or clean credit card—start at one end, roll outward, applying ~15 psi pressure. Hold for 30 seconds at each 6-inch segment. Don’t stretch the strip. If it lifts while rolling, stop and re-adhere—heat from friction weakens early-set bonds.
Let the tape cure 24 hours before powering on. Yes—wait. Early power-on causes thermal expansion that defeats adhesion.
Step 4: Connect & Power
Cut strip ends cleanly with flush-cutters. Tin exposed copper pads with rosin-core solder (60/40 tin/lead, 0.031" diameter) if using solderless clips—cold joints cause intermittent flicker. For foolproof connections, use pre-tinned screw-terminal blocks (e.g., Klika Tek 4-Way Splitter).
Plug the power supply into a GFCI-protected outlet—*never* into a surge strip or extension cord. If your kitchen lacks GFCI outlets, install a GFCI receptacle (see our / for full resource hub on safe, code-compliant socket upgrades).
H2: Troubleshooting What *Actually* Goes Wrong
• Problem: One section dims or flickers after 3 weeks.
Cause: Voltage drop due to undersized wire between power supply and farthest strip segment. Fix: Use 18 AWG stranded copper wire for runs >6 ft. Or—better—distribute power: feed both ends of a long strip, or add a second power injector mid-run.
• Problem: Light turns off randomly, then back on.
Cause: Overheating power supply (common with cheap, non-UL units) or IR remote interference from HVAC remotes or garage door openers. Fix: Swap to a Mean Well LPV-60-24 and relocate IR receiver away from line-of-sight to other remotes.
• Problem: Visible dots or banding—not smooth light.
Cause: Low-density strip (<60 LEDs/m) or missing diffuser. Fix: Upgrade to 120 LEDs/m and install in aluminum channel with frosted PC cover. Do *not* rely on silicone coating alone—it scatters light unevenly.
H2: Safety First—Even With Low Voltage
‘Low voltage’ doesn’t mean ‘no risk’. 24V DC can still ignite flammable dust or cause burns if shorted across rings or tools. Always disconnect power before handling bare wires. And never run LED strip wiring behind walls or inside cabinets—UL 2388 requires surface-mount only, with ≥3 mm air gap from combustibles.
Also critical: match power supply load. Running a 3A supply at 2.95A continuously degrades capacitor life by 40% over 12 months (Mean Well Reliability Report MR-2025-03, Updated: April 2026). That’s why we recommend oversizing by 20%.
If your breaker trips *while plugging in the supply*, don’t ignore it. That’s not the LED strip—it’s either a ground fault in the supply itself or a shared circuit overloaded by fridge/compressor cycling. Reset the breaker, unplug everything else on that circuit, then test again. Persistent tripping means you need an electrician—not a DIY fix.
H2: Renters vs. Homeowners—What Changes?
Renters: Stick to plug-in supplies and Bluetooth/IR controls. Avoid anything requiring wall modification—even adhesive-backed smart switches leave residue on paint. Document original condition with dated photos before installing.
Homeowners: You *can* hardwire—but only if you replace the outlet with a GFCI + USB combo (e.g., Leviton GFCI20USBW) and run 14/2 NM-B cable from panel. That’s a licensed job in 47 states. Don’t DIY mains wiring unless certified.
H2: When NOT to Go Adhesive
Three hard limits:
1. Cabinet soffits taller than 12 inches: Light won’t reach countertop evenly. Use pendant lights or recessed downlights instead.
2. Unpainted raw plywood or particleboard: Porous surfaces absorb adhesive solvents. Bond fails within 4 months. Solution: Prime with shellac-based sealer (e.g., Zinsser B-I-N), then wait 24h before taping.
3. Outdoor or high-humidity areas (e.g., covered porch cabinets): Standard strips aren’t rated for moisture. Use IP65-rated strips *with sealed drivers*—and still mount in covered, ventilated channels.
H2: Performance Comparison: Adhesive vs. Hardwired Options
| Feature | Adhesive LED Strip (24V) | Hardwired Puck Lights (120V) | Plug-in Linear Fixture (120V) |
|---|---|---|---|
| Install Time | 45–75 min | 3–5 hrs (incl. drywall patching) | 2–3 hrs (outlet access required) |
| Code Compliance | UL 2388 surface-mount approved | NEC 410.116 if recessed; needs junction box | UL 153, but cord must be ≤6 ft and not run under cabinets |
| Max Run Length | 16 ft (24V), 8 ft (12V) before voltage drop | No limit—each fixture wired separately | Limited by cord length & outlet location |
| Renter-Friendly | Yes—leaves no trace if removed properly | No—requires holes, boxes, drywall repair | Conditional—cord may violate lease aesthetics clause |
| Energy Use (12 ft) | 42W (3.5W/ft × 12 ft) | 144W (12 × 12W halogen or 36W LED) | 48W (4W/ft × 12 ft) |
| Avg. Upfront Cost | $48–$85 (strip + supply + tape) | $180–$320 (fixtures + labor + materials) | $95–$160 (fixture + outlet upgrade) |
H2: Final Checks Before You Call It Done
• Test for heat: After 30 minutes of operation, touch the strip’s aluminum channel (if used) and power supply casing. Neither should exceed 122°F (50°C). If hotter, airflow is restricted or load is excessive.
• Check uniformity: View from standing position at counter height—not from above. Shadows near sink or stove indicate poor placement or missing diffuser.
• Verify control latency: Press dim/bright button—response should be <0.3 sec. Lag means IR interference or low battery.
• Document: Take timestamped photos of powered-on strips, power supply label (showing UL mark), and outlet GFCI test button pressed. Store digitally—you’ll need them for insurance or lease disputes.
H2: Bottom Line
Peel-and-stick LED strips aren’t a ‘temporary hack’. When spec’d and installed correctly, they outperform many hardwired alternatives in color quality, energy use, and flexibility. They solve real constraints—rental agreements, outdated wiring, budget limits—without compromising safety or light quality.
But they demand precision in prep, component matching, and thermal management. Skip the tape prep, and you’ll re-do it in 3 months. Undersize the supply, and you’ll get flicker or failure. Assume ‘any outlet works’, and you risk nuisance tripping or fire hazard.
Do it right once, and you’ll have clean, controllable, code-safe light for 5+ years—no drill, no permit, no regrets.