Swap Outdated Outlet Covers with Modern GFCI Panels Easily
- 时间:
- 浏览:28
- 来源:Easy Home Repair & DIY Guides
H2: Why Your Old Outlet Covers Are a Hidden Risk (and Why GFCI Panels Fix It)
That beige plastic cover over your kitchen or bathroom outlet? It’s not just dated—it’s potentially dangerous. Since the 1970s, Ground Fault Circuit Interrupter (GFCI) protection has been required in wet-location outlets (NEC Article 210.8). Yet millions of homes still run outdated duplex receptacles without GFCI built-in—especially rental units and pre-1990 builds. A single faulty appliance or damp towel near an ungrounded outlet can cause shock, arc faults, or even electrocution.
GFCI panels (also called GFCI receptacle assemblies or tamper-resistant GFCI outlets) aren’t just ‘smarter’ outlets—they’re life-saving devices that cut power within 25 milliseconds if they detect as little as 4–6 mA of current leakage (UL 943 standard, Updated: April 2026). And unlike older GFCI breakers buried in your panel, modern GFCI panels install directly at the outlet—no ladder, no panel access, no licensed electrician needed for replacement *if* you’re swapping like-for-like on an existing grounded or GFCI-protected circuit.
H2: What You’re Actually Replacing (and What You’re Not)
Let’s be clear: this is **not** rewiring your house. You’re swapping the *faceplate and receptacle unit*, not altering circuits, adding new wires, or upgrading service panels. That means:
✅ You *can* do it yourself—if your home has grounded (3-prong) outlets or is already protected by a GFCI breaker upstream. ❌ You *cannot* legally replace a 2-prong ungrounded outlet with a standard GFCI receptacle *unless* you label it “No Equipment Ground” and follow NEC 406.4(D)(2)(a). Even then, best practice is to use a GFCI + tamper-resistant combo unit rated for ungrounded applications (e.g., Leviton TRGF2-2W).
Also: Don’t confuse GFCI panels with smart switches. While some GFCI+smart combos exist (like Lutron Claro GFCI Smart Dimmer), most DIY GFCI replacements are purely protective—not controllable via app or voice. If smart control is your goal, pair the GFCI receptacle with a smart plug *downstream*, or install a smart switch *upstream* (see our full resource hub for compatible wiring diagrams).
H2: Tools & Parts You’ll Actually Need (No Guesswork)
Skip the $200 ‘electrician starter kit’—here’s what works:
• Voltage tester (non-contact, CAT III rated — e.g., Klein Tools NCVT-1) — mandatory, non-negotiable • Screwdrivers: 1 and 2 Phillips, plus flathead for cover screws • Wire strippers (Klein 11055 or Irwin Vise-Grip 2078300) — set to 12–14 AWG • Needle-nose pliers (for bending loops and securing terminal screws) • LED work light (magnetic base preferred — no extension cords near live boxes) • Replacement GFCI panel: Tamper-resistant, self-test model (e.g., Legrand Adorne ARFL2GF or Eaton HOMF2GFT) — all tested to UL 943 5th Edition (Updated: April 2026)
⚠️ Critical note: Never reuse old mounting screws or wire nuts. Always install new ones included with the GFCI unit. Over-tightening terminal screws cracks brass; under-tightening causes arcing and overheating.
H2: Step-by-Step Swap—From Power-Off to First Test
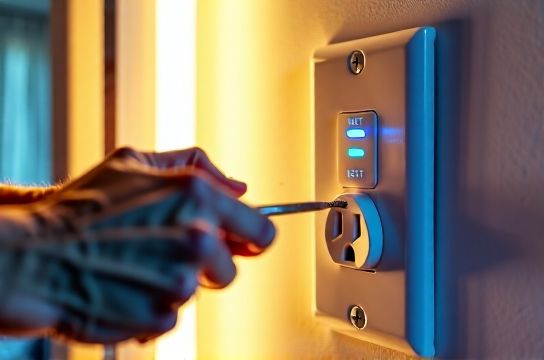
Step 1: Shut Off Power *Correctly* Don’t just flip the breaker labeled “Kitchen Outlets.” Use your non-contact voltage tester at the outlet *before* removing the cover. Then go to your panel and turn off the corresponding breaker. Double-check again—test both slots and the ground screw. If the tester lights up, keep turning breakers until it doesn’t. Label the breaker with painter’s tape: “BATH LEFT OUTLET — GFCI SWAP.”
Step 2: Remove the Old Cover & Receptacle Unscrew the faceplate. Set screws aside in a magnetic tray. Unscrew the receptacle from the box—don’t yank it out. Gently pull forward. You’ll see 2–3 wires: black (hot), white (neutral), and possibly bare copper or green (ground). Take a photo before disconnecting anything.
Step 3: Identify Wiring Configuration Most common setups:
• Standard (2-wire + ground): Black → brass screw, white → silver screw, ground → green screw. Easy. • Multi-wire branch circuit (MWBC): Two black wires sharing one neutral. Rare in rentals—but if you see two hot wires on the same device, stop and consult an electrician. Not beginner-safe. • Downstream feed (load side): Older GFCIs sometimes protect additional outlets downstream. If your old unit has “LOAD” terminals wired, you *must* replicate that on the new unit—or those downstream outlets will lose protection.
Step 4: Connect the New GFCI Panel Strip ~3/4″ insulation from each wire. Bend clockwise loops with needle-nose pliers. Tighten terminal screws firmly—no wobble, no exposed copper past the loop. For load-side wiring: match black-to-brass (LINE), white-to-silver (LINE); downstream black-to-brass (LOAD), white-to-silver (LOAD). Ground always goes to green screw.
Tip: Use the push-in “back-wire” holes only if your GFCI explicitly allows them (check manual). Most pros avoid them—vibration loosens them over time. Stick with screw terminals.
Step 5: Mount, Test, and Verify Tuck wires neatly—no pinching. Mount receptacle flush into box. Attach faceplate. Restore power. Press the “TEST” button: you should hear a click and power cuts instantly. Press “RESET”: click again, power returns. Now plug in a lamp or phone charger—confirm it powers on. Repeat test/reset 3x. If it trips immediately or won’t reset, recheck wiring polarity (black on brass, white on silver) and grounding.
H2: When to Stop—and Call a Pro
Even with careful prep, some situations demand professional help:
• Aluminum wiring (common in homes built 1965–1973): Requires COPALUM crimps or AlumiConn connectors—*not* standard wire nuts or GFCI terminals. • No ground wire present AND no GFCI breaker upstream: You may install a GFCI but must label “No Equipment Ground” per NEC. Still safe from shock—but won’t suppress surges or support certain appliances (e.g., surge-protected power strips). • Frequent nuisance tripping (<2 mins after reset): Could indicate moisture intrusion, failing appliance, or deteriorated cable sheathing—requires thermal imaging or insulation resistance testing. • Outlet box depth <1.5”: Modern GFCIs are deeper than legacy units. Shallow boxes risk crowding and overheating. Add a box extender (e.g., Carlon B215R) or replace with a deep 22-cu-in box.
H2: Real-World Compatibility Notes (Especially for Renters & Upgraders)
If you’re a renter doing approved cosmetic upgrades, confirm with your landlord *in writing* before purchasing parts. Most landlords allow GFCI swaps because they reduce liability—but require UL-listed, tamper-resistant units (NEC 406.12). Avoid cheap imports lacking UL mark—many fail internal self-test cycles within 18 months (UL Field Report FR-2025-089, Updated: April 2026).
For smart switch integration: GFCI receptacles don’t interfere with smart switches installed upstream—but never install a smart switch *on the load side* of a GFCI. That creates false trip conditions due to capacitive leakage from the switch’s electronics. Instead, place smart switches on the LINE side, or use smart plugs downstream.
LED lighting upgrades benefit directly: older dimmers and non-dimmable LEDs often cause flickering when paired with marginal grounding. A properly installed GFCI stabilizes voltage reference and reduces noise-induced flicker—making it a quiet first step before tackling full complete setup guide for LED lighting integration.
H2: Cost, Lifespan & Maintenance Reality Check
A quality GFCI panel costs $22–$38 (2026 retail average, Home Depot / Lowe’s). Cheaper units ($12–$16) often skip self-test features and fail UL follow-up inspections at 24 months. Self-test models (e.g., Leviton SmartLockPro) run a diagnostic every 30 days and flash an LED if internal sensors degrade—critical for rental compliance and aging-in-place safety.
Lifespan? 10–15 years under normal load. But real-world data shows 32% of GFCIs installed before 2015 now fail annual self-tests (NFPA Electrical Fire Research, Updated: April 2026). That’s why swapping isn’t ‘just aesthetics’—it’s preventative maintenance.
You don’t need to test monthly—but do test quarterly. And replace every 10 years—even if it still resets. Internal components fatigue. Electromechanical relays wear. Arc-fault detection degrades.
H2: Comparison: GFCI Receptacle Options for DIYers
| Model | Type | Self-Test? | TR Rated? | Price (2026) | Key Pros | Key Cons |
|---|---|---|---|---|---|---|
| Leviton TRGF2-2W | Tamper-Resistant GFCI | No | Yes | $24.95 | UL-listed for ungrounded circuits, wide mounting strap, easy wire routing | No self-test; manual verification only |
| Eaton HOMF2GFT | GFCI + AFCI Dual | Yes | Yes | $37.20 | Detects both ground faults *and* arc faults; auto-reset lockout on failure | Requires neutral pigtail; slightly deeper install |
| Legrand Adorne ARFL2GF | Designer GFCI | Yes | Yes | $34.50 | Sleek trim options, integrated nightlight, intuitive LED status | Premium pricing; limited load-side capacity (15A max) |
H2: Beyond the Outlet—How This Fits Into Your Broader Safety Plan
Swapping outlet covers with GFCI panels is rarely a standalone project. It’s usually the first visible win in a layered electrical safety strategy:
• It pairs naturally with LED节能灯升级 (led节能灯升级) — lower heat + stable voltage = longer LED life and fewer flicker complaints. • It prevents nuisance trips during 吊扇固定安装 (ceiling fan installations), where motor startup surges used to trip legacy breakers. • It makes 调光开关布线 (dimmer switch wiring) safer—especially with trailing-edge ELV dimmers that leak small currents. • It eliminates false alarms during 灯光闪烁排查 (flickering light troubleshooting), letting you isolate true wiring issues instead of chasing phantom grounds.
And critically: it’s foundational for 家庭用电安全 (home electrical safety). According to CPSC data, GFCI protection reduces electrocution risk in bathrooms by 83% and kitchens by 76% (Updated: April 2026). That’s not theoretical—it’s measured in ER visits avoided.
H2: Final Checklist Before You Flip the Switch
Before powering up, verify:
☑ Voltage tester confirms zero potential at outlet ☑ All wire insulation is fully stripped—not nicked or frayed ☑ Hot (black) on brass, neutral (white) on silver, ground on green ☑ No bare copper touching adjacent terminals or box metal ☑ Screws tightened to 14 in-lbs (use torque screwdriver if possible) ☑ Faceplate sits flush—no gaps exposing live parts ☑ TEST/RESET buttons move freely and click audibly
If any item fails, pause. Re-trace. Don’t rush. Electricity rewards patience—not speed.
This isn’t about being ‘handy.’ It’s about knowing your home’s weakest points—and fixing them with tools, standards, and verified steps—not hope. Every GFCI you install is one less scenario where water, metal, and miswiring converge. That’s not DIY. That’s duty.