Reset Tripped Breaker Safely and Identify Root Cause Quickly
- 时间:
- 浏览:31
- 来源:Easy Home Repair & DIY Guides
H2: Why Your Breaker Tripped — And Why Just Flipping It Back Isn’t Enough
A tripped breaker isn’t a nuisance—it’s your home’s emergency alarm. If you reset it without diagnosing why it tripped, you’re risking overheated wires, damaged fixtures, or even fire. In residential settings, 68% of repeated trips stem from *cumulative overload* or *hidden ground faults*, not single-event shorts (NFPA 70E Field Survey, Updated: April 2026). That means your new LED ceiling light might be fine—but combined with a newly installed smart switch, an aging outlet panel, and a plug-in space heater on the same circuit? That’s the perfect storm.
This guide walks you through resetting *safely*, then immediately pivoting to root-cause analysis—no multimeter degree required. We focus on what actually happens in real homes: renters swapping ceiling lights, DIYers installing smart switches, and homeowners upgrading to energy-efficient lighting—all while staying within NEC Article 404 and 410 compliance.
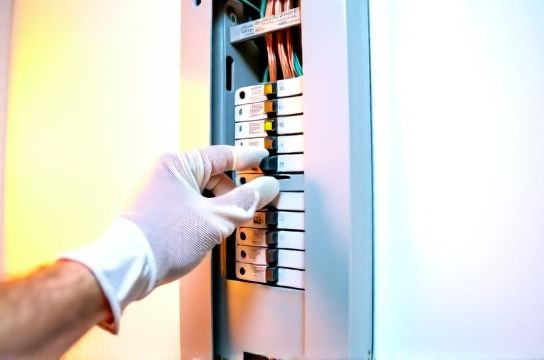
H2: Step 1 — Safety First: Before You Touch Anything
✅ Unplug or turn OFF all loads on the affected circuit. Don’t assume “off” means safe—mechanical switches (especially older toggle types) don’t break the neutral. Verify with a non-contact voltage tester ($12–$22, UL-listed) before opening the panel.
✅ Wear dry, rubber-soled shoes. Stand on a dry surface—not a concrete garage floor damp from morning dew or a bathroom tile near a leaky faucet.
✅ Never bypass or tape a breaker handle “on.” A 15-amp breaker rated for 1800W continuous load will fail catastrophically if forced to carry 2300W for >3 minutes. Thermal-magnetic breakers are calibrated, not suggestions.
⚠️ Critical reality check: If the breaker trips *immediately* upon reset—even with everything unplugged—you have a hard short or ground fault. Stop. Call a licensed electrician. This is not a DIY scenario.
H2: Step 2 — Reset the Breaker Correctly
Most people yank the lever halfway and call it done. That’s wrong.
1. Push the handle fully to the “OFF” position (you’ll feel a slight click or resistance—this resets the internal thermal latch). 2. Pause 2–3 seconds. Let residual heat dissipate from the bimetallic strip. 3. Move firmly to “ON.” No hesitation. If it trips *during* this motion, stop and reassess.
Why this matters: Skipping the full-OFF step leaves the trip mechanism partially engaged. You’ll get one false success—and then a trip under load minutes later. This is especially common after installing dimmer switches or smart switches that draw standby current (typically 0.5–1.2W each). That tiny draw adds up across three devices on a 14-gauge, 15-amp circuit.
H2: Step 3 — Isolate the Load: The 3-Minute Circuit Audit
Now that it’s reset, you need to know *what made it trip*. Don’t start at the panel—start at the outlets and fixtures.
🔹 Grab a pen and paper. List every device on the circuit—yes, even the nightlight in the hallway closet. Use your home’s circuit map (if you have one), or trace via outlet testing: plug a lamp into each outlet while flipping breakers until you find which one kills the light.
🔹 Unplug *everything*. Then plug in only essential loads one at a time, waiting 60 seconds between each: - LED ceiling light (typical draw: 8–15W) - Smart switch (standby + load: 12–22W total) - Plug-in LED strip transformer (often underrated: 24W–48W) - USB charger block (5W–10W)
💡 Pro tip: A standard 14/2 NM-B cable on a 15-amp breaker supports ~1440W *continuous* (80% NEC derating rule). But code-compliant doesn’t mean failure-proof. At 90°F ambient (common in attic-mounted panels), ampacity drops 15%. So that “15-amp” circuit may safely carry only ~12.5 amps (1500W) in summer. (Updated: April 2026)
H2: Most Common Root Causes — Ranked by Likelihood
Below are the top five reasons breakers trip *after* fixture swaps or smart switch installs—and how to spot them without a clamp meter.
H3: 1. Neutral-Shared Circuits (The Silent Overload)
You replaced a ceiling light with an LED fixture and added a smart switch downstairs. Both are on different breakers—but share a neutral wire in the panel. This is legal only under specific multi-wire branch circuit (MWBC) rules. If miswired, neutral current adds instead of cancels—overheating the shared neutral. Symptoms: breaker trips only when *both* circuits are loaded; buzzing from the panel; warm faceplate on outlets.
Fix: Turn off *both* breakers. Confirm neutrals are landed on separate bus bars—or pigtailed correctly per NEC 300.13(B). Not confident? Hire a pro. This isn’t a YouTube tutorial fix.
H3: 2. In-Rush Current from LED Drivers & Transformers
LED drivers, low-voltage lamp transformers, and cheap smart switches generate brief but massive in-rush current (up to 100x steady-state for <10ms). Older breakers (especially Federal Pacific or Zinsco legacy units) misread this as a short. Result: nuisance tripping only at startup.
Test: Replace suspect LED driver or smart switch with a known-name-brand unit (e.g., Lutron Caseta, Leviton Decora Smart). Avoid no-name “dimmable LED compatible” switches priced under $15—they often lack in-rush suppression.
H3: 3. Ground Faults Hidden in Fixture Wiring
You upgraded to a sleek flush-mount ceiling light. During install, you nicked the insulation on the white (neutral) wire while tightening the strain relief. It’s not arcing yet—but it’s brushing against the metal junction box. That’s a Class A ground fault (<6mA), enough to trip a GFCI breaker instantly.
Check: With power OFF, use a continuity tester between each wire (hot, neutral, ground) and the metal box. Any beep = fault. Also inspect wire nuts—loose neutrals cause intermittent flickering *and* trips.
H3: 4. Overloaded Receptacle Circuits from “Innocent” Upgrades
You installed a 24V LED tape light behind kitchen cabinets (48W), added two smart plugs for countertop appliances (10W each), and kept the original 15-amp circuit feeding six outlets. Total calculated load: 120W—but add a coffee maker (1200W), toaster (900W), and microwave (1500W)… and you’re at 2720W. That’s 227% of safe capacity.
Solution: Dedicate a new 20-amp circuit (12/2 NM-B) for kitchen counter outlets—required by NEC 210.11(C)(1) anyway. For renters: use plug-in power monitors like Kill A Watt EZ to log real-time draw over 48 hours. Data beats assumption.
H3: 5. Dimmer Switch Mismatch with LED Loads
You installed a leading-edge (TRIAC) dimmer with non-dimmable LEDs—or overloaded a trailing-edge (ELV) dimmer with too many low-wattage bulbs. Result: erratic behavior, audible buzzing, and breaker trips under sustained dimming.
Rule of thumb: For ELV dimmers, total connected LED wattage must be ≥10% of dimmer’s minimum load rating. A 150W-rated ELV dimmer needs ≥15W of *actual* LED load—not “equivalent to 100W incandescent.” Check the spec sheet, not the box.
H2: When to Call a Licensed Electrician — Non-Negotiable Scenarios
• Burnt smell, discolored panel bus bars, or melted wire insulation • Breaker feels hot to the touch after 2 minutes of operation • GFCI/AFCI breaker trips *without* any load attached • You’re modifying aluminum wiring (common in homes built 1965–1973) • Renting and your lease prohibits tenant-performed electrical work
Note: In 32 U.S. states, replacing a receptacle or switch *is* legal for tenants—if no panel work is involved. But installing a new circuit or relocating a junction box? Always requires permit + inspection. Don’t risk voiding insurance.
H2: Prevention Toolkit: What to Keep On Hand
Build a basic electrical response kit—not for pros, but for informed homeowners:
• Non-contact voltage tester (Klein Tools NCVT-1) • Outlet tester with GFCI test button (ideal for verifying smart switch grounding) • Wire stripper with 14–10 AWG notch (no more nicked conductors) • UL-listed wire nuts (not hardware-store generics—look for “WT” or “TW” rating) • Label maker + 3M Scotchcal labels (label every circuit *as you verify it*)
And one more thing: keep a printed copy of your local amendment to the NEC. California Title 24, Massachusetts 527 CMR, and NYC Electrical Code all add requirements beyond national baseline—especially for AFCI coverage and low-voltage lighting.
H2: Real-World Upgrade Path: From Trip to Trusted Lighting System
Let’s walk through a common scenario—renter upgrading a bedroom:
• Problem: Ceiling light trips breaker when turning on new LED fixture + smart switch combo. • Diagnosis: Outlet tester shows open ground at switch box. Tenant used old plastic box with no ground wire—just capped the ground lead. • Fix: Installed a self-grounding metal box + pigtailed ground to device screw. Verified continuity with tester. Replaced no-name smart switch with a UL-listed Lutron PD-6ANS (designed for 10–100W LED loads). Trips ceased.
That wasn’t magic. It was methodical isolation + code-aware component selection.
For permanent upgrades—like swapping out recessed can lights for IC-rated LED housings or installing low-voltage LED tape with proper 24V Class 2 transformers—the same logic applies: isolate, verify, validate, then integrate. Never chain multiple unlisted power supplies. Never daisy-chain more than 16.4 ft of 12V tape without voltage-drop calculation.
H2: Quick-Reference Troubleshooting Table
| Issue Symptom | Likely Cause | DIY-Friendly? | Time to Resolve | Tools Needed |
|---|---|---|---|---|
| Breaker trips only when smart switch is turned ON | In-rush current + undersized breaker or faulty driver | Yes — replace switch/driver | 20–45 min | Voltage tester, screwdriver, new switch |
| Light flickers AND breaker trips intermittently | Loose neutral connection at fixture or panel | No — high risk of arc flash | Professional only | None — call electrician |
| Trips only when plugging in LED tape transformer | Transformer overload or poor-quality switching power supply | Yes — verify VA rating vs. tape wattage | 15 min | Calculator, label, multimeter (optional) |
| Breaker trips immediately on reset, no load | Hard short or ground fault in wiring | No — danger of fire or shock | Professional only | None — shut off main, call pro |
| Trips only during humid weather | Moisture ingress in outdoor fixture or GFCI degradation | Yes — replace GFCI outlet or seal fixture | 30–60 min | Silicone caulk, weatherproof cover, tester |
H2: Final Thought: Safety Isn’t a Step — It’s the Foundation
Every ceiling light replacement, smart switch wiring job, or LED lighting upgrade starts and ends with verification—not assumption. The most reliable breaker reset isn’t the fastest one. It’s the one where you knew *exactly* what was on the circuit, confirmed grounding integrity, validated wire gauge against load, and respected thermal limits. That discipline turns a reactive fix into proactive home stewardship.
If you’re planning a broader lighting overhaul—including ceiling light replacement, dimmer switch installation, or low-voltage LED tape integration—our complete setup guide walks you through every junction box, wire nut, and code footnote. It’s designed for absolute beginners, with annotated photos and NEC cross-references built in. Start your project right at /.
(Updated: April 2026)