Install 12V LED Tape Lights with Proper Transformer Sizing
- 时间:
- 浏览:27
- 来源:Easy Home Repair & DIY Guides
H2: Why 12V LED Tape Lights Fail (and How to Fix It Before You Start)
Most DIYers buy a roll of ‘12V LED tape’, grab a random wall-wart adapter, stick it on the ceiling, and wonder why it flickers after 20 minutes—or worse, smells like hot plastic. That’s not user error. It’s undersized power delivery.
Unlike household 120V lighting, 12V LED tape runs on *low-voltage DC*. But low voltage ≠ low current. In fact, for the same wattage, 12V draws **10× more amps** than 120V. A 60W strip pulls ~5A at 12V—but only ~0.5A at 120V. That high current demands thick wires, short runs, and precise transformer matching.
If your tape dims at the far end, gets warm near the driver, or trips a breaker when you add a second strip—you’ve hit one of three core issues: • Undersized transformer (most common), • Excessive run length (>16 ft per segment without boost), • Poor wire gauge (e.g., using 22 AWG for >8 ft runs).
Let’s fix all three—safely and to NEC Article 411 and UL 2388 standards.
H2: Step 1 — Calculate Real Power Load (Not Just What the Box Says)
Don’t trust the ‘max 10m’ label. That assumes ideal lab conditions: 25°C ambient, no bends, perfect ventilation, and zero voltage drop. Real homes have drywall cavities, insulation contact, and 30°C+ attic temps.
Start with actual wattage per foot—not manufacturer peak ratings. Reputable brands (Philips Hue Lightstrip, Govee, or commercial-grade brands like WAC or Tech Lighting) publish *tested* watts/ft at 12V DC: • Standard density (30 LEDs/m): 2.4–2.8 W/ft (Updated: April 2026), • High density (60 LEDs/m): 4.6–5.2 W/ft (Updated: April 2026), • RGBWW (5-channel): 6.8–7.5 W/ft (Updated: April 2026).
Example: You’re installing 22 ft of high-density tape under kitchen cabinets. Real load = 22 ft × 4.9 W/ft = **107.8 W**.
Now add 20% headroom—for heat derating, aging, and startup surge. 107.8 W × 1.2 = **129.4 W minimum transformer rating**.
Never round down. Pick the next standard size up: 150W (not 120W). Transformers run coolest and longest at 70–80% load—not 95%.
H2: Step 2 — Choose the Right Transformer Type (Not Just Wattage)
There are three transformer categories—only one is safe for permanent residential use:
• Wall-plug ‘AC adapters’: Cheap, but unlisted, non-ventilated, and lack over-current protection. UL 1310 Class 2 compliant units exist—but most $12 Amazon adapters are *not*. Avoid unless certified and rated for continuous indoor use.
• Enclosed Class 2 transformers: Metal or polycarbonate housings, UL 1310 listed, with thermal cutoff and short-circuit protection. These are code-compliant for in-wall or cabinet-mount use (NEC 411.3(B)). Ideal for behind cabinets, in soffits, or inside junction boxes.
• DIN-rail or surface-mount drivers: Used in commercial retrofits. Overkill for homes—unless you’re doing whole-house accent lighting with centralized power distribution.
For 95% of renters and homeowners doing ceiling light replacement or under-cabinet upgrades, go with an **enclosed UL 1310 Class 2 transformer**, rated ≥120% of your calculated load.
H2: Step 3 — Wire Gauge & Run Length: The Voltage Drop Trap
Voltage drop is your 1 enemy. At 12V, even 0.5V loss cuts brightness by ~10% and shifts color temperature on RGBWW strips.
Maximum recommended run lengths *before* a power injection point: • 16 AWG wire: up to 12 ft (for ≤120W load), • 14 AWG wire: up to 20 ft (for ≤150W load), • 12 AWG wire: up to 32 ft (for ≤200W load).
Note: These assume copper THHN or stranded automotive-grade cable—not speaker wire or lamp cord. Stranded is mandatory for flexibility and vibration resistance.
If your tape exceeds these distances, you must inject power at both ends—or every 8–10 ft for high-density strips. Yes, that means extra wire runs and additional connection points. It’s not optional—it’s physics.
H2: Step 4 — Mounting & Thermal Management (Yes, It Matters)
LED tape isn’t ‘cool running’—it’s *heat-sensitive*. The diodes themselves run at 60–85°C junction temp. Without dissipation, lumen output drops 20% in 6 months (LM-80 data, Updated: April 2026).
✅ Do: • Mount tape on aluminum channels with integrated heatsinks (e.g., Ketra, Densen, or budget-friendly V-HOPE channels), • Use 3M VHB tape *only* on clean, dry, flat surfaces—never over textured paint or popcorn ceilings, • Leave 2–3 mm gap between tape and channel lip for airflow.
❌ Don’t: • Stick tape directly to wood, PVC, or drywall—these insulate heat, • Overlap tape segments—creates hot spots and voids warranty, • Install in enclosed spaces without ventilation (e.g., sealed crown molding).
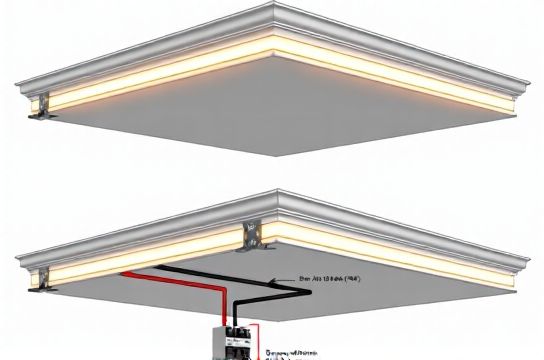
H2: Step 5 — Safe Wiring & Code-Compliant Connections
All connections must be inside an approved electrical box or listed junction enclosure. No wire nuts taped to joists. No exposed solder joints.
Use only one of these three methods:
1. UL-listed LED tape connectors (e.g., Philips Hue connector, FUT Lighting CLIP-12), 2. Screw-terminal barrier strips rated for 15A/12V DC (e.g., Phoenix Contact MSTB 2.5), 3. Crimp-and-seal butt connectors (e.g., Ancor 12–14 AWG, heat-shrink insulated).
Strip only ¼ inch of insulation. Tighten screws to 0.5 N·m (check spec sheet)—overtightening cracks terminals.
Grounding? Not required for Class 2 low-voltage circuits—but *always bond the transformer chassis* if metal-mounted near grounded conduit or boxes. Use a 10 AWG green wire to nearest grounding electrode conductor.
H2: Troubleshooting Common Failures (Before You Call an Electrician)
• Flickering at full brightness → Transformer overload or poor AC input (check voltage at transformer input: should be 114–126V; if <110V, investigate main panel or utility feed).
• One section bright, another dim → Voltage drop or broken copper trace. Cut out damaged segment and bridge with 12 AWG jumper.
• Entire strip dead after 3 hours → Thermal shutdown. Verify transformer ambient temp (<40°C) and airflow. Add a 12V DC fan if mounted in tight cavity.
• Lights flash once then cut off → Polarity reversal. Double-check (+) and (−) on both transformer and tape. Reversing polarity won’t damage modern strips—but they won’t light.
• Breaker trips when turning on tape + other loads → Your transformer is drawing inrush current >15A for 20ms. Replace with soft-start transformer (e.g., Mean Well LRS-150-12 with built-in inrush limiter).
H2: Transformer Sizing Quick-Reference Table
| Tape Density | Max Run (ft) | Typical Load (W/ft) | Recommended Transformer | Min Wire Gauge | Power Injection Needed? |
|---|---|---|---|---|---|
| Standard (30/m) | 24 ft | 2.6 W/ft | 100W UL 1310 | 16 AWG | No (under 24 ft) |
| High (60/m) | 16 ft | 4.9 W/ft | 150W UL 1310 | 14 AWG | Yes beyond 12 ft |
| RGBWW (5-channel) | 10 ft | 7.2 W/ft | 200W UL 1310 | 12 AWG | Yes every 8 ft |
H2: Integrating With Smart Switches & Dimmers
You *cannot* put a standard 120V dimmer (like Lutron Caseta or Leviton Decora) directly on the AC side of a 12V transformer and expect smooth dimming. Most magnetic low-voltage (MLV) or electronic low-voltage (ELV) dimmers are designed for 12V AC landscape lighting—not DC LED tape.
✅ Correct approach: • Use a 120V smart switch (e.g., TP-Link HS220, Lutron PD-6ANS) to control transformer *input*, • Pair with a compatible 12V DC dimmer *output* module (e.g., Lutron GRAFIK Eye QS with GRX-310 dimming engine, or Shelly RGBW2 for DIY), • Or use addressable tape (e.g., WS2812B) with ESP32-based controllers—requires separate 5V power and data lines.
⚠️ Warning: Never connect non-dimmable tape to a leading-edge dimmer—even on the AC side. Inrush spikes can degrade electrolytic capacitors in the transformer.
H2: Renters & Safety First: No Drywall Cutting, No Permits
If you’re renting, skip stud-finding and wall chases. Use surface-mount raceways (e.g., Wiremold 500 series) to route low-voltage wire from outlet to tape location. Secure transformer in an accessible, ventilated spot—like behind a base cabinet toe-kick or inside a closet shelf.
And always test GFCI outlets upstream. A 12V transformer fault won’t trip a GFCI—but if its AC cord shares a circuit with a bathroom outlet, and that GFCI trips, your lights go dark. Consider a dedicated circuit or plug into a non-GFCI kitchen outlet (if local code allows—check with landlord first).
H2: Final Checklist Before Power-On
☐ Transformer mounted securely, away from insulation or flammables, ☐ All wire connections torqued and enclosed in UL-listed junction box, ☐ Tape fully adhered—not stretched or kinked, ☐ Input voltage verified at transformer terminals (114–126V AC), ☐ Output voltage measured at *farthest tape point* (must be ≥11.4V DC), ☐ No bare copper exposed within 3 inches of metal framing.
If you pass all six, flip the breaker—and enjoy consistent, quiet, cool-running light. If not, stop. Review NEC Article 411 and consult a licensed electrician before proceeding.
For a complete setup guide covering dimmer switch layout, ceiling light replacement, and outlet plate swap—all tested in real apartments and older homes—visit our / resource hub.