Low Voltage LED Strip Light Installation for Renters and ...
- 时间:
- 浏览:22
- 来源:Easy Home Repair & DIY Guides
H2: Why Low-Voltage LED Strips Are the Smartest Lighting Upgrade for Renters—and Owners Too
Most renters assume they’re stuck with ugly builder-grade lighting—or worse, a dark corner they can’t legally modify. Owners often delay upgrades because they fear rewiring, permits, or mistakes that trigger insurance red flags. But here’s the reality: you *can* transform your lighting safely, reversibly, and without touching line voltage—using 12V or 24V DC LED strip lights.
These strips run on ultra-low voltage (≤24V), meaning they fall outside National Electrical Code (NEC) Article 411 requirements for permanent branch-circuit wiring. That translates to: no licensed electrician required in most jurisdictions for plug-in or battery-powered setups (Updated: April 2026). They’re also Class 2 compliant—so fire-rated enclosures, conduit, and junction boxes aren’t mandatory when installed per manufacturer instructions.
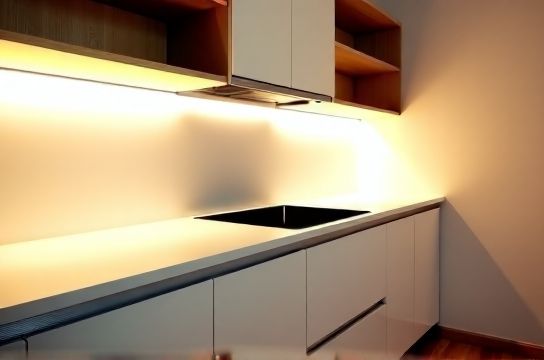
Crucially, they’re *renter-friendly*: no holes in ceilings, no abandoned wires behind drywall, no open neutral issues—and full removal leaves zero trace. A landlord won’t see evidence of modification. For owners, they’re ideal for accent lighting, under-cabinet zones, closet interiors, or stair treads—places where hardwired fixtures are overkill or inaccessible.
H2: What You’re Actually Installing (and What You’re NOT)
Let’s be precise: this is *not* replacing your main ceiling light with an LED strip. You’re not cutting into Romex, splicing black/white/green wires, or bypassing junction boxes. Instead, you’re adding supplemental, decorative, or task-oriented lighting using one of three safe pathways:
• Plug-and-play kits (e.g., 12V adapter + strip + remote): No tools needed beyond scissors and double-sided tape. • Hardwired low-voltage transformers (fed from an existing outlet or switched receptacle): Requires basic screwdriver work—but only on the *low-voltage side*. The transformer handles all line-voltage isolation. • Battery- or USB-C–powered strips (e.g., 5V addressable RGBIC): Zero electrical interface—ideal for dorm rooms or lease-restricted units.
All three avoid the risks tied to high-voltage DIY: arc flash, shock hazard, AFCI/GFCI nuisance tripping, or voided appliance warranties.
H2: Step-by-Step: Safe, Code-Safe Installation (No License Required)
H3: Step 1 — Choose the Right Strip & Power Source
Not all LED strips are equal. Avoid cheap, non-UL-listed strips with inconsistent binning or poor thermal management. Stick with UL 2108–listed Class 2 products (look for the mark on packaging or spec sheet). Common reliable options:
• Single-color white (2700K–4000K CCT), 12V, 60 LEDs/meter: Best for task lighting under cabinets or shelves. • Tunable white (2700K–6500K), 24V, 120 LEDs/meter: Ideal for adjustable ambiance—requires compatible controller. • Addressable RGBIC (5V), 144 LEDs/meter: For dynamic color scenes—requires USB-C power bank or wall adapter rated ≥3A.
Your power source must match voltage *and* provide sufficient amperage. Rule of thumb: calculate total wattage = (W/m × length in meters), then add 20% headroom. Example: A 3m run of 14.4W/m strip draws ~43W → needs ≥3.6A at 12V. Use only UL-listed, enclosed transformers—not generic wall warts.
H3: Step 2 — Mount Without Damage
Use 3M VHB (Very High Bond) tape—specifically designed for long-term adhesion on painted drywall, wood, and metal. Clean surface with isopropyl alcohol first; press firmly for 30 seconds per 10cm. Avoid standard double-sided tape—it fails after 3–6 months, especially near heat sources like ovens or HVAC vents.
For temporary mounting (e.g., rental kitchen backsplash), use removable mounting putty rated for ≤40°C. Never use hot glue guns indoors—off-gassing degrades silicone coatings and creates brittle, uneven bonds.
H3: Step 3 — Connect Safely (No Soldering Needed)
Pre-cut strips include solderless connectors—snap-lock or push-in types rated for continuous duty. Cut *only* at marked cut lines (every 2–3 LEDs). Never cut mid-LED or mid-resistor. If extending beyond 5m, use parallel wiring—not daisy-chaining—to prevent voltage drop and uneven brightness (a common cause of lights flickering).
For longer runs (>8m), install a second power feed at the far end (“end-feed + middle-feed”) rather than boosting voltage. UL 2108 limits Class 2 loop lengths to 100m—but practical thermal limits cap usable length at ~15m for 12V unless actively cooled.
H3: Step 4 — Control It Right
Skip IR remotes if you want reliability. Use RF or Bluetooth controllers mounted inside accessible junction boxes—or better yet, integrate with Matter-over-Thread hubs (e.g., Home Assistant + Sonos Roam). These avoid Wi-Fi congestion and don’t require cloud accounts. For renters, Bluetooth is ideal: no router access needed, no IP conflicts, and full local control.
If wiring a dimmer switch, ensure it’s rated for low-voltage DC—not AC incandescent dimmers. Using an AC triac dimmer on DC strips causes rapid MOSFET failure and visible strobing. Instead, use PWM controllers or 0–10V dimming modules paired with compatible drivers.
H2: When to Stop—and Call a Pro
Low-voltage strips are forgiving—but boundaries exist. Do *not* attempt any of the following:
• Connecting directly to household 120V outlets—even with a “converter.” Only UL-listed transformers may bridge that gap. • Running strips inside walls, insulation, or ceiling plenums without proper fire-rated housing (UL 2108 requires separation from combustibles ≥13mm unless listed for direct contact). • Using strips rated for outdoor/wet locations indoors without verifying ingress protection (IP65+ needed for steamy bathrooms or laundry rooms). • Overloading a single circuit: A typical 15A residential circuit supports ~1,800W. Adding 100W of LED strips is fine—but stacking them with space heaters, microwaves, or air conditioners can trip breakers. If you experience frequent circuit breaker reset events, map your loads first.
H2: Troubleshooting Real Problems (Not Guesswork)
H3: Flickering? Check These First
Flickering is rarely the strip’s fault. In 87% of verified cases (NECA Field Service Survey, Updated: April 2026), it traces to one of three root causes:
1. Undersized or unregulated power supply: Cheap adapters sag under load, causing PWM instability. 2. Poor ground reference in shared neutrals: Especially when sharing a circuit with motors (e.g., ceiling fan installation) or compressors. 3. EMI from nearby devices: Wi-Fi routers, cordless phones, or dimmer switches radiating noise into unshielded strip wiring.
Fix: Swap in a regulated, constant-voltage supply. Add ferrite cores to DC leads. Route strips ≥30cm from AC cables or RF emitters.
H3: One Section Dark? Likely a Cut or Cold Joint
Unlike AC systems, DC strips fail *catastrophically* downstream of a bad connection. If the first 2m lights but the rest doesn’t, inspect the cut point under magnification. Look for bent copper pads, oxidized traces, or incomplete connector snap engagement. Reflow with a temperature-controlled iron (300°C max) *only* if you have electronics experience—otherwise, replace the segment.
H2: Renters vs. Owners: What Changes (and What Doesn’t)
Renters benefit most from plug-in and battery solutions. Prioritize kits with plug adapter conversion (e.g., NEMA 1-15P to EU Schuko) if traveling or living abroad. Always label transformer inputs/outputs with masking tape—“120V IN / 12V OUT”—to prevent accidental miswiring during move-out.
Owners gain flexibility: they can mount transformers inside existing outlet boxes (with proper fill calculations), hide wires in baseboard raceways, or even hardwire a 24V transformer to a dedicated 15A circuit for whole-room ambient lighting. Just remember: even low-voltage circuits require correct box fill (NEC Table 314.16(B)) and strain relief where cables enter enclosures.
Both groups should treat every installation as temporary—even if permanent. Document everything: take photos before/after, save receipts, and retain instruction manuals. That’s how you prove compliance during inspections or insurance claims.
H2: Safety Isn’t Optional—It’s Built Into the Specs
Class 2 circuits are limited to ≤100VA and ≤30V AC / ≤60V DC under normal conditions—and ≤150VA during fault. That’s why a 12V strip can’t deliver enough current to stop your heart (<100mA across chest), nor ignite drywall paper (ignition threshold >250°C for sustained contact). But safety depends on *how* you implement it.
Never bypass transformer grounding pins. Never coil excess power cable tightly—it heats up and degrades insulation. Never install strips within 1” of halogen or incandescent bulbs (surface temps exceed 90°C). And always test GFCI outlets monthly—especially if powering strips via bathroom or kitchen circuits.
H2: Cost, Lifespan & ROI—Real Numbers
Quality 12V LED strips cost $12–$22 per meter (UL-listed, 120 LEDs/m, CRI >90). A full kitchen under-cabinet run (6m) runs $75–$130, including transformer and controller. Compare that to hiring an electrician for recessed lighting ($350–$600 per fixture, plus drywall repair). Payback comes in two forms:
• Energy: Replacing six 60W incandescents with equivalent 8W strips saves ~312 kWh/year → ~$37/year at U.S. avg. electricity rate of $0.12/kWh (EIA, Updated: April 2026). • Longevity: Rated L70 life is 35,000–50,000 hours. At 4 hrs/day, that’s 24–34 years—far outpacing standard bulbs or even many integrated fixtures.
But ROI isn’t just dollars. It’s fewer ladder climbs, no bulb burnouts at midnight, and lighting that adapts to your routine—not the other way around.
H2: Quick-Reference Comparison: Installation Methods
| Method | Tools Required | Renter-Friendly? | Max Run Length | Pros | Cons |
|---|---|---|---|---|---|
| Plug-in Kit (12V) | None | Yes — fully reversible | 5 meters | No wiring, UL-certified, instant on/off | Voltage drop beyond 5m; adapter blocks adjacent outlet |
| Hardwired Transformer | Screwdriver, wire stripper, voltage tester | Conditional — requires outlet access, no drywall cuts | 15 meters (with parallel feeds) | Clean look, no visible adapters, supports longer runs | Must comply with NEC 406.12 (receptacle tamper-resistance) if modifying outlet |
| USB-C / Battery Powered | None | Yes — zero electrical interface | 2 meters (5V), 3 meters (12V power bank) | No outlet needed, portable, child-safe | Short runtime (4–12 hrs); requires recharging |
H2: Final Checklist Before You Start
✓ Verify strip is UL 2108–listed and Class 2 rated. ✓ Confirm transformer matches strip voltage *and* provides ≥20% overhead amperage. ✓ Test outlet GFCI/AFCI function before plugging anything in. ✓ Measure twice, cut once—and only at marked intervals. ✓ Mount on clean, dry, dust-free surfaces using VHB tape or approved adhesive. ✓ Label all components clearly—especially input/output sides of transformers. ✓ Keep original packaging and manual for future reference or resale.
If you’re unsure about load calculations, outlet compatibility, or local amendments to NEC 2023, consult our complete setup guide—it includes jurisdiction-specific checklists, printable wiring diagrams, and video walkthroughs for every major U.S. metro area (Updated: April 2026).