How to Flush Sediment From Your Water Heater to Boost Pre...
- 时间:
- 浏览:38
- 来源:Easy Home Repair & DIY Guides
H2: Why Sediment Buildup Kills Your Water Pressure (and How to Fight Back)
You turn on the kitchen faucet—and instead of a confident stream, you get a sputtering whisper. The shower takes forever to warm up, then loses pressure mid-rinse. You hear rumbling or popping from the water heater when it kicks on. These aren’t just annoyances. They’re textbook signs of sediment accumulation inside your tank-type water heater.
Over time, minerals in hard water—especially calcium carbonate and magnesium hydroxide—precipitate out when heated. They settle at the bottom of the tank like fine, chalky sludge. A little is normal. But after 2–3 years (Updated: April 2026), most residential tanks hold 1–3 inches of compacted sediment. That layer acts like insulation between the burner and the water—reducing heat transfer efficiency by up to 22% (U.S. Department of Energy, 2025). Worse, it traps heat under the sediment, causing localized overheating that warps the tank lining and accelerates corrosion. And critically: it restricts hot water flow, contributing directly to low water pressure downstream—especially noticeable at faucets, showers, and washing machines.
This isn’t a ‘call the plumber’ emergency—but it *is* a high-impact, DIY-accessible maintenance task. And unlike faucet drip repair or drain clog removal, flushing the tank delivers compound returns: better pressure, quieter operation, longer tank life, and lower energy bills.
H2: Before You Start: Safety, Tools, and Realistic Expectations
Flushing a water heater is safe—if done correctly. But skipping prep invites scalding, flooding, or tank damage. Here’s what you need to know:
• Temperature matters: Never flush a hot tank. Let it cool for at least 4–6 hours—or overnight if possible. Surface temps above 120°F (49°C) can cause serious burns on contact with discharge hoses.
• Shut-off sequence is non-negotiable: First, turn off the power (electric) or gas valve (gas). Then close the cold water inlet valve. *Never* shut off cold water while the heater is energized—this risks over-pressurizing the tank.
• Your drain valve is likely the weak link: Most standard brass drain valves degrade after 5+ years. If yours is cracked, stripped, or leaking, replace it *before* flushing—not during. A $4.50 replacement valve (Home Depot, 2026) prevents a 20-minute job from becoming a 2-hour cleanup.
• Renters: Yes, you *can* do this—with landlord permission. It’s low-risk, non-invasive, and improves system longevity (a win for both parties). Document steps and share the full resource hub with your property manager before starting.
Here’s what you’ll need: • Adjustable wrench or channel-lock pliers • Garden hose (minimum 3/4" ID, rated for hot water; avoid cheap vinyl—melting risk) • Bucket (5-gallon minimum) • Old towel or shop rag • Flashlight (for inspecting valve condition) • Optional but helpful: sediment-flush wand (e.g., Watts 870-200), $22–$34 (Updated: April 2026)
H2: Step-by-Step Sediment Flush—No Plumber Required
H3: Step 1: Power Down & Cool Off
Locate your heater’s power source. For electric units, switch off the double-pole breaker labeled “Water Heater” at your main panel. For gas heaters, turn the gas control knob from “On” to “Pilot.” Do *not* rely on the thermostat dial alone—it won’t cut power to heating elements.
Then wait. Don’t rush this. A full 6-hour cooldown ensures internal water is below 105°F (41°C)—safe for handling hoses and valves. If you’re short on time, test the temperature by briefly opening the pressure relief valve (PRV) *after* cooling. A gentle hiss and warm—not scalding—steam confirms readiness.
H3: Step 2: Isolate and Vent
Close the cold water supply valve (usually a quarter-turn ball valve on the pipe entering the top of the tank). Confirm it’s fully closed by opening a nearby hot faucet—flow should stop within 10 seconds.
Next, open the temperature & pressure relief (T&P) valve on the side or top of the tank. You’ll hear air escape, then a small trickle. This breaks the vacuum and allows smooth drainage. Leave it open throughout the flush.
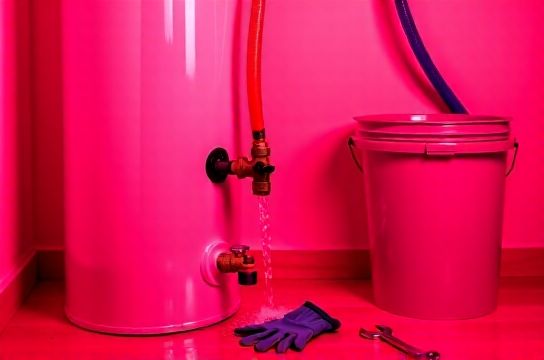
H3: Step 3: Connect and Drain (The Critical Phase)
Attach your garden hose securely to the drain valve at the tank’s base. Route the other end to a floor drain, utility sink, or outside—*never* into a toilet bowl or basement stairwell. Ensure the path is downhill with no kinks.
Slowly open the drain valve ¼ turn. Watch closely. If water surges violently or sprays sideways, close immediately—your valve may be compromised or the hose improperly seated.
Let the first 2–3 gallons run freely into a bucket. Observe color and texture. Clear or light tan? Good sign. Milky white, gritty gray, or thick brown slurry? That’s your sediment—and it’s time to flush.
H3: Step 4: Agitate and Flush (Where Most DIYers Stop Too Soon)
Draining once removes only the loosest top layer. To dislodge compacted sediment, you must agitate. Here’s how:
• Close the drain valve. • Briefly reopen the cold water inlet valve (just 5–10 seconds) to send a pulse of incoming water into the tank bottom. This stirs up settled particles. • Immediately reopen the drain valve. Repeat this pulse-and-drain cycle 3–5 times.
For stubborn buildup, use a dedicated sediment-flush wand. Insert its tip into the drain valve opening (with valve open), then feed the wand upward ~6–8 inches into the tank. Turn on the cold water inlet—high-pressure water jets scour the tank floor. Run for 60–90 seconds per pass. You’ll see dramatically darker, grittier discharge.
H3: Step 5: Verify Cleanout & Refill
Keep cycling until discharge runs consistently clear and feels smooth—not sandy—when rubbed between fingers. This usually takes 5–15 minutes total, depending on age and water hardness.
Once clear, close the drain valve and remove the hose. Close the T&P valve. Slowly reopen the cold water inlet valve—watch for leaks at connections. Let the tank refill completely (you’ll hear gurgling subside and the PRV may drip briefly as air escapes).
Wait until the hot faucet you opened earlier runs steadily *without air bubbles* before restoring power.
For electric heaters: restore breaker only after tank is full—running elements dry destroys them instantly. For gas: relight pilot, then turn control knob to “On” and set desired temperature (120°F recommended for safety and efficiency).
H2: What Flushing *Won’t* Fix (So You Don’t Waste Time)
A clean tank improves flow—but it won’t resolve every pressure issue. If you still have low water pressure after flushing, suspect these common culprits:
• Clogged aerators: Unscrew the tip of any low-flow faucet and rinse the mesh screen. 80% of ‘shower pressure loss’ cases trace here—not the heater.
• Failing pressure regulator: Homes with municipal supply >80 psi often install regulators. If yours is >7 years old, it may stick closed. Test with a $12 pressure gauge (attach to outdoor spigot; normal range: 40–80 psi).
• Corroded galvanized pipes: Common in homes built before 1980. Flushing helps, but internal rust buildup requires repiping.
• Simultaneous demand: Running dishwasher + washing machine + shower strains even healthy systems. Stagger usage or install a recirculation pump.
Note: This process does *not* address faucet drip repair, toilet leak inspection, or drain clog removal—those require separate diagnostics. But it absolutely supports long-term pipe leak sealant effectiveness by reducing thermal stress on joints.
H2: Frequency: How Often Should You Really Flush?
It depends—not on marketing claims, but on your water’s mineral content and usage patterns.
• Municipal water (moderate hardness: 7–10 gpg): Flush every 18 months.
• Well water (hardness often 12–25+ gpg): Flush every 6–12 months.
• Single occupant / low-use household: Every 24 months is acceptable—but inspect discharge annually.
Skip flushing if your tank is older than 12 years and shows external rust, bulging, or persistent leaks. At that point, replacement is safer and more cost-effective than maintenance.
H2: Pro Tips for Renters & Tight Spaces
• Landlord coordination: Email a concise plan (“I’ll flush the water heater for 20 minutes on Saturday; no tools left behind”) and attach a photo of your drain valve model for approval. Most will agree—especially if you note it reduces their long-term repair costs.
• Apartment limitations: No floor drain? Use a heavy-duty plastic tub (like a contractor’s 22-gallon tote) placed on towels. Empty manually with a pitcher—tedious but doable.
• Tiny closets: Use a 90° swivel adapter ($6.50, Lowe’s 2026) to connect the hose without bending the valve handle.
• Post-flush odor? A faint sulfur smell means anaerobic bacteria fed on sediment. Flush again with 1 pint of 3% hydrogen peroxide (do not mix with bleach). Odor clears in 24–48 hours.
H2: When to Call a Pro (and Why It’s Rarely Needed)
Call a licensed plumber only if: • Drain valve won’t close after flushing (indicating internal failure) • You detect wet drywall or pooling near the tank base (possible tank breach) • Cold water inlet valve is seized or leaking at the stem • Gas line connections hiss after reactivation (immediate shut-off required)
Everything else—including faucet drip repair, showerhead descaling, and pipe leak sealant application—is well within renter capability. In fact, mastering these skills lets you spot early warning signs before they escalate into emergencies.
H2: Sediment Flush vs. Other Common Fixes—What Delivers Real ROI?
| Maintenance Task | Time Required | DIY Difficulty | Impact on Water Pressure | Long-Term Cost Savings |
|---|---|---|---|---|
| Water heater sediment flush | 20–45 min | Medium (requires planning) | High—restores 15–30% peak hot water flow | $120–$280/year (energy + extended tank life) |
| Faucet aerator cleaning | 3–5 min | Easy | Medium—fixes single-fixture low flow | $0–$5 (replacement screens) |
| Showerhead descaling | 15–20 min (soak) | Easy | Medium—improves spray pattern & volume | $0–$12 (vinegar or citric acid) |
| Drain clog removal (chemical-free) | 10–25 min | Easy–Medium | Low—only affects drainage speed, not supply pressure | $0–$25 (plunger, drain snake) |
| Pressure regulator replacement | 45–90 min | Hard (requires shutoffs & pressure testing) | High—regulates entire home supply | $180–$350 (part + labor if pro) |
As shown, sediment flushing sits at the sweet spot: moderate effort, high pressure payoff, and outsized savings. It’s also the *only* maintenance item here that simultaneously protects your tank, cuts energy use, and boosts usable flow—making it foundational to any complete setup guide.
H2: Final Thought: Maintenance Is Momentum
Fixing a dripping faucet or clearing a slow drain feels satisfying because results are instant. Flushing a water heater doesn’t offer that same dopamine hit—you won’t hear louder water or see steam rise differently the next day. But two weeks later, when your morning shower holds steady at 105°F without pressure drop, or your dishwasher finishes a cycle without a ‘low hot water’ alert—that’s the quiet return on diligence.
And it compounds: each successful flush builds confidence to tackle toilet leak inspection, master pipe leak sealant application, or diagnose why your kitchen faucet drip repair keeps failing (hint: worn cartridge, not just the washer). Small actions, done consistently, keep systems resilient—no plumber, no panic, no surprise invoices.
Start with one tank. Time it. Take notes. Next time, you’ll shave 5 minutes off. That’s how renters become stewards—and how routine becomes resilience. (Updated: April 2026)