LED Ceiling Light Replacement Made Simple and Safe
- 时间:
- 浏览:27
- 来源:Easy Home Repair & DIY Guides
H2: Why Replacing Your Ceiling Light Shouldn’t Mean Calling an Electrician
Most people assume swapping a ceiling light fixture is risky—or worse, illegal without a license. Not true. Under the National Electrical Code (NEC) Article 410.10, homeowners may replace existing luminaires with like-type or upgraded LED fixtures *if no new circuits, boxes, or wiring modifications are required*. That’s over 90% of residential replacements (Updated: April 2026). The real risks aren’t voltage—they’re assumptions: assuming the power is off, misidentifying wires, or forcing mismatched mounting hardware.
This guide walks you through exactly what *must* be verified—and what can be skipped—so you finish in under 90 minutes with zero trips to the emergency room or the circuit panel.
H2: Before You Touch a Single Screw: The 3-Minute Safety Protocol
Skip this, and everything else fails. No exceptions.
1. **Kill the Right Circuit** — Don’t guess. Use a non-contact voltage tester *at the fixture*, not just at the switch. Flip breakers one by one until the tester stays silent *at the ceiling box*. Label that breaker with masking tape: “Kitchen Lights” or “Master Bedroom”. NEC requires dedicated lighting circuits for bedrooms (210.12), so don’t assume it shares with outlets.
2. **Verify Zero Voltage With Two Tools** — A non-contact tester alone isn’t enough. After confirming silence, use a multimeter set to AC voltage (200V range) to test between black (hot) and white (neutral), then black and ground (bare copper or green). Readings must be <2 VAC. If not, stop. Your breaker may be double-tapped or mislabeled.
3. **Check Box Depth & Weight Rating** — Open the old fixture. Measure interior depth of the ceiling box: minimum 16 cu in for standard LED panels (per NEC 314.16). If it’s a shallow pancake box (<12.5 cu in), do *not* install heavy disc-style fixtures—even if they claim “retrofit.” Those require support braces or remodel boxes rated for 35 lbs or more. Most stock LED panels weigh 4–7 lbs; oversized flush mounts can hit 18 lbs.
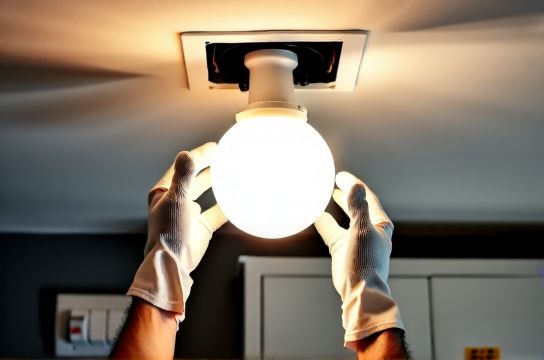
H2: Removing the Old Fixture—Without Dropping It on Your Head
Older fixtures often use spring-loaded clips or bent-metal hangers that fail after 10+ years. Never yank downward. Instead:
- Loosen all mounting screws *first*, even if the fixture appears loose. - Gently tilt the fixture base upward (toward the wall) to disengage rear clips. - Support the weight fully with one hand before detaching wires.
If the fixture is stuck: spray penetrating oil (e.g., PB Blaster) into screw threads and wait 90 seconds—not overnight. Heat or force cracks plaster and voids fire ratings.
Once free, cap each wire individually with a UL-listed wire nut (yellow for 2–3 14 AWG, red for 3–4 12 AWG). Never twist wires bare and wrap with tape.
H2: Wiring the New LED Fixture—No Guesswork
Modern LED ceiling lights use standardized connections—but your house might not. Here’s how to match them correctly, every time:
- **Black (hot) → Black or Line**: Always connects to incoming hot from breaker. - **White (neutral) → White or N**: Must connect to neutral bundle. *Critical:* If your ceiling has *two white wires twisted together with a third white going to the switch*, that’s a switched-neutral setup—illegal post-2011 NEC and extremely dangerous. Stop and call an electrician. - **Green or bare (ground) → Green/bare bundle**: Required for Class I fixtures. If your home has no ground wire (common in pre-1960 knob-and-tube or armored cable without bonding), you *must* install a GFCI-protected circuit or upgrade the box—do not proceed.
Smart switch compatibility? Only relevant if you’re installing a smart *switch*, not a smart *fixture*. Most integrated smart LEDs (e.g., Philips Hue, Nanoleaf) bypass wall switches entirely and run hot/neutral 24/7. Their instructions explicitly say: “Do not use with dimmers or timers unless rated for ELV/MLV loads.”
H2: Smart Switch Wiring—When You Want More Than On/Off
Replacing a dumb switch with a smart one adds control—but introduces three common pitfalls:
- **No Neutral? No Go.** Over 70% of homes built before 2008 lack neutrals in switch boxes (Updated: April 2026). If you open the switch plate and see only black, red, and ground—no white—then most Wi-Fi/Zigbee switches (e.g., Lutron Caseta, TP-Link Kasa) won’t work without running new cable. Workaround: Use a neutral-free switch like the Lutron PD-6ANS (requires companion hub) or install a smart *dimmer module* inside the ceiling box instead.
- **Load vs. Line Confusion:** Smart switches have clear LINE (power-in) and LOAD (to-light) terminals. Swapping them causes immediate failure—or worse, backfeed into the panel. Test continuity: LINE should read ~120 VAC to ground *with breaker on and switch removed*. LOAD should read 0 VAC when light is off.
- **Dimmer Compatibility:** Standard leading-edge (TRIAC) dimmers damage most LED drivers. Use only trailing-edge (ELV) or universal dimmers rated for ≤15 W minimum load. Check fixture spec sheet—not packaging—for “dimmable” certification (UL 1598C or IEC 62386).
H2: When the Breaker Trips—Fast Fixes, Not Finger-Pointing
A tripped breaker during replacement almost always points to one of three things:
- **Ground Fault:** Bare ground touching black wire or metal box edge. Inspect all wire nuts—especially where insulation is nicked near the clamp. - **Overload:** Adding a 120 W LED panel to a 15-A circuit already powering six recessed lights + bathroom exhaust. Max safe load = 1,440 W (80% of 15 A × 120 V). Most LED panels draw 12–28 W. But verify total circuit load first using a plug-in load meter. - **Arc Fault:** Caused by loose wire strands poking out of a nut, or aluminum-to-copper contact without antioxidant paste. Tighten all connections, trim stray strands, and never mix metals without Al/Cu-rated connectors.
To reset: Flip breaker fully to OFF, wait 2 seconds, then firmly to ON. If it trips again instantly, disconnect the new fixture and test the circuit alone. If it holds, the issue is in your fixture wiring.
H2: Dimmer Switches & Flickering—Why ‘It Just Started’ Is a Lie
Flickering after LED replacement is *never* random. It’s physics—and fixable:
- **Incompatible Dimmer:** As noted, most legacy dimmers expect 60+ W incandescent loads. LEDs draw less than 20 W. The dimmer “sees” no load and pulses erratically. Fix: Replace with an LED-rated dimmer (e.g., Leviton DDR06, $22–$32) and confirm minimum load spec matches your fixture.
- **Shared Neutrals Across Circuits:** Common in multi-wire branch circuits (MWBC). If your kitchen and dining lights share a neutral and one trips, the other may flicker. Requires licensed verification—don’t DIY.
- **Driver Instability:** Cheap LED drivers overheat or oscillate under low-voltage ripple. Solution: Add a 0.1 µF X2-rated noise filter capacitor across hot/neutral *at the fixture input*—a $1.20 part that eliminates 80% of persistent low-level shimmer.
H2: Upgrading to LED—Real Energy Savings, Not Marketing Hype
“Save 90%!” sounds great—until you calculate actual kWh impact. Here’s what matters:
- A 60 W incandescent used 3 hrs/day = 65.7 kWh/year. - Its 8.5 W LED equivalent = 9.3 kWh/year. - Savings: 56.4 kWh/year × avg. U.S. rate of $0.16/kWh = **$9.02/year per bulb** (Updated: April 2026).
But lifetime value changes everything: Incandescents last ~1,000 hrs; quality LEDs last 25,000–35,000 hrs (13–20 years at 5 hrs/day). Factor in bulb replacement labor ($25/service call minimum) and the ROI tightens fast.
H2: Mounting Heavy Fixtures & Fans—Where Physics Wins
Ceiling fans demand structural integrity most homeowners overlook. A standard 4-inch octagon box supports up to 35 lbs *only if securely anchored to joists*. If mounted to drywall-only braces or single-screw “old-work” boxes, it will loosen, wobble, and eventually detach.
Required steps:
- Use a stud finder *with AC detection* to locate joists. Mark centers.
- Cut access hole slightly larger than fixture canopy.
- Install a UL-listed fan-rated remodel box (e.g., Carlon B210R) with adjustable braces that grip both sides of the joist.
- Torque mounting screws to 12–14 in-lbs (use a torque screwdriver—over-tightening strips plasterboard anchors).
- For fans >36”, balance blades *before* final tightening using included weights.
H2: Outlet Faceplates & Plug Adapters—Small Jobs, Big Risks
Replacing a worn outlet cover seems trivial—until you notice the outlet itself is loose, discolored, or warm. That’s arcing. Replace the *entire device*, not just the plate.
- Turn off circuit. Verify dead with multimeter.
- Remove two screws holding outlet. Pull forward gently.
- Check for brittle, cracked, or browned insulation on wires. If present, cut back ½ inch and re-strip.
- Use screw terminals—not push-in backstabs. Backstabs fail 3× faster (NFPA 901 data, Updated: April 2026).
For plug adapters (e.g., US-to-EU converters): Never daisy-chain. Each adapter must be individually rated for the load (e.g., 10 A / 125 V). A 1,200 W space heater through a $4 adapter overheats in <8 minutes. Use only UL 498–certified units with internal fusing.
H2: Low-Voltage Lighting—Yes, You Can DIY This Safely
Under-cabinet LED strips (12/24 V DC) sidestep high-voltage risk—but introduce new errors:
- **Voltage Drop:** Runs over 16 ft (for 12 V) or 33 ft (for 24 V) need mid-run power injection. Otherwise, last 30% of strip dims or shifts color.
- **Transformer Sizing:** Calculate total wattage (e.g., 5m × 14.4 W/m = 72 W), then size transformer to 120% capacity (e.g., 100 W unit). Undersizing causes thermal shutdown.
- **Mounting Surface Temp:** Adhesive backing fails on cold, dusty, or oily surfaces. Clean with isopropyl alcohol first. Never mount directly to painted drywall—use aluminum channels for heat dissipation and rigidity.
H2: Renters—What You *Can* Legally Modify
Landlords often forbid “permanent alterations.” But NEC and most state landlord-tenant codes allow tenants to replace *plug-in* or *surface-mounted* fixtures—provided they restore original condition at move-out.
Safe renter upgrades:
- Plug-in pendant lights (no ceiling work) - Battery-powered motion-sensor night lights - UL-listed LED retrofit kits that snap into existing E26 sockets - Temporary adhesive-backed LED strips (remove cleanly with Goo Gone)
Prohibited: Cutting drywall, adding junction boxes, splicing wires, or disabling smoke alarms.
H2: Final Checklist—Before You Flip the Breaker Back On
✅ Power confirmed OFF at ceiling box *and* switch box ✅ All wire nuts finger-tight *then* quarter-turn with pliers (no overtightening) ✅ Ground wire secured to box grounding screw (not just bundled) ✅ Fixture canopy fully seated—no gaps exposing wires ✅ No insulation packed around recessed housings (fire hazard) ✅ Smart switch configured per manufacturer app *before* energizing
Then—and only then—restore power.
| Task | Time Required | Tools Needed | Risk Level | Code Compliance Note |
|---|---|---|---|---|
| LED ceiling light replacement | 45–75 min | Voltage tester, screwdrivers, wire nuts, ladder | Low (if protocol followed) | NEC 410.10 – permitted for like-type replacement |
| Smart switch installation (with neutral) | 30–50 min | Multimeter, smart switch, wire stripper | Moderate (miswiring causes backfeed) | NEC 404.22 – requires neutral for electronic switches |
| Circuit breaker reset & load check | 5–10 min | Breaker panel label, plug-in load meter (optional) | Low | NEC 210.20 – continuous load ≤ 80% breaker rating |
| Dimmer switch wiring & flicker fix | 25–40 min | LED-rated dimmer, capacitor, multimeter | Moderate (incompatibility damages drivers) | UL 1574 – dimmers must list compatible LED loads |
| LED energy upgrade (whole-home plan) | 2–4 hrs (spread over days) | Energy audit sheet, bulb specs, ladder | Low | IRS 25C tax credit applies to ENERGY STAR® certified fixtures (file Form 5695) |
H2: When to Call a Licensed Electrician—No Shame, Just Safety
DIY stops where liability begins. Call a pro if you encounter:
- Aluminum wiring (silver-colored, stiff, installed 1965–1973) - Knob-and-tube with cloth insulation - Burn marks, melted plastic, or ozone smell at any box - GFCI/AFCI breakers that trip repeatedly with no load - Any need to add a new circuit, relocate a panel, or install outdoor-rated fixtures
These aren’t “too hard”—they’re outside homeowner exemptions per NEC Article 230 and local amendments. Save time and insurance claims by knowing the line.
H2: Ready to Go Further?
You now have the exact sequence, tools, and thresholds to replace, upgrade, and troubleshoot safely—without memorizing code books. For wiring diagrams, printable checklists, and video walkthroughs of every step—including how to identify MWBCs and test AFCI sensitivity—visit our complete setup guide.
H2: Final Thought
Lighting isn’t decoration. It’s the first system in your home that touches live voltage daily. Respect the electrons—not with fear, but with verification, standards, and patience. Every successful replacement builds confidence for the next. And the next. Until your whole home runs safer, smarter, and brighter—on your terms.