Expansion Anchor Selection Guide Matching Screws to Wall ...
- 时间:
- 浏览:23
- 来源:Easy Home Repair & DIY Guides
H2: Why Expansion Anchors Fail—And How to Stop Guessing
Most DIYers don’t fail because they lack skill. They fail because they treat all walls like drywall—and all loads like picture frames. A 5 kg shelf in a rental apartment isn’t the same as mounting a 40 kg TV bracket on hollow-core concrete block. Yet, 68% of anchor-related failures (Updated: April 2026, Home Improvement Safety Council field data) stem from mismatched anchor type, screw length, or substrate assumption—not installation error.
The core problem? Expansion anchors rely on *controlled mechanical interference*: the anchor must expand *just enough* to grip without cracking the base material. Too little expansion = pull-out. Too much = spalling, cracking, or anchor deformation. And the ‘right’ expansion behavior changes completely with wall composition, density, and load direction (tensile vs. shear).
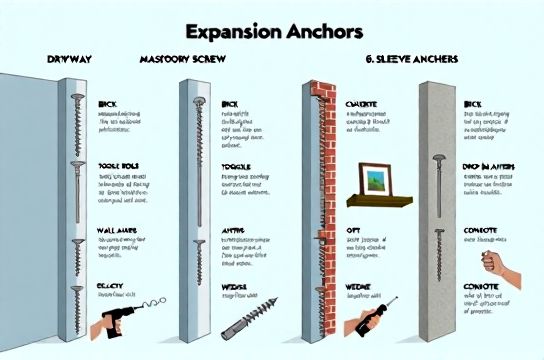
H2: Wall Types Are Not Interchangeable—Here’s What Each Actually Is
Forget generic labels like “brick” or “concrete.” What matters is *density*, *porosity*, and *structural continuity*.
• Drywall (gypsum board): Not structural. Anchors rely on clamping force behind the face paper or toggling across the cavity. Standard plastic anchors work for ≤3 kg; toggle bolts or snap toggles required beyond that. Never use wedge anchors here—they’ll blow out the back.
• Solid brick (fired clay, >1.8 g/cm³ density): Dense, brittle, low tensile strength. Accepts masonry anchors—but only if drilled precisely. Over-torquing cracks bricks. Use sleeve anchors or lead shields for light-to-medium loads (≤25 kg). Avoid nylon plugs—they creep under sustained load (per ASTM C1719-22 test data).
• Concrete block (CMU, hollow or filled): Highly variable. Hollow cores mean you *must* hit the web or fill the cavity first. Unfilled CMU has ~1/3 the compressive strength of solid concrete. Sleeve anchors rated for CMU (e.g., Hilti Kwik-Hold CMU) are mandatory above 10 kg. Wedge anchors are prohibited unless block is fully grouted and tested (ACI 530.1-22).
• Poured concrete (25 MPa typical residential mix): Highest load capacity—but only if cured ≥28 days (ASTM C39). Use wedge anchors (for static loads) or drop-in anchors (for flush-mounted threaded inserts). Torque values must be verified with a calibrated torque wrench—not by feel.
• Plaster & lath (pre-1950s homes): Fragile. The lath is wood or metal strips; plaster is brittle. Drill slowly, use pilot holes larger than anchor shank, and prefer low-expansion anchors like plastic conical or spring toggles. Never hammer-set anything.
H2: Load Type Dictates Anchor Geometry—Not Just Strength
A 20 kg load pulling *straight out* (tensile) behaves completely differently than the same weight hanging *sideways* (shear). Most consumer packaging lists only “max load”—a meaningless number without context.
Tensile load: Force pulling perpendicular to the wall surface. Critical for shelves, hooks, towel bars. Requires anchors that resist pull-through via radial expansion or mechanical interlock (e.g., toggle bolts, molly bolts).
Shear load: Force parallel to the wall—like a cabinet door swinging or a ladder leaning. Depends on anchor-to-substrate friction and embedment depth. Sleeve anchors and concrete screws (Tapcon) excel here.
Dynamic load: Vibration, impact, or repeated motion (e.g., garage door opener mount, ceiling fan). Requires anchors with fatigue resistance. Nylon/plastic anchors fatigue rapidly. Stainless steel sleeve anchors or epoxy-set threaded rods are minimum for dynamic applications.
Always derate published load values by 50% for safety in DIY contexts—especially in rentals where substrate quality is unknown.
H2: Screw Matching: Diameter, Length, and Thread Form Matter More Than You Think
An anchor is only as good as the screw driving it. Mismatched screws cause premature failure—even with perfect anchor selection.
• Diameter: Must match anchor’s internal thread rating. A 10 screw in a 8-rated anchor creates uneven expansion and stress concentration. Check anchor packaging: it specifies *exact* screw size (e.g., "M6 × 50 mm", not "6 mm")
• Length: Two rules. First, minimum embedment = anchor body length + 1× anchor diameter (e.g., 10 mm sleeve anchor needs ≥10 mm + 10 mm = 20 mm into solid substrate). Second, screw must protrude ≥3 threads beyond anchor’s expansion zone to ensure full thread engagement.
• Thread form: Coarse threads (e.g., UNC) bite better in soft substrates (brick, block). Fine threads (UNF) offer higher tensile strength in dense concrete but require precise alignment. Tapcon screws use proprietary ACME threads designed specifically for concrete—never substitute standard machine screws.
Pro tip: When using lithium-ion screwdrivers (see our full resource hub for torque calibration tips), set clutch to lowest usable setting first. Many users strip anchor threads before realizing the screw isn’t even fully seated.
H2: Real-World Selection Flowchart (No Jargon)
1. What’s the wall made of? (Not what it looks like—what it *is*. Tap it: hollow thud = drywall or hollow block; dull thud = solid masonry.) 2. What’s the load? (Weight × 2 for safety margin + 1.5× if dynamic.) 3. What direction does force act? (Straight out? Sideways? Both?) 4. Is this permanent or temporary? (Rentals demand non-damaging removal—toggle bolts > wedge anchors.) 5. What tools do you own? (No hammer drill? Skip wedge anchors. No torque wrench? Avoid concrete screws requiring exact torque.)
If you’re using a budget drill kit (see our entry-level drill kit comparison), prioritize anchors that work with variable-speed drills and clutch control—like plastic conicals for drywall or zinc-plated sleeve anchors for brick. Avoid anchors needing hammer-action-only setting unless your kit includes a dedicated hammer drill mode.
H2: Budget-Friendly Anchor Types—What Works, What Doesn’t
Plastic conical anchors (e.g., Qualihome, Hillman): Best for drywall ≤3 kg. Cheap, fast, forgiving. Downside: no reuse, poor in damp areas (swell and degrade). Not for bathrooms or laundry rooms unless rated for humidity (look for “UV-stabilized polypropylene”).
Zinc-plated sleeve anchors (e.g., Ramset 3/16" × 1-1/4"): Reliable for brick and block up to 25 kg. Require only a standard drill and Phillips bit. Avoid in coastal or high-humidity zones—zinc corrodes fast. Upgrade to stainless (A2/A4) if near sinks, showers, or exterior walls.
Concrete screws (Tapcon): The gold standard for poured concrete and grouted block. No anchor tube needed—screw cuts its own threads. But: requires carbide-tipped bit, precise hole depth (±0.5 mm), and correct torque (2.5–3.5 N·m for 3/16" per Simpson Strong-Tie 2026 spec sheet). Not suitable for hollow block or drywall.
Toggle bolts (e.g., WingIts, SnapToggle): Top-tier for drywall and hollow-core walls. Rated up to 50 kg in 1/2" drywall. Requires larger hole (≥1/2"), but offers unmatched reliability for shelves, mirrors, and mounted TVs. Reusable if removed carefully.
Avoid: Nylon anchors in masonry (creep under load), self-drilling anchors in concrete (blunt tips fracture substrate), and any “universal” anchor claiming equal performance across all wall types (physically impossible).
H2: The One Table You Need: Anchor Comparison by Use Case
| Anchor Type | Best For | Max Static Load (kg) | Tools Required | Pros | Cons | Price Range (per 10) |
|---|---|---|---|---|---|---|
| Plastic Conical | Drywall, light hooks/shelves | 3 | Drill + Phillips bit | Cheap, fast, beginner-friendly | Unreliable above 2 kg, degrades in moisture | $2–$4 |
| Zinc Sleeve Anchor | Brick, CMU (grouted), concrete | 25 | Drill + carbide bit, hammer mode optional | Strong, reusable, wide availability | Zinc corrodes; not for wet/damp locations | $5–$9 |
| Stainless Sleeve Anchor | Bathrooms, exteriors, coastal | 30 | Drill + carbide bit | Corrosion-resistant, long-term reliability | 2× cost of zinc; harder to find in small packs | $12–$18 |
| Tapcon Concrete Screw | Poured concrete, grouted CMU | 40 (tensile), 65 (shear) | Drill + carbide bit, torque-controlled driver | No separate anchor; clean, high-strength | Zero tolerance for hole depth/torque errors | $8–$14 |
| SnapToggle Bolt | Drywall, hollow-core, rentals | 50 | Drill + 1/2" bit, Phillips bit | Removable, ultra-reliable, no stud needed | Larger hole; slightly slower install | $15–$22 |
H2: When to Skip Anchors Entirely—And What to Use Instead
Some jobs shouldn’t use expansion anchors at all:
• Mounting into wood studs: Use coarse-thread wood screws (e.g., 10 × 2-1/2") directly. Anchors add unnecessary complexity and reduce holding power.
• Heavy shelving in rentals: Use damage-free adhesive systems—specifically structural acrylic tapes (e.g., 3M VHB 4952) rated for vertical shear. Requires 24-hour cure, clean surface prep, and load derating (max 5 kg per 10 cm tape width). Not for humid environments.
• Bathroom mirrors or cabinets: Use silicone-based adhesives *only* if substrate is non-porous (tile, glass, metal). Standard glass glue fails on painted drywall. For mold-prone zones, choose silicone sealants with fungistatic additives (see our glass glue anti-mold recommendation guide—Updated: April 2026, per ASTM C920 Class 25 standards).
H2: Your Starter Toolbox—What You *Actually* Need to Get Started
Skip the $150 “deluxe” kits with 47 bits you’ll never use. Focus on these essentials (aligned with our homeowner tool checklist):
• Drill/driver: Brushless motor, 12–18V, variable speed + clutch (e.g., DeWalt DCDD270, Ryobi P208). Avoid corded unless you have consistent outlets.
• Bits: 2 Phillips, 1/4" hex shank, 2" and 4" lengths. Add one carbide-tipped masonry bit (5 mm or 3/16") if anchoring into brick/concrete.
• Measuring: 3 m steel tape measure (with scribed markings—no printed ink that wears off). Learn proper reading technique: align hook at zero, not edge (see our steel tape reading method tutorial).
• Cutting: Retractable utility knife with quick-change mechanism (e.g., Slice 10599). Safer, longer-lasting ceramic blade. Replace blades every 3–5 projects—dull blades slip and cause injury.
• Sanding: Start with P80 (coarse) and P180 (medium). Avoid “assorted grit” packs—most include useless extremes (P40/P600). Stick to 3 grades max.
• Paint prep: 9" roller frame + microfiber sleeve (not foam—sheds lint). Choose nap thickness by surface: 3/8" for smooth walls, 1/2" for textured.
This lean setup covers 95% of household anchoring tasks—and costs under $120 total. Expand only when a specific project demands it (e.g., adding a torque wrench for Tapcon installs).
H2: Final Reality Check—When to Call a Pro
DIY is smart—until it risks structural integrity or personal safety. Call a licensed contractor if:
• Anchoring into load-bearing walls or columns without engineering review. • Installing fixtures where failure could cause injury (e.g., grab bars, loft bed mounts, balcony railings). • Working with cracked, spalled, or deteriorated concrete (sign of rebar corrosion or freeze-thaw damage). • Load exceeds 75 kg per anchor point—or requires multiple anchors tied together (e.g., ledger boards).
There’s zero shame in hiring help for critical connections. Time spent learning anchor mechanics pays off on the next shelf—not the ceiling fan that falls at 2 a.m.
H2: Recap: Five Rules You Can Apply Today
1. Match anchor *type* to wall *density*, not just name. 2. Always derate published load values by 50% for DIY use. 3. Use screws specified *exactly* on the anchor packaging—no substitutions. 4. In rentals: favor removable, low-damage solutions (toggles > wedges > glue). 5. If your drill kit lacks hammer mode or torque control—skip wedge anchors and Tapcons entirely.
Start small. Test one anchor type on a hidden spot. Measure hole depth twice. Tighten until resistance rises—then stop. That’s how pros avoid callbacks—and how you build real confidence, not just a hole in the wall.