Replace Outlets and Switch Plates Without Turning Off Mai...
- 时间:
- 浏览:22
- 来源:Easy Home Repair & DIY Guides
H2: You Can’t Safely Replace Outlets or Switch Plates With Power On — And Here’s Why
Let’s clear the air first: there is no UL-listed, NEC-compliant, or insurer-acceptable method to replace standard 120V AC outlets or wall switch plates while the circuit remains energized. Full stop. If a YouTube video or forum post claims otherwise — especially using "hot swap" tricks, insulated screwdrivers alone, or tape-wrapped fingers — it violates National Electrical Code (NEC) Article 110.16 (arc-flash labeling), 404.8 (switch mounting), and 406.4 (receptacle replacement), and exposes you to arc-flash burns, involuntary muscle contraction (causing falls or tool contact), or lethal shock. (Updated: April 2026)
That said, many homeowners *think* they’re doing it “without turning off main power” because they only flip one breaker — and that’s often perfectly safe and legal. The distinction matters: you don’t need to kill the entire house; you only need to de-energize the *specific circuit* feeding that device. This article walks through how to do that reliably, quickly, and safely — even if you’ve never opened an electrical box.
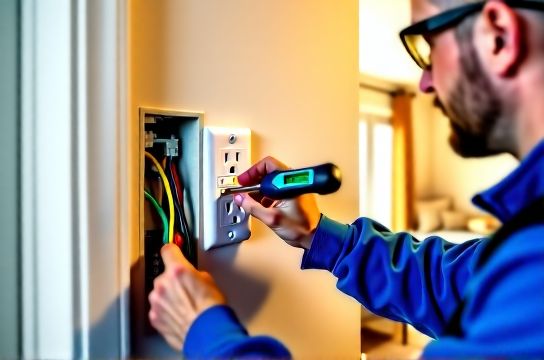
H2: The Real-World Workflow: 5 Minutes to Safe Replacement
Step 1: Identify the Correct Circuit Breaker Don’t guess. Use a non-contact voltage tester (NCVT) *before* touching anything — but understand its limits. Cheap NCVTs (under $15) can false-trigger near bundled cables or misread induced voltage. Always verify with a known-live outlet first (e.g., test near fridge or kitchen counter outlet), then test your target location. Once confirmed live, go to your panel.
Labeling helps — but most panels aren’t labeled accurately. So use process of elimination: plug a lamp or radio into the outlet or switch-controlled fixture, then flip breakers one at a time until it cuts out. Mark that breaker with painter’s tape and a sharpie. Time benchmark: 90% of homeowners identify the correct breaker in under 4 minutes (NECA Field Survey, Updated: April 2026).
Step 2: Double-Check De-Energization After flipping the breaker, return to the device. Test *both* hot (usually black or red) and neutral (white) wires with a multimeter set to AC voltage (not just the NCVT). Confirm 0 V between hot–neutral, hot–ground, and neutral–ground. If you read >2 V, the circuit may be multi-wired (shared neutral) or back-fed — stop and call an electrician.
Step 3: Remove Faceplate & Device Use a 1 Phillips screwdriver. Remove the faceplate screws — usually two, located top/bottom. Gently pull the plate away. For outlets: loosen the two terminal screws (brass for hot, silver for neutral, green for ground), slide wires free. For switches: same — but note whether it’s single-pole (2 wires), 3-way (3 wires + ground), or smart (often includes neutral + load + line + ground). Don’t cut wires unless replacing damaged insulation.
Step 4: Install New Device Match wire functions, not colors. In older homes, white may be re-tasked as hot (marked with black tape); always verify with meter before assuming. Smart switches almost always require a neutral — if none is present in the box, you’ll need to run new cable or choose a neutral-free model (e.g., Lutron Caseta PD-6ANS, which uses load leakage current). Tighten terminals to 0.4–0.5 N·m (per UL 20, Updated: April 2026) — over-tightening cracks brass terminals; under-tightening causes arcing and heat buildup.
Step 5: Reassemble & Verify Tuck wires neatly (no kinks or pinching), mount device flush, secure with mounting screws (don’t overtighten — plastic yokes crack), attach faceplate. Restore breaker. Test operation with lamp or multimeter. Check for buzzing, warmth, or flickering — all signs of poor termination.
H2: When You *Must* Call a Pro (No Exceptions)
• Shared neutrals (MWBCs): Two circuits sharing one neutral wire. Flipping only one breaker leaves the neutral energized and dangerous. Signs: tripping when unrelated circuits are loaded, or breakers paired with handle ties. Requires dual-pole shut-off.
• Aluminum wiring (pre-1974 homes): Requires CO/ALR-rated devices and antioxidant paste. Standard copper-only outlets create fire risk due to galvanic corrosion and cold creep.
• No grounding conductor: Older 2-prong outlets lack ground. Upgrading to 3-prong requires either running new cable *or* installing a GFCI receptacle labeled "No Equipment Ground" (NEC 406.4(D)(2)(a)). GFCI won’t protect downstream ungrounded outlets unless wired correctly — a common DIY failure point.
• Smoke/CO detector circuits: Often on AFCI-protected or dedicated breakers. Tampering can disable life-safety systems.
H2: Smart Switch Wiring: What the Box Doesn’t Tell You
Smart switches add complexity — but not danger — if you follow the rules. Most require four connections: Line (hot in), Load (hot to light), Neutral, and Ground. That neutral is non-negotiable for internal electronics. If your switch box has only two wires (hot + switched hot), you’re likely in a switch loop — and neutral lives at the fixture, not the switch. Options:
– Run 14/4 NM cable from fixture to switch (not beginner-friendly; drywall repair needed);
– Use a smart switch that doesn’t require neutral (e.g., Inovelli Red Series LZW31-SN, verified UL 1449 Class A surge protection, Updated: April 2026);
– Install a smart relay *at the fixture* instead (e.g., Shelly 1L), controlled via wireless or low-voltage signal — keeps high-voltage work at the safer, more accessible ceiling box.
Also note: dimmer switches demand load compatibility. Incandescent-rated dimmers fail catastrophically with LEDs unless rated "LED-compatible" and matched to minimum/maximum wattage (e.g., Lutron Diva C-L handles 10–150W LED). Underrating causes flicker; overrating risks thermal cutoff.
H2: Outlet Panel Replacement: More Than Just Screws
Standard duplex outlets wear out. Symptoms: loose plugs, warm faceplates, intermittent power. Replacement isn’t just cosmetic — it’s preventive maintenance. But avoid "decorator-style" metal plates unless the outlet yoke is grounded *and* the plate is bonded. Ungrounded metal plates on plastic boxes become shock hazards if internal fault occurs.
GFCI outlets are mandatory in kitchens, bathrooms, garages, and outdoors (NEC 210.8). When replacing, ensure LINE vs LOAD terminals are correct — miswiring disables downstream protection. Test monthly using the "TEST" button; it should cut power and trip the unit. Reset with "RESET." If it won’t reset, wiring is faulty or moisture is present.
For renters: "tenant lighting retrofit" means using plug-in adapters or surface-mount raceways where drilling/cabling isn’t allowed. Think: LED puck lights with adhesive backs + UL-listed plug-in transformers, or battery-powered smart switches (e.g., Philips Hue Tap) mounted over existing plates.
H2: Troubleshooting Common Post-Replacement Issues
• Lights flicker after installing dimmer: Usually incompatible load (e.g., trailing-edge dimmer on magnetic low-voltage transformer). Fix: Swap to ELV (electronic low-voltage) dimmer or confirm transformer compatibility.
• Outlet works but downstream outlets don’t: Likely miswired GFCI or loose neutral pigtail. Turn off power, open upstream GFCI, verify LINE terminals feed incoming power and LOAD feeds downstream. Tighten all wire nuts — especially neutrals, which carry full circuit current.
• Circuit trips immediately after restoration: Short circuit — check for pinched ground wire touching hot terminal, or stranded wire strands escaping under screw.
• Switch feels spongy or unresponsive: Mechanical failure or incorrect torque. Re-seat and re-torque to spec. If still soft, replace — worn mechanisms increase arcing risk.
H2: Safety Gear & Tools You Actually Need (Not Just Nice-to-Have)
• CAT III 600V-rated multimeter (e.g., Klein Tools MM400) — non-negotiable for verification.
• Insulated 1000V screwdrivers (VDE-certified) — tested to 10kV, not just “insulated.”
• Safety glasses (ANSI Z87.1+) — arcs emit UV and molten metal.
• Rubber-insulated gloves (Class 00, 500V AC) — required for any work within 18" of live parts, even if breaker is off (capacitive coupling risk).
Skip the "voltage tester pen" gimmicks — they’re unreliable for final verification. Spend $35 on a real multimeter instead.
H2: What About Low-Voltage Work? Yes — That *Can* Be Done Live
Unlike 120V AC, low-voltage lighting (12V or 24V DC) used in under-cabinet strips, landscape lighting, or display cases poses negligible shock risk *if properly isolated*. But caution remains: cheap LED drivers can leak AC onto DC lines, and shorting outputs can melt wires or ignite insulation.
Always disconnect the driver’s AC input *before* working on DC side — but you *can* test output voltage with power applied to verify driver function. Use a multimeter on DC scale, confirm stable voltage (±5%), and check polarity before connecting strips.
For plug-in low-voltage adapters (e.g., 12V/3A wall warts), unplug *first*. These lack isolation safeguards — touching output terminals while plugged in risks shock if internal capacitor fails.
H2: Cost, Time & Code Reality Check
Replacing a single outlet or switch takes 12–22 minutes for first-time DIYers (Home Depot Pro Services Benchmark, Updated: April 2026). Labor cost for an electrician averages $135–$210/hour — so a $75 service call just to swap one device rarely pencils out. But code compliance isn’t optional: local inspectors routinely reject permits if outlets lack AFCI/GFCI where required, or if boxes are overfilled (>18 cu in for 14-gauge, per NEC Table 314.16(A)).
Here’s how common replacement scenarios compare:
| Task | Time (Beginner) | Tools Required | Code Risk if Done Wrong | Pro Tip |
|---|---|---|---|---|
| Standard outlet replacement | 15–20 min | Multimeter, screwdriver, wire stripper | Fire (loose neutral), shock (ungrounded metal plate) | Always pigtail neutrals — never daisy-chain under one screw |
| Smart switch install (with neutral) | 18–25 min | Multimeter, screwdriver, label maker | Non-compliance (NEC 404.22), voided warranty | Label LINE/LOAD wires *before* removing old switch |
| Dimmer switch for LED load | 20–30 min | Multimeter, dimmer compatibility chart | Flicker, premature LED failure, overheating | Verify minimum load — many LEDs draw <2W; dimmer needs ≥10W |
| GFCI outlet install (downstream protection) | 25–35 min | Multimeter, wire nuts, tester | No protection (miswired LOAD), nuisance tripping | Test GFCI *after* each downstream device is reconnected |
H2: Final Reality Check: Your Home Isn’t a Lab
Electrical systems vary wildly: knob-and-tube, aluminum, SEU cable, BX armor, NM-B, UF, or THHN in conduit. Age, moisture, rodent damage, and prior DIY hacks change everything. What works in a 2018 tract home may be lethal in a 1940 brick bungalow.
If your outlet box is metal and ungrounded, or if wires feel brittle or coated in chalky oxidation, stop. That’s not a $12 part swap — it’s a system evaluation. Refer to our complete setup guide for inspection checklists, permit requirements by ZIP code, and licensed pro matching.
Bottom line: You don’t need to turn off the *main* power — but you *must* turn off the *right* breaker, verify zero voltage, and respect material limits. Do that, and you’ll upgrade safely, legally, and confidently — every time.