Low Voltage Lighting Installation for Accent and Task Areas
- 时间:
- 浏览:19
- 来源:Easy Home Repair & DIY Guides
H2: Why Low Voltage Lighting Makes Sense for Accent and Task Areas
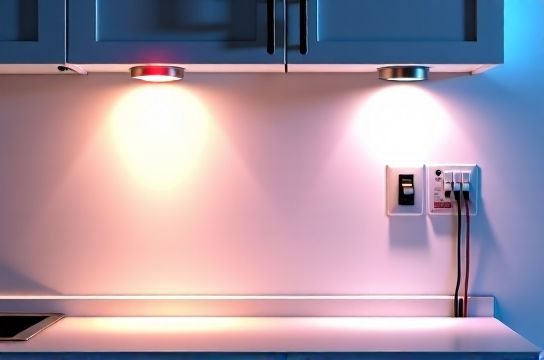
Low voltage lighting (typically 12V or 24V DC) is the go-to solution when you need precise, controllable illumination without the risks or complexity of line-voltage (120V AC) circuits. It’s especially effective for highlighting artwork, under-cabinet task zones, stair treads, shelving, or kitchen backsplashes — places where brightness must be localized, glare minimized, and heat output kept low.
Unlike standard overhead fixtures, low voltage systems use a transformer or driver to step down household voltage safely. That means lower shock risk, easier mounting (no junction box required behind every fixture), and greater design flexibility. But don’t mistake "low voltage" for "low complexity." Poor planning still leads to flickering, uneven output, overheating drivers, or tripped breakers upstream — especially when mixing with smart controls or shared circuits.
H2: Core Components & What You’ll Actually Use
Every functional low voltage lighting system has four essential parts:
• Power source: UL-listed Class 2 transformer or constant-voltage LED driver (e.g., Mean Well HLG-60H-12A). Output must match your lamp’s voltage and total wattage demand — plus a 20% headroom margin (Updated: April 2026).
• Wiring: Stranded 12–16 AWG copper wire rated for wet/dry locations (e.g., SPT-2 or THHN in conduit). Solid-core wire is a hard no — it fractures at bends and fails under vibration.
• Fixtures: LED tape lights, puck lights, linear channels, or recessed aperture spots. All must share the same voltage (12V or 24V) and be rated for continuous duty — not just “decorative” or non-UL listed imports.
• Controls: Dimmers, smart switches, or relay modules that are explicitly compatible with low voltage DC loads. Standard incandescent dimmers will destroy LED drivers.
H2: Realistic Installation Workflow — No Guesswork
Forget YouTube tutorials that skip grounding checks or assume your wall cavity is empty. Here’s how pros do it — adapted for DIYers who’ve never turned off a breaker before.
H3: Step 1 — Verify Circuit Capacity & Isolate Power
Before touching a wire, locate the correct circuit breaker. Labeling is often wrong — test with a non-contact voltage tester *at the fixture location*, not just the panel. Confirm zero voltage on both hot and neutral conductors. Then, tag the breaker with tape and a note: "LOW VOLTAGE INSTALL — DO NOT RESET."
Why this matters: Overloading a 15A circuit with multiple drivers + other loads (e.g., a fridge or bathroom fan on the same leg) causes nuisance trips. A single 12V/60W LED strip draws ~0.5A at 120V input — but five strips on one driver can draw 2.5A *just from the primary side*. Add in a smart switch, USB outlet, or nearby receptacle load, and you’re flirting with 80% continuous load — the NEC limit for residential circuits (NEC 210.19(A)(1), Updated: April 2026).
H3: Step 2 — Mount & Secure the Driver/Transformer
Mount drivers in open-air, ventilated spaces — never inside insulation, ceiling tiles, or enclosed cabinets. Surface-mount metal enclosures with thermal cutoffs (e.g., Philips Advance Xitanium) are preferred over plastic plug-in “wall warts.”
If installing in an attic or garage, use a weatherproof NEMA 3R enclosure. Drivers generate heat: a 100W unit runs ~65°C surface temp. Enclosing it traps heat and cuts lifespan by up to 50% (Luminous Group thermal aging study, Updated: April 2026).
H3: Step 3 — Run Low Voltage Wiring With Voltage Drop in Mind
Voltage drop is the 1 cause of dim ends, color shift, or inconsistent dimming. For 12V systems, keep runs under 16 feet (5 m) without boosting. At 24V, you can stretch to ~33 feet (10 m) — but only if using 14 AWG or thicker wire.
Use this rule of thumb: If your longest run exceeds 80% of the max recommended length, parallel-wire from both ends (a “home-run loop”) or add a local boost point. Never daisy-chain more than three 12V tape segments without recalculating drop.
H3: Step 4 — Connect Fixtures Using Proper Polarity & Termination
LEDs are polarity-sensitive. Reversed connections won’t light — and may damage the driver. Always mark (+) and (–) on your wire ends with red/black heat-shrink or tape *before* stripping.
For tape lights: Use solderless clamp connectors rated for your tape width (e.g., 10mm or 8mm) — not alligator clips or friction-fit adapters. Crimp, then solder, then insulate with dual-wall heat shrink (adhesive-lined).
For puck lights: Match wire gauge to load. A 3W puck draws ~0.25A at 12V — 18 AWG is acceptable *only* for runs under 10 ft. Go to 16 AWG if feeding 4+ pucks from one run.
H2: Integrating Smart Switches & Dimmers — Without Flicker or Failure
You *can* use smart switches with low voltage lighting — but only if they control the *primary (120V) side* of the driver, not the 12V output. Attempting to place a Lutron Caseta PD-6ANS or TP-Link Kasa HS220 on the 12V side will result in immediate driver failure.
Instead, install the smart switch upstream — replacing the standard wall switch that feeds the driver’s AC input. Ensure the switch is rated for inductive or electronic low-voltage loads (check manufacturer datasheet; many “universal” smart switches list minimum load requirements as high as 25W — too much for a single 12W driver). If your driver draws <20W, use a Lutron PD-5NE (designed for <10W loads) or pair with a neutral-wire bypass resistor (sold separately, UL-recognized).
Dimming adds another layer. Not all 12V LED tapes are dimmable — check packaging for “PWM dimmable” or “0–10V compatible.” And your driver must match: a non-dimmable driver + dimmer = either no dimming or catastrophic failure.
For smooth, silent dimming, use a trailing-edge (electronic low-voltage) dimmer like the Leviton D25-DLZ or Lutron DVCL-153P. Avoid leading-edge (incandescent) dimmers entirely.
H2: Troubleshooting the Most Common Failures
H3: Lights Flash or Flicker Intermittently
First, rule out power supply issues. Measure DC output with a multimeter: stable 12.0–12.6V (for 12V) or 23.8–24.6V (for 24V) under load. If voltage sags >0.5V when lights turn on, your driver is undersized or overheating.
Second, inspect connections. Loose splices in wire nuts (on the AC side) or cold solder joints (on DC side) cause micro-interruptions. Re-terminate any connection made with push-in “backstab” outlets — they fail under thermal cycling.
Third, check for shared neutrals. If your lighting circuit shares a neutral with another circuit (common in older homes), current imbalance trips AFCI/GFCI breakers unpredictably — even with low voltage loads downstream. Use a circuit tracer and clamp meter to verify dedicated neutral continuity.
H3: Breaker Trips Immediately After Power-On
This isn’t about the low voltage side — it’s almost always an AC-side fault. Common culprits:
• Shorted driver input (test resistance between hot/neutral terminals — should be >100kΩ) • Ground fault in AC wiring (check for nicked sheathing near staples or boxes) • Overloaded shared circuit (see earlier capacity check) • Moisture ingress in outdoor-rated drivers mounted without drip loops
Never reset a breaker more than once without diagnosis. Repeated resetting degrades internal contacts and increases fire risk (NFPA 70E Table 130.5(C), Updated: April 2026).
H3: One Side of Tape Light Is Dimmer Than the Other
Classic voltage drop. Confirm wire gauge and run length. Also check for accidental series wiring — some tape reels have cut marks that mislead users into thinking segments are independent when they’re actually wired in series internally. Read the spec sheet: most 12V tapes are *parallel-cut only* — cutting elsewhere breaks the circuit.
H2: Safety First — Non-Negotiable Rules for Beginners
• Always de-energize and verify *both* hot and neutral before working — even on low voltage circuits. Backfeed from miswired multi-wire branch circuits has killed DIYers.
• Never use extension cords or power strips to feed drivers. They’re not rated for continuous 24/7 operation and lack thermal protection.
• Replace old aluminum wiring or knob-and-tube before adding new loads. Aluminum-to-copper pigtails require COPALUM crimps — wire nuts alone are a fire hazard (CPSC Alert 12-02, Updated: April 2026).
• If your home was built before 1980 and lacks a grounding conductor in outlets, do *not* install smart switches or GFCI-protected lighting without upgrading the circuit — retrofitting ground wires is permitted by NEC 250.130(C), but requires professional verification.
• Store spare fuses and breaker labels. A labeled panel saves hours during emergencies — and helps landlords and tenants avoid confusion during renter-led upgrades like租客灯具改造.
H2: When to Call a Licensed Electrician
DIY is viable for discrete, isolated low voltage installations — but cross certain lines, and code compliance vanishes:
• Adding new circuits (running new 120V cable from panel) • Modifying main service panels or subpanels • Installing lighting in damp/wet locations (e.g., covered patios, bathrooms) without proper IP65+ rated drivers and fixtures • Any work involving gas lines, structural framing, or fire-rated assemblies
Also — if your breaker trips repeatedly *after* confirming load and connections, suspect hidden faults: rodent-chewed cables, corroded underground conduit, or failing panel bus bars. These require thermal imaging and megohmmeter testing — tools beyond beginner scope.
H2: Cost & Time Comparison: DIY vs. Pro Installation
The table below reflects 2026 regional averages for a typical under-cabinet accent lighting project (24 ft of 12V tape, 3 puck lights, one smart switch, and driver):
| Item | DIY Cost (USD) | Pro Cost (USD) | Time Required | Key Risks / Trade-offs |
|---|---|---|---|---|
| Materials Only (driver, tape, wire, switch, boxes) | $142–$218 | N/A | N/A | Import drivers may lack UL listing; non-certified tape emits hazardous VOCs when overheated |
| DIY Labor (self-performed) | $0 | N/A | 6–10 hrs | Higher chance of voltage drop, poor dimming, or future breaker trips due to learning curve |
| Pro Installation (licensed, insured) | N/A | $580–$940 | 3–5 hrs | Includes permit, inspection, 2-yr labor warranty, and NEC-compliant documentation |
Note: Prices reflect national median (Angie’s List + HomeAdvisor 2026 Contractor Survey, Updated: April 2026). Labor rates vary widely: $65/hr in rural Midwest vs. $135/hr in SF Bay Area.
H2: Final Checklist Before Power-Up
✅ Driver securely mounted, ventilated, and labeled with input/output specs ✅ All AC wiring tightened to torque spec (e.g., 18 in-lbs for 14 AWG on terminals) ✅ DC polarity verified end-to-end with multimeter continuity test ✅ No exposed copper beyond terminal blocks or solder points ✅ Smart switch configured per manufacturer instructions (no default settings) ✅ Breaker labeled clearly: "KITCHEN UNDER-CABINET LIGHTS — 12V SYSTEM" ✅ Spare 3A and 5A fuses on hand (most drivers use slow-blow fuses)
If you’re unsure about any item — pause. Re-read the driver manual. Watch the UL file number (e.g., E156191) on the label, then search it at https://iq.ul.com — it confirms real-world certification, not just marketing claims.
H2: Next Steps & Where to Go Deeper
You now know how to plan, wire, troubleshoot, and safely energize low voltage lighting for accent and task applications — with zero assumptions about prior experience. This foundation applies directly to related upgrades like 吸顶灯更换安装, 智能开关接线, 空开跳闸复位, 调光开关布线, led节能灯升级, 吊扇固定安装, 插座面板替换, 灯光闪烁排查, 家庭用电安全, 低压灯带安装, 插头转换器使用, and 租客灯具改造 — all part of a cohesive, safety-first approach to residential electrical modernization.
For a complete setup guide covering permits, labeling standards, and multi-zone smart control wiring diagrams, visit our full resource hub at /.