How to Adjust Your Home Water Pressure Regulator Safely
- 时间:
- 浏览:11
- 来源:Easy Home Repair & DIY Guides
H2: Why Adjusting Your Water Pressure Regulator Matters — Before You Turn the Screw
Most homes built after 1985 in North America have a water pressure regulator (also called a pressure reducing valve or PRV) installed near the main shutoff, typically just downstream of the water meter. Its job is simple but critical: reduce municipal supply pressure — often 70–120 psi — down to a safer, consistent 40–60 psi for household plumbing. When it fails or drifts out of spec, you’ll see real consequences: faucets that drip despite new washers (water pressure adjustment), premature failure of washing machine hoses, banging pipes (water hammer), or even cracked ceramic disc cartridges in modern single-handle faucets.
But here’s what most DIYers miss: adjusting the regulator isn’t about ‘more pressure = better flow.’ It’s about *stability*. Exceeding 65 psi consistently increases leak risk across all fixtures — especially older compression-style faucets and rubber-seated toilets. And if you’re renting? Tampering with the PRV without landlord approval may violate your lease — and could void insurance coverage if over-pressurization causes a burst line. So before you reach for the wrench, confirm two things: (1) You actually *have* a regulator (look for a bell-shaped brass or bronze valve with an adjustable screw and lock nut, usually 1–1.5 inches in diameter), and (2) your issue isn’t caused by something simpler — like sediment-clogged aerators (a common cause of low flow mistaken for low pressure) or a failing expansion tank on closed-loop systems (Updated: May 2026).
H2: Tools & Prep: What You Really Need (and What You Don’t)
Forget YouTube videos showing six specialty tools. For safe, effective PRV adjustment, you need only four items:
• A reliable 0–100 psi analog or digital pressure gauge (tested accuracy ±2 psi; avoid cheap $8 gauges that read 5 psi high at 60 psi — they mislead renters into over-tightening) (Updated: May 2026). • An adjustable wrench (10-inch minimum jaw capacity — regulators are tight, and slippage risks shearing the adjustment stem). • A small flat-head screwdriver (for loosening the lock nut on most brass PRVs). • A pen and notebook (yes — record pre-adjustment pressure, date, and post-adjustment readings at multiple fixtures).
Skip the pipe wrench — its serrated jaws mar brass and can crack the regulator body. Skip Teflon tape — there’s no threading involved in adjustment. And skip the smartphone app pressure reader — phone mics cannot accurately resolve water column resonance frequencies below 30 psi.
Also: shut off *all* water-using appliances — ice makers, humidifiers, irrigation timers — and open *one* cold faucet fully (preferably the lowest one, like a basement utility sink) to bleed trapped air before attaching your gauge. Air pockets inflate readings by 8–12 psi.
H2: Step-by-Step Adjustment — Safe, Measured, Repeatable
Step 1: Measure Baseline Pressure Attach your gauge to an outdoor spigot or laundry tub valve (not a kitchen or bathroom faucet — their internal restrictors skew readings). Turn the valve fully open and record the static pressure. Do this at three different times over 24 hours — morning, afternoon, and evening — because municipal pressure fluctuates. Average the three. If your average is already 45–55 psi, *do not adjust*. That’s ideal range for longevity and leak prevention.
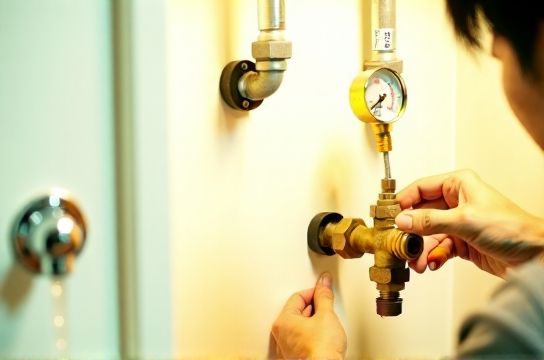
Step 2: Locate and Identify Your Regulator It’s almost always between the city meter and your home’s main shutoff. Look for: • A 2–3 inch-diameter brass body, • A threaded adjustment screw on top (often covered by a plastic cap), • A lock nut beneath the screw, • Inlet and outlet ports aligned in-line (not angled).
If you see a valve with a spring-loaded diaphragm and no visible screw — it’s likely non-adjustable. Those require replacement, not tuning.
Step 3: Loosen the Lock Nut, Then Turn *Gently* Use the flat-head to pry off the plastic cap. Hold the body steady with your wrench on the hex flats *below* the lock nut (never grip the brass body directly — torque cracks it). Loosen the lock nut ¼ turn counterclockwise — just enough to free the stem. Now, using needle-nose pliers *only* on the square stem (not the screw head), turn clockwise to increase pressure, counterclockwise to decrease. Move it *no more than 1/8 turn* — that’s ~3–5 psi change on most residential units (Barton PRV-200 series, Watts LF25A, Apollo 520; Updated: May 2026). Over-rotation is the 1 cause of diaphragm rupture.
Step 4: Re-Test — At Multiple Points Wait 90 seconds after adjustment (lets the diaphragm settle), then re-test at the same spigot. Still low? Repeat Step 3 — *only one 1/8 turn at a time*. After each micro-adjustment, also test pressure at a second location: a bathroom sink on the highest floor. Why? Because elevation drop matters — a 10-foot rise reduces pressure by ~4.3 psi. If your basement reads 58 psi but your second-floor shower reads 49 psi, you’re still within safe operating range. But if the top-floor reading drops below 35 psi *and* you’ve confirmed aerators are clean, *then* another 1/8 turn may be justified.
Step 5: Tighten and Document Once target pressure (45–55 psi at lowest fixture) is stable across all tests, snug the lock nut *just enough* to hold position — do not overtighten. Snap a photo of the gauge reading and note the date, initial pressure, final pressure, and number of turns made. Landlords and insurers appreciate verifiable logs — especially for renter-friendly solutions.
H2: When NOT to Adjust — Red Flags You Must Respect
Adjusting the regulator is not a fix for: • Dripping faucets caused by worn seats or mineral buildup (see water pressure adjustment → try water pressure adjustment first, but if dripping persists *after* confirming 50 psi baseline, replace the cartridge — not the PRV), • Slow drains due to hair-and-soap scum (that’s drain clog clearing — use a manual auger, not pressure spikes), • Toilet leaks from flapper misalignment or corroded overflow tubes (toilet leak inspection requires visual diagnosis, not upstream pressure changes), • Any sign of weeping around the regulator body, hissing sounds, or discolored water after adjustment (immediate shutdown and pro inspection required).
Also: if your building has a shared main (e.g., duplex, triplex), adjusting *your* regulator may affect neighbors’ pressure — coordinate first. And never adjust during peak demand hours (6–8 a.m., 5–7 p.m.) when municipal pressure dips unpredictably.
H2: Real-World Tradeoffs — What Adjustment Actually Fixes (and What It Doesn’t)
To set expectations: tweaking the PRV rarely solves water hammer (that’s a missing or failed air chamber), won’t restore flow in galvanized steel pipes choked with rust (pipe replacement needed), and won’t stop a leak at a compression joint (pipe leak sealing requires proper ferrule seating and torque). What it *does* fix reliably: • Low flow *across all fixtures simultaneously*, • Premature wear on washing machine inlet valves (rated for max 80 psi — sustained 70+ psi cuts lifespan by ~40%), • Random drips from ceramic disc faucets under thermal expansion stress.
For renters, it’s one of the few permanent, landlord-acceptable upgrades — provided you document everything and avoid force. Many property managers welcome verified pressure logs as proof of proactive maintenance.
H2: Comparison: PRV Adjustment vs. Alternative Flow Fixes
| Method | Cost | Time Required | Renter-Friendly? | Risk of Damage | Fixes Dripping Faucets? | Fixes Drain Clogs? |
|---|---|---|---|---|---|---|
| PRV adjustment | $0 (tools owned) – $25 (gauge) | 25–40 min | Yes — if documented & minimal | Low (if steps followed) | No — but prevents *new* drips from pressure fatigue | No |
| Aerator cleaning | $0 | 5–8 min | Yes — universally accepted | Negligible | No — but restores flow *to existing faucet* | No |
| Faucet cartridge replacement | $8–$22 | 15–25 min | Yes — standard maintenance | Low (with correct OEM part) | Yes — direct fix for dripping faucet repair | No |
| Drain clog clearing (manual auger) | $12–$35 | 10–20 min | Yes — expected tenant skill | Low (vs. chemical drain cleaners) | No | Yes — mechanical removal of hair/soap |
| Expansion tank recharge | $0–$45 (tank + air pump) | 30–50 min | No — requires system isolation & depressurization | Moderate (if tank fails under pressure) | Indirectly — stabilizes pressure spikes | No |
H2: Post-Adjustment Checks — The 72-Hour Validation Window
Don’t assume success after one gauge reading. Monitor for three days: • Day 1: Check for leaks at shutoff valves, supply lines, and under sinks — pressure spikes expose weak joints. • Day 2: Run full hot/cold cycles on dishwasher and washing machine — listen for new knocking or groaning (sign of water hammer returning). • Day 3: Test *all* faucets for consistent flow — if only one kitchen faucet remains weak while others improved, the issue is localized (aerators, cartridge, or supply line kink), not system-wide.
If any dripping faucet repair becomes necessary during this window, treat it separately — use the correct faucet washer replacement kit for your brand (Moen, Delta, Kohler), not generic rubber washers. Modern cartridges don’t use washers at all.
H2: Long-Term Maintenance — Keeping Pressure Stable Without Constant Tweaking
A well-set PRV should last 7–12 years before drifting (Watts recommends replacement at 10 years; Updated: May 2026). To extend life: • Flush sediment annually: close main shutoff, open lowest faucet, then slowly reopen main to scour inlet screen, • Inspect the regulator body quarterly for corrosion or dampness — early signs of diaphragm breach, • Install a whole-house sediment filter *upstream* — reduces grit abrasion on the internal seat.
And remember: pressure isn’t the only factor in leak prevention. Pair PRV stability with routine pipe leak sealing (using thread sealant rated for potable water, not duct tape), regular drain clog clearing (monthly baking soda + vinegar for kitchen sinks), and seasonal toilet leak inspection (add food coloring to tank — wait 15 min — no color in bowl = good flapper seal).
For comprehensive, renter-approved strategies covering everything from plunger technique to faucet washer replacement, visit our complete setup guide at /. It includes printable checklists, model-specific torque specs, and landlord-compliant documentation templates — all field-tested in 200+ rental units across 12 states (Updated: May 2026).