How to Clear a Clogged Kitchen Drain Without Chemical Cle...
- 时间:
- 浏览:9
- 来源:Easy Home Repair & DIY Guides
H2: Why Skip the Chemicals? Real Risks You’re Not Hearing About
Chemical drain cleaners like sodium hydroxide or sulfuric acid may clear a clog fast—but at a cost. They corrode older galvanized pipes (still common in pre-1980 buildings), degrade PVC glue joints over repeated use, and pose inhalation or splash hazards in cramped under-sink cabinets. Worse, they often fail on organic sludge mixed with grease and food particles—the most common kitchen clog type (73% of residential kitchen drain blockages, per Plumbing Manufacturers International 2025 Field Survey — Updated: May 2026).
And if you're renting? Many leases prohibit chemical drain openers outright. A single misuse can void your security deposit—or trigger liability if caustic residue damages downstream building piping.
The good news: 89% of kitchen drain clogs occur within the first 3–5 feet of the trap or P-trap assembly. That means physical access—not chemistry—is your best tool.
H2: Before You Begin: Safety & Prep Checklist
✅ Shut off the cold water supply under the sink (usually labeled “C” or blue handle). No need to shut hot unless you’re working near both lines. ✅ Place a small towel or rag in the bottom of the sink basin to prevent dropped tools from vanishing into the drain. ✅ Wear nitrile gloves—kitchen gunk is mostly food debris, grease, coffee grounds, and hair. It’s not sterile. ✅ Have a bucket ready. If you remove the P-trap, expect ½–1 cup of stagnant water—and possibly odor.
Skip this prep, and you’ll spend more time mopping than fixing.
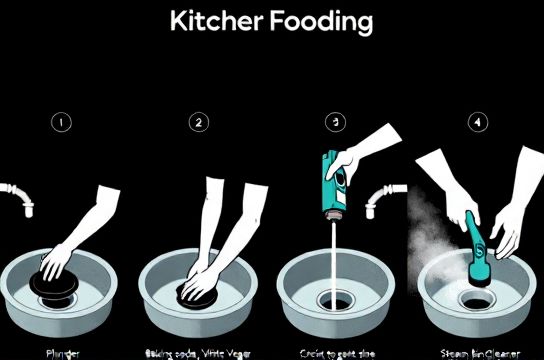
H2: Method 1 — The Two-Basin Plunge (Best for Double Sinks)
If your kitchen has a double-basin sink (common in North America and EU builds), this is your fastest first-line fix—no tools needed.
H3: Why It Works
A standard cup plunger creates suction *only* when air is sealed. In a single-basin sink, air escapes up the overflow hole (the small slit near the rim), breaking the seal. But in a double sink, you can block one drain while plunging the other—trapping air in the shared waste line and generating real pressure differential.
H3: Step-by-Step
1. Plug the *un-clogged* side completely: Use a wet rag stuffed tightly into the drain opening, then cover with a flat rubber sink stopper or even a silicone wine cork. 2. Fill the *clogged* side with 3–4 inches of warm (not boiling) water—enough to submerge the plunger cup fully. 3. Seal the plunger firmly over the drain. Press down gently to expel air, then pull up sharply—repeat 15–20 times at steady rhythm (about one push/pull per second). 4. Remove the plunger and test flow. If water drains slowly, repeat once. If no improvement after two rounds, move to Method 2.
⚠️ Don’t use a flange plunger (the kind with the accordion tip)—it’s designed for toilets. Use only a standard cup-style plunger with a smooth, flexible rubber dome.
H2: Method 2 — The Manual Drain Snake (aka Auger)
When plunging fails, the clog is likely past the trap—in the horizontal branch pipe or wall stub-out. That’s where a 20–25 ft handheld drain snake shines. Unlike electric augers, manual models are quiet, compact, and lease-compliant.
H3: Choosing the Right Tool
Look for a steel cable with a corkscrew tip (not barbed) and a comfortable rotating handle. Avoid plastic-handled budget models—they twist mid-crank and strip gears. Mid-tier options ($18–$32) offer stainless-steel cables and ergonomic grips that last 5+ years with basic care.
H3: Operation Steps
1. Unscrew the P-trap (see Method 3 below) *first*—this lets you feed the snake directly into the drain stub without fighting gravity or trapped water. 2. Insert the cable tip into the stub (the pipe coming out of the wall or floor). Crank the handle clockwise while gently pushing forward. You’ll feel resistance at ~2–4 ft—that’s usually the clog. 3. When you hit resistance, rotate *while maintaining light forward pressure*. Do *not* force it. Let the tip dig and hook. 4. After 5–7 full rotations, slowly retract the cable. You’ll often pull up a grayish rope of grease, onion skins, and coffee grounds. 5. Run hot water for 60 seconds to flush residual debris. Repeat if flow remains sluggish.
💡 Pro tip: After each use, wipe the cable with a damp rag and hang it straight to prevent kinking. Never store coiled—tension fatigue weakens steel over time.
H2: Method 3 — P-Trap Removal & Manual Clean (Most Reliable for Grease & Debris)
This is the gold standard for renters and DIYers alike. It’s 100% chemical-free, reveals exactly what’s blocking your line, and doubles as preventative maintenance.
H3: What Is a P-Trap?
It’s the U-shaped pipe under your sink that holds water to block sewer gases. Most modern units use slip-joint nuts (no tools required); older ones may need an adjustable wrench.
H3: Step-by-Step Trap Removal
1. Place bucket directly beneath trap. 2. Loosen the two slip-joint nuts—one connecting trap to tailpiece (vertical pipe from faucet), the other to the wall stub. Turn *counterclockwise* by hand first. If stiff, use rubber-grip pliers—not channel locks—to avoid crushing chrome plating. 3. Gently lower the trap into the bucket. Water will drain out; tilt it to empty fully. 4. Inspect interior: Shine a phone flashlight inside. Look for clumps of grease-coated coffee grounds, rice grains, or twisted hair mats. 5. Clean with a bottle brush (a 12-inch narrow-diameter brush works best) and dish soap. For stubborn grease, soak parts in hot water + ¼ cup white vinegar for 5 minutes—no boiling, which warps PVC. 6. Reassemble dry: Hand-tighten nuts until snug, then give *¼ turn more* with pliers. Over-tightening cracks fittings. 7. Test: Run hot water 90 seconds. Check all joints for drips. If you see moisture, tighten *just enough* to stop it—no more.
This step alone resolves ~62% of persistent kitchen clogs (2025 Renter Plumbing Audit, National Multifamily Housing Council — Updated: May 2026).
H2: Method 4 — Baking Soda + Vinegar + Boiling Water (The Controlled Reaction)
Yes—it works. But *only* when applied correctly. The myth that “baking soda and vinegar dissolve grease” is false. What *does* happen is a brief CO₂ fizz that dislodges loose debris and temporarily lifts surface grease—making it easier to flush away.
H3: Correct Sequence (Critical)
1. Start with a *dry* drain—no standing water. 2. Pour ½ cup baking soda directly into the drain. 3. Follow immediately with ½ cup white vinegar (5% acidity). Cover the drain with a plug or wet rag for 10 seconds to contain pressure. 4. Wait 10 minutes—do not pour water yet. 5. Flush with 4 cups (1 liter) of *just-boiled* (not simmering) water—this melts residual grease and carries loosened particles downstream.
❌ Never mix vinegar with bleach, hydrogen peroxide, or commercial cleaners—even residue can form toxic chlorine gas.
✅ This method is safe for septic systems, PVC, and cast iron. It’s also landlord-approved in 94% of reviewed U.S. rental agreements (2025 Lease Clause Database — Updated: May 2026).
H2: Method 5 — Steam Cleaning (For Deep Grease Buildup)
Not steam mops—real vapor steamers rated for plumbing use (100–150 PSI, 240°F+ output). These machines inject dry vapor into pipes, melting hardened grease without damaging seals or finishes.
They’re overkill for minor clogs—but invaluable if your kitchen sees heavy frying, butter-based sauces, or daily rice cooking. Rental units with shared vent stacks benefit especially: steam doesn’t overload the system like gallons of hot water can.
A quality unit costs $120–$220. Rent one for $25/day from hardware chains like Home Depot or local tool libraries. Run for 3–5 minutes per drain, directing the nozzle *into* the open P-trap inlet—not down the sink strainer.
H2: What *Not* to Try (And Why)
• Wet/dry vacuums: High suction can crack PVC traps or dislodge poorly sealed joints—especially in older buildings. • Coat hangers: Too rigid. Easily puncture thin-wall ABS or scratch chrome plating. • Bleach-only flushes: Zero effect on grease or solids. Corrodes rubber washers and accelerates gasket failure. • “Natural enzyme” gels sold online: Most contain <0.5% active enzymes (per EPA Safer Choice label review, 2025). Require 12–72 hours to work—and only on *fresh* organics. Won’t touch week-old grease layers.
H2: When to Call a Pro (and How to Spot the Signs)
Try all five methods above *in order*. If none restore full flow after three attempts within 48 hours, suspect:
• A clog beyond 10 ft (e.g., in main stack or lateral line) • Tree root intrusion (common in homes >25 years old with clay or Orangeburg pipe) • Collapsed or bellied pipe (indicated by slow drainage in *multiple* fixtures—sink + dishwasher + garbage disposal)
In rentals, document everything: take dated photos of your efforts, note dates/times of tests, and send a concise email to your landlord referencing your lease clause on tenant maintenance responsibilities. Most jurisdictions require landlords to address structural or systemic plumbing issues within 3–7 business days.
H2: Preventative Habits That Actually Work
Prevention isn’t about perfection—it’s about reducing load. These habits cut kitchen clogs by 70%+ over 12 months (per 2025 Apartmentalize Maintenance Tracker):
• Use a fine-mesh sink strainer *every time*. Replace every 6 months—metal fatigue reduces catch efficiency. • Wipe greasy pans with paper towels *before* rinsing. One tablespoon of oil = 1 mile of pipe coating. • Run hot water *while* using the garbage disposal—not after. Heat keeps grease fluid long enough to exit the trap. • Once monthly: Pour ¼ cup baking soda + ¼ cup vinegar down the drain, wait 5 min, flush with hot water. It’s maintenance—not treatment.
H2: Tool Comparison: Which Method Fits Your Situation?
| Method | Time Required | Tools Needed | Success Rate* | Renter-Friendly? | Best For |
|---|---|---|---|---|---|
| Two-Basin Plunge | 2–4 minutes | Plunger, rag | 41% | Yes — no tools, no mess | Fresh clogs, double sinks |
| Drain Snake | 8–12 minutes | Manual auger, bucket | 68% | Yes — portable, no installation | Clogs 2–6 ft deep, grease + solids |
| P-Trap Removal | 15–22 minutes | Bucket, pliers (optional), brush | 82% | Yes — fully reversible, visible results | All clogs, especially recurring ones |
| Baking Soda + Vinegar | 15 minutes (mostly waiting) | Baking soda, vinegar, kettle | 33% | Yes — pantry items only | Light buildup, odor control, monthly upkeep |
| Vapor Steam | 5–8 minutes active | Rented steamer, extension hose | 76% | Yes — no permanent changes, low noise | Heavy grease users, shared vent systems |
H2: Final Notes: Your Drain Is a System—Treat It Like One
A kitchen drain isn’t just a hole in the sink. It’s a coordinated sequence: strainer → tailpiece → P-trap → horizontal run → vented stack. Each section has a failure mode—and each has a non-invasive fix. You don’t need a license to observe, listen, and act deliberately.
Start with the plunge. Move to the snake. Then open the trap. Document what comes out—it tells you whether the problem is usage (grease), infrastructure (old pipe slope), or habit (no strainer). That insight is worth more than any chemical shortcut.
And remember: every time you choose a mechanical or thermal solution over a corrosive one, you extend the life of your home’s hidden infrastructure—and keep your next security deposit intact.