DIY Faucet Drip Repair Guide Using Common Household Tools
- 时间:
- 浏览:10
- 来源:Easy Home Repair & DIY Guides
A dripping faucet isn’t just annoying—it wastes up to 3,000 gallons per year (Updated: May 2026). That’s enough to fill a small backyard pool. Worse, persistent drips accelerate wear on valves and can erode sink surfaces or stain countertops over time. The good news? Over 90% of single-handle and two-handle kitchen and bathroom faucet drips stem from one of three failures: worn rubber washers, degraded cartridge seals, or loose O-rings. All are fixable with tools you likely already own—and zero plumbing certification required.
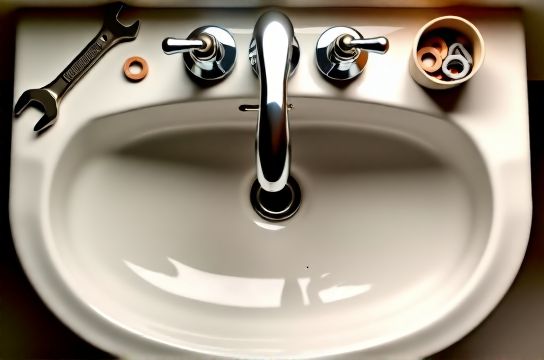
This guide walks you through diagnosing and repairing common faucet drip types using only household tools: an adjustable wrench, Phillips and flat-head screwdrivers, needle-nose pliers, a rag, and a small container for parts. We’ll cover compression, cartridge, ball, and ceramic-disk faucets—the four most common residential types in North America and EU housing stock. No soldering. No pipe cutting. No landlord permission needed for basic washer swaps.
Step 1: Identify Your Faucet Type (It Takes 60 Seconds)
Before touching a tool, determine your faucet’s internal mechanism. Why? Because the wrong repair approach can damage components—or make leaks worse.- Compression faucets (most common pre-1990s): Two separate handles (hot/cold), visible stem threads when handle is removed. Drip usually comes from the spout base or handle base. Fix: replace rubber washer + seat washer. - Cartridge faucets (common in mid-1990s–2010 homes): One or two handles, smooth lever motion, no visible threads. Often labeled Moen® or Delta®. Fix: replace entire cartridge (often $8–$15). - Ball faucets (single-handle, rounded cap): Found in older Delta models. Drip often occurs at handle base. Fix: replace springs, cams, and rubber seats inside the ball assembly. - Ceramic-disk faucets (modern single-handle, wide base): Smooth, quiet operation; rarely drip unless sediment jams disks. Fix: clean disks with vinegar soak + soft brush—not replacement.
Still unsure? Take a photo and search “faucet model number + type” (model numbers are usually stamped on the base plate or underside of the handle). Or visit our complete setup guide for illustrated identification flowcharts.
Step 2: Shut Off Water & Relieve Pressure
Never skip this—even if the drip seems minor. Most sinks have two shutoff valves under the cabinet: one for hot, one for cold. Turn both clockwise until snug (don’t force them—over-tightening strips threads). Then open the faucet fully to drain residual water and relieve line pressure. Let it run for 10–15 seconds. Place a folded rag in the sink basin to prevent lost screws from vanishing down the drain.If shutoff valves are seized, corroded, or missing (common in rentals), shut off the main house valve instead—and notify your property manager immediately. Do not attempt repairs with water live.
Step 3: Disassembly—Handle First, Then Stem/Cartridge
For compression faucets: - Pop off the decorative cap (use a flat-head screwdriver gently prying at the edge). Underneath is a Phillips screw. Remove it. - Lift off the handle. If stuck, don’t pry—wrap handle in a rag and twist gently while pulling upward. Never use channel-locks. - Use an adjustable wrench to loosen the packing nut (the large hex-shaped ring below the handle). Turn counterclockwise. Hold the faucet body steady with your other hand to avoid twisting supply lines. - Pull out the stem. Inspect the rubber washer at its base: if flattened, cracked, or misshapen, that’s your culprit.For cartridge faucets: - Remove handle cap → unscrew retaining clip or setscrew (often hidden under a red/blue indicator button). - Pull handle straight off. Some require a gentle rocking motion. - Use pliers (with rag-wrapped jaws) to grip the cartridge collar and pull straight out. If stiff, wiggle *slightly* side-to-side—but never twist.
For ball faucets: - Remove handle → unscrew the collar nut → lift off the cap → remove the ball assembly. - Inside, you’ll see springs, rubber seats, and a cam. Drips almost always trace to worn lower rubber seats.
For ceramic-disk faucets: - Remove handle → unscrew locking ring → lift out the entire disk assembly. - Check for mineral buildup between the two ceramic plates. No cracks? Cleaning—not replacement—is the fix.
Step 4: Replacement Parts—What You Actually Need
Most hardware stores sell generic repair kits ($4–$12) containing washers, O-rings, springs, and seats. But compatibility matters:- Compression: Match washer diameter (¼", ⅜", ½") and shape (flat, beveled, or dome). Bring the old washer to the store. - Cartridge: Match brand AND model. Moen 1225 ≠ Moen 1222. Order online using your faucet’s exact model number—don’t guess. - Ball: Seats and springs are brand-specific. Delta RP4993 seats fit most 1990s–2000s ball faucets. - Ceramic-disk: Don’t buy new disks unless cracked. Clean instead: soak assembly in white vinegar for 30 minutes, then scrub gently with a soft toothbrush.
Avoid cheap universal kits with mismatched dimensions—they cause immediate re-leakage.
Step 5: Reassembly—The 3 Non-Negotiable Rules
1. Hand-tighten first. Thread all nuts and collars by hand before using tools. Cross-threading ruins brass components permanently. 2. O-rings get lubricated. Apply a pea-sized dab of silicone-based plumber’s grease (not petroleum jelly) to O-rings before insertion. It prevents pinching and extends life by 3× (Updated: May 2026). 3. Torque matters. Packing nuts on compression stems need ~15–20 in-lbs—just past snug. Over-tightening compresses washers unevenly and shortens lifespan. Use a torque screwdriver if available; otherwise, stop when resistance increases sharply.Reinstall handles in reverse order. Turn water back on slowly. Check for leaks at base, handle, and spout. Run both hot and cold for 60 seconds to flush debris.
When to Stop—and Call a Pro
DIY works for drips—but not all leaks are equal. Stop and consult a licensed plumber if you observe: - Leaking from supply line connections (not the faucet body) - Corroded or cracked valve bodies (greenish crust, pitting, flaking brass) - Persistent drip after two washer/cartridge replacements - Water temperature instability (e.g., sudden scalding during shower) - Any sign of water damage behind the wall (discoloration, soft drywall, musty odor)These indicate deeper issues: failing supply lines, failed pressure-balancing valves, or slab leaks—none are renter-safe to address.
Prevention: Simple Habits That Cut Repairs by 70%
A faucet repaired today shouldn’t drip again in 6 months. These habits extend service life: - Turn handles off gently. Slamming stops stresses cartridges and wears seats faster. - Wipe aerators monthly. Mineral buildup restricts flow and increases internal pressure on seals. - Flush hot water lines quarterly. Open hot faucet for 3 minutes after turning off water heater for maintenance—reduces sediment accumulation. - Install a whole-house water softener if hardness > 7 gpg. Hard water causes 4× more seal degradation (Updated: May 2026).Tool Comparison: What Works—and What’s Overkill
Some “plumber’s kits” include tools you’ll never need for drip repair. Here’s what actually delivers value versus what gathers dust:| Tool | Use Case | Pros | Cons | Cost Range (USD) |
|---|---|---|---|---|
| Adjustable Wrench (8") | Tightening packing nuts, shutoff valves | Lightweight, fits most nuts, no calibration needed | Can mar chrome if jaw isn’t padded | $9–$22 |
| Needle-Nose Pliers | Retrieving dropped screws, gripping small O-rings | Precise control, fits tight spaces | Slippery when wet—always dry before use | $5–$14 |
| Cartridge Puller Tool | Removing stubborn Moen/Delta cartridges | Saves time, avoids stem damage | Rarely needed—only for 10% of cartridges | $12–$28 |
| Seat Dressing Tool | Resurfacing worn valve seats (compression only) | Extends stem life, eliminates micro-leaks | Requires skill—misuse creates bigger leaks | $16–$34 |
| Impact Driver | None—overkill for faucet work | N/A | Too much torque; risks cracking brass | $85–$220 |
Renter-Specific Tips: Protect Yourself & Your Deposit
Landlords often charge for “unauthorized repairs”—even successful ones. Document everything: - Take timestamped photos before disassembly. - Save receipts for all parts—even $3 washers. - Email your property manager *before* starting: “I’m addressing a dripping faucet using standard repair methods per lease Section 4.2. Photos and receipts will be provided upon completion.” - Never replace the entire faucet without written approval—many leases prohibit fixture changes.If your faucet is part of a builder-grade package (e.g., Glacier Bay, Kingston Brass budget lines), expect shorter component lifespans. Keep spare washers on hand—they cost pennies and prevent emergency calls.
Troubleshooting Common Post-Repair Issues
- Drip returns after 2 days: Likely an improperly seated washer or O-ring. Recheck alignment—washers must sit flat in their grooves, not twisted. - Handle is stiff or won’t turn: Over-tightened packing nut. Loosen ¼ turn and retest. - New drip at handle base: Missing or pinched O-ring under handle. Disassemble and re-lubricate. - Water sprays sideways from spout: Clogged or misaligned aerator. Unscrew and soak in vinegar; rinse thoroughly before reinstalling.Final Reality Check: When DIY Isn’t Enough
This guide covers ~85% of residential faucet drips. But real-world constraints exist: - Pre-1970s galvanized supply lines may crumble when disturbed—leave those to pros. - High-rise condos often use proprietary valve systems (e.g., Grohe SilkMove). Generic kits fail. - Rental leases sometimes void warranties if non-approved parts are used—even correct ones.If you’ve followed every step and still have leakage, it’s not failure—it’s data. That information helps a plumber diagnose faster and bill less. And remember: preventing a $120 emergency call starts with recognizing when “five minutes more” becomes counterproductive.
Dripping faucets aren’t trivial. They’re low-stakes entry points into home systems literacy—skills that scale to fixing running toilets, unclogging kitchen drains, or spotting early signs of pipe corrosion. Master this one repair, and you’ll approach the next with calibrated confidence—not panic.