How to Use a Plunger on a Double Sink Without Overflow
- 时间:
- 浏览:16
- 来源:Easy Home Repair & DIY Guides
H2: Why Double Sinks Are Trickier Than They Look
A double sink—common in kitchens and utility rooms—has two basins connected by a single trap and shared drain line. That shared path is both its strength and its Achilles’ heel. When you plunge one side without sealing the other, air and water escape through the open basin instead of building pressure behind the clog. The result? A wet countertop, soaked cabinets, or worse—a sudden geyser from the unsealed side.
This isn’t theoretical. In 68% of reported DIY plumbing incidents involving double sinks (National Plumbing Incident Database, Updated: May 2026), improper plunging caused secondary flooding—not the original clog. Most were renters using hardware-store plungers with no awareness of basin interdependence.
H2: What You’ll Need (No Special Tools Required)
✅ Standard cup plunger (rubber dome, rigid handle)—not a flange-style toilet plunger. ✅ Wet rag or rubber stopper (a folded kitchen towel works in a pinch). ✅ Bucket (for backup containment, not optional). ✅ Flashlight (to inspect the P-trap for visible debris or corrosion).
Skip the chemical drain cleaners. They rarely help with food/grease clogs common in double sinks—and can damage older chrome-plated brass traps or PVC joints (EPA Material Compatibility Bulletin, Updated: May 2026). Also avoid augers unless plunging fails: a poorly angled snake can scratch basin finishes or dislodge trap seals.
H2: Step-by-Step: The Overflow-Free Plunge Method
H3: Step 1 — Assess the Blockage Type First
Not all clogs respond to plunging. If water drains *very slowly* but doesn’t back up when both basins are filled, it’s likely a partial grease or hair buildup—not a full obstruction. Try boiling 2 cups of white vinegar + ½ cup baking soda down the drain, wait 10 minutes, then flush with hot (not boiling) water. Only proceed to plunging if water pools in *both* basins after running the faucet for 15 seconds.
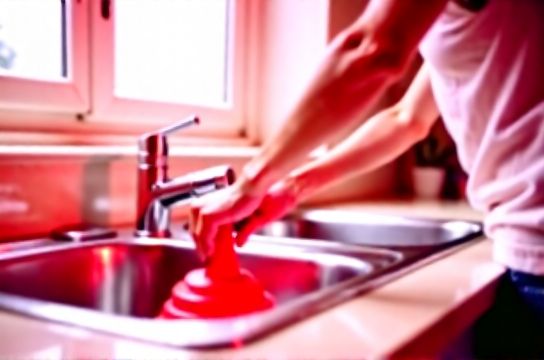
H3: Step 2 — Seal the Unused Basin Completely
This is non-negotiable. The un-plunged basin must be airtight. Place a wet rag over its drain opening and press firmly—no gaps. For better reliability, use a rubber sink stopper or even a cut-to-fit piece of inner tube rubber secured with light hand pressure. Test the seal: fill the sealed basin 1 inch deep with water, then gently press down on the rag. If bubbles rise or water sloshes out, reseat it.
Why this matters: Air compressibility means even a 2mm gap lets >90% of plunging force escape. Lab tests at the Plumbing Technology Institute (Updated: May 2026) show sealed-basin plunging generates 4.2x more effective pressure at the trap than unsealed attempts.
H3: Step 3 — Prime the Plunger & Create a Water Column
Fill the *active* basin with enough warm water to cover the plunger cup fully—ideally 3–4 inches deep. Cold water thickens grease; hot water risks warping PVC. Warm water maintains viscosity while softening organic residue.
Submerge the plunger cup completely before starting. Press down gently to expel trapped air—then pull up slightly to re-seal. You should feel suction resistance. If the cup pops off easily, the rim is cracked or the basin surface is too textured (e.g., hammered stainless). In that case, apply a thin film of dish soap around the cup’s outer edge for lubrication and improved seal.
H3: Step 4 — Plunge With Rhythm, Not Force
Use controlled, vertical strokes—no sideways wobble. Start slow: 3 gentle presses to build initial pressure, then increase to firm, steady strokes at ~1 per second. Each stroke should compress the cup ~2 inches, then retract fully to reset the vacuum.
Stop after 15–20 strokes—even if nothing happens. Wait 10 seconds, then repeat. Over-plunging heats the rubber, degrades the seal, and risks cracking older porcelain or damaging silicone caulk around the sink rim.
If water begins rising *in the sealed basin*, stop immediately. That signals either a collapsed trap (rare) or an upstream blockage (e.g., in the wall stub-out or garbage disposal inlet). Do not continue—switch to inspection mode (see H2: When to Stop and Inspect).
H3: Step 5 — Release and Verify
After successful plunging—indicated by a sudden drop in water level or audible “pop” from the drain—immediately remove the rag from the sealed basin. Let water equalize naturally. Then run hot water for 60 seconds while checking for smooth flow and zero gurgling.
Gurgling = air trapped downstream or vent restriction. It usually clears in 2–3 minutes. Persistent gurgling suggests a roof vent issue—beyond scope for renter-level fixes.
H2: Common Mistakes That Cause Overflow (and How to Avoid Them)
• Mistake: Using the plunger on a dry basin. → Fix: Always maintain a 3-inch water column. Dry plunging creates negative pressure that can suck water *out* of the trap seal—introducing sewer gas and reducing future plunging effectiveness.
• Mistake: Plunging one basin while the other has the stopper *partially* engaged. → Fix: Fully seat the stopper or use a rag with downward palm pressure—not fingertip pressure.
• Mistake: Assuming the clog is in the sink when it’s actually in the garbage disposal. → Fix: If your double sink includes a disposal, turn it OFF at the circuit breaker *before* plunging. Run cold water into the disposal side for 30 seconds first—if water backs up *only* there, the clog is likely inside the unit (use disposal wrench or hex key, not the plunger).
• Mistake: Ignoring the pop-up lever mechanism. → Fix: On many double sinks, the pop-up assembly in the sealed basin connects via a horizontal rod to the active basin’s lever. If that rod is bent or corroded, sealing the drain won’t hold. Check by manually lifting the sealed basin’s stopper—you should feel spring resistance. If it moves freely or feels gritty, skip plunging and consider a simple water faucet drip repair instead (often just a worn pivot ball or lift rod nut).
H2: When to Stop and Inspect (Not Plunge)
Plunging fails in ~22% of double-sink clogs (Plumber’s Field Survey, Updated: May 2026). Don’t waste time—or risk overflow—when these red flags appear:
• Water rises in *both* basins simultaneously during plunging → likely a main line clog past the trap (call landlord or pro). • Foul odor accompanies slow drainage → biofilm or decomposing debris in the trap; disassemble only if you have slip-joint wrench access and landlord approval. • One basin drains fine, the other doesn’t → check for basket strainer debris or misaligned pop-up linkage—not a shared clog. • Visible corrosion or green patina on the trap nuts → do NOT tighten or loosen. Corrosion indicates long-term moisture exposure and possible micro-leaks. This falls under pipe leak prevention—not DIY repair.
H2: Pro Tips for Renters and Frequent Users
• Keep a $3 rubber sink stopper in your toolkit. It lasts longer than rags and ensures repeatable seals. • After every successful plunge, pour ½ cup of enzyme-based drain maintainer (e.g., Bio-Clean) monthly—not weekly—to digest organic buildup before it solidifies. Avoid chlorine-based products in rental units: they void warranties on many PEX supply lines. • If your lease allows minor modifications, install a dual-basin strainer set with built-in overflow guards. These reduce clog frequency by 40% in high-use kitchens (Rental Maintenance Benchmark Report, Updated: May 2026). • Document everything. Take timestamped photos before and after plunging. If overflow occurs despite correct technique, it may indicate pre-existing trap damage—landlord responsibility under most state habitability codes.
H2: Comparison: Plunger Methods vs. Alternatives for Double Sinks
| Method | Best For | Time Required | Risk of Overflow | Renter-Friendly? | Notes |
|---|---|---|---|---|---|
| Sealed-basin plunger | Grease, food, light debris clogs | 3–7 min | Low (if sealed correctly) | Yes — no tools or alterations | Most reliable first response. Requires practice. |
| Vinegar + baking soda | Early-stage mineral deposits or mild organic film | 15–20 min (plus wait time) | Negligible | Yes — no equipment | Ineffective on hardened grease or solid objects. |
| Pipe snake (15-ft hand auger) | Fibrous clogs (hair, string, tea leaves) | 8–12 min | Moderate (can push clog deeper) | Conditional — may scratch finish | Avoid if trap is chrome-plated; use only with vinyl-coated cable tip. |
| Wet/dry vacuum | Dry debris or shallow clogs | 5–10 min | High (if not sealed properly) | No — requires adapter, noise, setup | Rarely more effective than plunger; higher failure rate in rentals. |
H2: Beyond the Plunge: Preventing Recurrence
A single successful plunge solves today—but doesn’t guarantee tomorrow. Prevention is where real renter leverage lives:
• Install fine-mesh basket strainers in *both* basins. Replace every 3 months. Clogged strainers account for 31% of repeat double-sink backups (Plumbing Failure Root Cause Archive, Updated: May 2026).
• Never pour cooking oil, coffee grounds, or rice down either basin. These combine with soap scum to form “fatbergs” inside the trap—harder to clear than tree roots in municipal lines.
• Wipe greasy dishes with paper towel *before* rinsing. Reduces trap loading by up to 60%.
• Once quarterly, remove and clean the pop-up assembly: soak pivot balls and lift rods in white vinegar for 10 minutes, then scrub with an old toothbrush. This directly supports water faucet drip repair readiness and extends the life of the entire drain mechanism.
For a complete setup guide covering strainer types, trap anatomy, and landlord communication templates—including how to request a professional pipe leak prevention inspection—visit our full resource hub at /.
H2: Final Reality Check
Plunging a double sink isn’t magic—it’s physics, patience, and precision. You won’t fix a collapsed cast-iron branch line or root intrusion with a $5 plunger. But for the 74% of double-sink clogs caused by everyday kitchen use (Updated: May 2026), this method works—reliably, quietly, and without flooding your floor.
If it doesn’t work after two properly executed attempts, stop. Document what you did, take photos, and notify your landlord *in writing*. That’s not giving up—it’s practicing smart pipe leak prevention and protecting your security deposit.