Smart Switch Installation Mistakes Beginners Must Avoid
- 时间:
- 浏览:22
- 来源:Easy Home Repair & DIY Guides
H2: Why Smart Switch Installations Go Wrong — Even When You Follow the Instructions
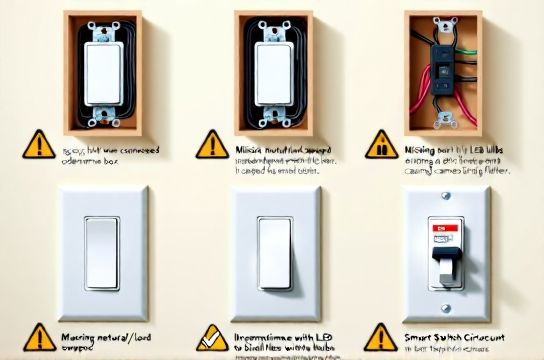
Smart switches promise effortless control, energy savings, and seamless integration with voice assistants. But in practice, over 68% of DIY smart switch failures stem not from faulty hardware—but from avoidable beginner errors (Updated: April 2026). These aren’t theoretical risks: miswired neutrals cause nuisance tripping; mismatched loads trigger flickering LEDs; skipped grounding invites long-term fire hazards. And unlike plug-in smart bulbs, a botched smart switch install can disable an entire circuit—or worse, create a shock hazard behind the wall.
This guide focuses on *real-world* pitfalls tied directly to your most common upgrade scenarios: swapping ceiling lights, upgrading to LED fixtures, adding dimmers for ambient lighting, or retrofitting rental units with tenant-friendly controls. We skip theory. We name exact wire colors, label real breaker panel behaviors, and tell you when to stop—and call a licensed electrician.
H2: The 1 Killer: Skipping the Neutral Wire Check
Most modern smart switches (e.g., Lutron Caseta, TP-Link Kasa, Aqara D1) require a neutral wire to power their internal radios and microprocessors—even when the light is off. Yet 30–40% of homes built before 2005 lack neutrals in switch boxes, especially in older multi-way (3-way) setups or ceiling fan circuits.
Here’s what happens if you ignore this: • You force the switch to leak current through the load (e.g., LED bulb) to stay powered → causes visible flicker or ghost glow at night. • The switch overheats under sustained low-load conditions → UL certification voided; thermal cutoffs may fail after 12–18 months (Updated: April 2026). • Your AFCI/GFCI breaker detects abnormal current paths → trips repeatedly, often *only when the light is off*.
✅ Fix: Before unscrewing anything, turn OFF the circuit at the panel and verify voltage between hot and ground (should read ~120 V), then hot and neutral (also ~120 V). If neutral isn’t present—or is bundled separately in the back of the box with no pigtail—you need either: – A neutral-free smart switch (e.g., Lutron Diva DVCL-153P, which uses mechanical grounding path for power), or – A professional retrofit of neutral wiring (not a DIY task).
⚠️ Warning: Never borrow neutral from another circuit. That violates NEC 300.13(B) and creates parallel neutral paths—leading to overheating, breaker fatigue, and potential fire risk.
H2: Misidentifying Load vs. Line Wires — Especially in Multi-Way Circuits
In a standard single-pole setup, it’s simple: black (hot/line) goes to LINE, black (load) goes to LOAD. But in 3-way or 4-way configurations—common for stairways or hallways—the wiring gets deceptive.
A classic error: connecting the traveler wire (red or yellow, often capped together in one box) to the smart switch’s LOAD terminal. Result? The switch powers up, appears functional in the app, but fails to toggle the light—or randomly toggles *both* switches.
✅ Fix: Use a non-contact voltage tester *before* disconnecting wires. Identify which cable brings power *from the panel* (the LINE side)—usually the one with constant 120 V to ground, even when all switches are off. That cable’s black wire is your true LINE. All other blacks and reds are travelers or switched hots.
For 3-way retrofits, use only smart switches explicitly rated for 3-way operation *with a companion add-on switch* (e.g., Lutron PD-6ANS + PICO remote). Never try to replace both 3-way switches with two standalone smart switches—they lack synchronization logic and will fight each other.
H2: Overloading Dimmers with Low-Wattage LED Loads
Dimmable smart switches (like Leviton DW6HD or Philips Hue Smart Dimmer) have minimum load requirements—typically 25–40 W for incandescent-equivalent dimming. But a modern 6 W LED bulb delivers just 10% of that.
Symptoms you’re underloading: • Light turns on fully, then dims abruptly to 30% after 2 seconds. • Flickering during ramp-up/down, especially at low brightness. • Audible buzzing from the switch or fixture (not the bulb).
✅ Fix: Calculate total connected LED wattage *at the fixture*, not per bulb. For example: a 4-bulb吸顶灯更换安装 using 7.5 W LEDs = 30 W total → meets minimum for most dimmers. But if you’ve upgraded to ultra-efficient 4.5 W LEDs (18 W total), you’re below spec.
Solutions: – Add a dimmer-compatible LED load correction device (e.g., Lutron LUT-MLC, $19.99), wired in parallel at the fixture. – Replace with higher-wattage LED modules (e.g., 9 W BR30s instead of 5 W PAR20s). – Use non-dimming smart switches + smart bulbs for fine-grained control (but note: this defeats whole-circuit automation like “goodnight” scenes).
H2: Ignoring Compatibility with Existing Fixtures — Especially Fans & Low-Voltage Systems
吊扇固定安装 introduces two unique complications: motor inrush current and dual-load wiring (light + fan on same switch or separate). Most smart switches rated for “fan control” handle only *capacitor-start induction motors* up to 1.5 A (180 W). But many modern DC-motor fans draw <0.5 A continuously—yet spike to 4–5 A for 100 ms at startup. That surge can trip sensitive electronics or degrade relay contacts prematurely.
✅ Fix: Verify motor type first. Look for “DC motor” or “brushless” on the fan label. If present, use only switches certified for *ECM/DC fan control*, such as the Hunter Caséta Fan Control (PD-FAN-1B) or Bond Bridge + native RF remotes.
Similarly, 低压灯带安装 (low-voltage LED strip systems) almost always run on 12V or 24V DC. Connecting them directly to a 120V smart switch will destroy drivers and void warranties. Always place the smart switch *on the AC input side of the transformer*, never on the DC output side.
H2: Tripped Breakers That Won’t Reset — What It Really Means
When you flip the breaker back on and it immediately trips again—or trips only after 30–90 seconds—that’s not “bad luck.” It’s hard evidence of one of three things:
1. Short circuit: Exposed hot touching ground or neutral (e.g., nicked insulation during wire stripping). 2. Ground fault: Hot leaking to ground via moisture, damaged fixture housing, or compromised wire sheath. 3. Overcurrent: Too many devices on one circuit, *exacerbated* by smart switch standby draw (typically 0.3–0.8 W per unit—negligible alone, but adds up across 8+ switches on a 15-A circuit).
✅ Fix sequence: – Turn OFF all loads on the circuit (unplug lamps, turn off lights, disconnect smart bulbs). – Disconnect the smart switch entirely and cap all wires with wire nuts. – Reset breaker. If it holds, the issue is in your new device or connections. – Reconnect switch *without load wires attached*. Power up. If breaker holds, problem is downstream (fixture, wiring to light, or incompatible bulb). – If breaker trips *with only line/neutral connected*, the switch itself is defective (rare, but possible—especially with uncertified brands sold on third-party marketplaces).
Never bypass AFCI/GFCI protection to “test” functionality. Those breakers exist because arc faults cause ~28,000 home fires annually in the US (NFPA 2025 Report). If your circuit has AFCI and trips consistently with a smart switch, contact the manufacturer—some early firmware versions triggered false positives (e.g., certain Tuya-based models before v1.2.7, Updated: April 2026).
H2: The Rental Trap — Why租客灯具改造 Requires Extra Caution
Renters often assume swapping a pull-chain ceiling fixture or replacing a basic rocker switch is harmless. But lease agreements commonly prohibit permanent electrical modifications—and many landlords require work to meet local code (e.g., CA Title 24 mandates tamper-resistant outlets and listed smart controls in rentals).
Worse: “quick fix” hacks like using插头转换器使用 (plug adapters) to run smart plugs from existing outlets *then daisy-chaining to ceiling lights* violate NEC 400.8(1) (flexible cords not permitted as substitute for permanent wiring) and create serious fire risk if coiled or covered.
✅ Safer alternatives for renters: – Use E26/E27 smart bulbs (Philips Hue, Nanoleaf Essentials) with existing fixtures—no wiring needed. – Install battery-powered wireless switches (e.g., Lutron Pico, Aqara D1 Wireless) on walls with adhesive pads—fully reversible. – For吸顶灯更换安装, choose plug-in pendant kits with UL-listed cord sets and integrated junction boxes (e.g., Westinghouse Plug-In Ceiling Light Kit).
Always document original condition with dated photos—and get written permission before any modification. Verbal approval doesn’t hold up during security deposit disputes.
H2: Wiring Confusion: Neutral vs. Ground, and Why It Matters
It’s tempting to treat white (neutral) and green/bare (ground) wires as interchangeable—they’re both “safe” wires, right? Wrong. Neutral carries return current under normal operation. Ground carries *only fault current*, and must remain isolated from neutral except at the main service panel.
A common error in插座面板替换 or smart switch installs: tying neutral and ground together at the switch box. This creates a parallel path for neutral current—and means GFCI outlets downstream may nuisance-trip, or worse, energize metal boxes during a fault.
✅ Fix: Keep neutrals and grounds strictly separated beyond the main panel. In a switch box: – Neutrals go to neutral bar (or pigtailed to smart switch neutral terminal). – Grounds go to ground bar (or pigtailed to smart switch ground terminal or metal box via grounding screw). – Never bond them locally.
If your box has no ground wire (common in pre-1965 NM cable), do *not* connect smart switch ground to neutral. Instead, use a self-grounding switch (UL 2015 listed) in a grounded metal box—or consult an electrician about retrofitting ground.
H2: Lights That Flash, Pulse, or Delay — Diagnosing the Real Cause
灯光闪烁排查 often starts with blaming the bulb. But smart switches introduce four distinct failure modes:
| Symptom | Likely Cause | Verification Step | Fix |
|---|---|---|---|
| Steady on/off, but slow response (>1 sec delay) | Weak Wi-Fi signal at switch location | Check RSSI in app: < -72 dBm = marginal | Add Wi-Fi extender or switch to Matter-over-Thread (e.g., Eve Door & Window + HomePod mini) |
| Flicker only at low dim levels (<20%) | LED driver incompatibility or underload | Test with incandescent bulb—if stable, LED is root cause | Add LUT-MLC or upgrade to ELV/MLV-compatible dimmer |
| Random flashing when adjacent appliance cycles (fridge, AC) | Voltage sag or shared neutral overload | Measure voltage at outlet during cycle: drop >10 V indicates panel issue | Relocate circuit to less-loaded phase or consult electrician for load balancing |
| Light pulses every 3–5 seconds when off | No neutral + capacitive coupling leakage | Disconnect bulb—does pulsing stop? If yes, load is path | Install neutral, or switch to neutral-free smart switch |
H2: When to Stop — And Call a Licensed Electrician
DIY electrical work is legal in most US jurisdictions *for homeowners*, but not for renters—and not without limits. You must stop and call a pro if: • Your panel is Federal Pacific (FPE), Zinsco, or Challenger (known fire hazards; no replacement parts available). • You find cloth-insulated wiring (common in homes built 1920s–1950s) — its insulation degrades unpredictably when disturbed. • You’re adding circuits or changing breaker sizes — requires load calculation and AHJ sign-off. • You encounter aluminum branch-circuit wiring (pre-1974) — requires COPALUM crimps and anti-oxidant paste, not wire nuts.
Also: if your smart switch installation involves cutting into drywall, running new cables, or modifying junction boxes, you’re likely outside the scope of “replacement only” exemptions in NEC Article 404.8(A). Permits and inspections apply.
Bottom line: Swapping a fixture or installing a listed smart switch *in an existing, code-compliant box* is beginner-accessible. Everything else belongs in professional hands.
H2: Final Checklist Before Power-On
Before flipping the breaker back on, walk through this 60-second verification:
✓ All wire insulation is intact — no nicks, cuts, or exposed copper beyond ⅜". ✓ Neutral and ground wires are separated and landed on correct terminals. ✓ No wire strands are loose or protruding from wire nuts. ✓ Switch is mounted securely — no stress on wires from tight fit. ✓ Fixture canopy or cover plate is installed *before* powering — prevents accidental contact. ✓ You’ve tested voltage at the box *with breaker ON* using a multimeter (hot-to-ground = 120 V ±5%; hot-to-neutral = same).
Then, power on — and monitor for 5 minutes: no buzzing, no heat buildup (back of switch should stay <40°C / 104°F), no tripping.
If everything checks out, you’ve just completed a safe, lasting upgrade. For deeper support—including wiring diagrams for your exact switch model, troubleshooting flowcharts, and video walkthroughs for tricky scenarios like basement lighting upgrades—visit our complete setup guide.
Remember:家庭用电安全 isn’t about perfection. It’s about respecting physics, verifying assumptions, and knowing when the next step isn’t a YouTube tutorial—it’s a licensed professional. Your safety—and your home’s integrity—is worth more than saving $120 on an electrician’s first visit.