Dimmable Light Switch Wiring for Single Pole
- 时间:
- 浏览:23
- 来源:Easy Home Repair & DIY Guides
H2: Why Single-Pole Dimmer Wiring Is Trickier Than It Looks
You’ve bought a sleek new dimmable switch — maybe a Lutron Caseta or a TP-Link Kasa Smart Dimmer — and your old incandescent fixture is getting swapped for an energy-efficient LED ceiling light. Great plan. But when you open the wall box and see three wires (black, white, bare copper) plus a red wire coiled in the back? Or worse — only two wires and no neutral? That’s where most DIYers pause, double-check the packaging, and quietly call an electrician.
Single-pole dimmer wiring *seems* simple: one hot feed, one switched hot to the light, neutral (often required), and ground. But real-world conditions — outdated wiring, missing neutrals, incompatible LED loads, or shared neutrals from multi-wire branch circuits — turn straightforward swaps into troubleshooting sprints.
This guide walks you through dimmable light switch wiring for single pole applications with zero assumptions about your prior experience. We’ll cover what’s *required* by the National Electrical Code (NEC 2023), why some smart dimmers won’t work with certain LED bulbs (even if they claim compatibility), and how to verify load compatibility *before* flipping the breaker back on. No jargon without explanation. No ‘just follow the diagram’ hand-waving.
H2: What You’re Actually Connecting (and Why Each Wire Matters)
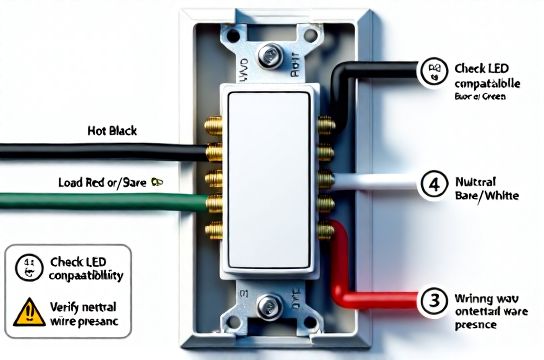
Let’s name the players in your wall box:
• Black (Hot/Line): Carries 120V AC from your panel — *always live when the breaker is on*. Verify with a non-contact voltage tester *before touching anything*. • Red (Load/Switched Hot): The wire going *to the light fixture*. When the switch is on, this carries power to the light. When off, it’s dead (assuming correct wiring). • White (Neutral): Returns current to the panel. Required for nearly all modern dimmers (especially smart ones) to power internal electronics. Not optional — even if your old switch didn’t use it. NEC 2023 mandates neutral presence in all switch boxes for new installations (NEC 404.2(C)). • Bare Copper or Green (Ground): Safety path to earth. Must be connected — no exceptions.
⚠️ Critical reality check: If your home was built before 2011 (especially pre-2000), your single-pole switch box may *not contain a neutral*. That’s because older switches were purely mechanical — no electronics needed power. In those cases, you have three options: (1) run a new 14/4 or 12/4 cable (not recommended for beginners), (2) install a neutral-free dimmer like the Lutron Diva DVCL-153P (mechanical + electronic hybrid), or (3) upgrade the circuit during a broader renovation. Do *not* bond neutral to ground — that violates NEC and creates shock/fire risk.
H2: Step-by-Step Wiring — With Safety Checks Built In
Before you begin: • Turn OFF the correct breaker — not just the switch. Confirm at the panel using its label. Then test *both* black and red wires in the box with a non-contact tester. Test again after removing the old switch. • Take photos *before* disconnecting anything. Label wires with tape if needed (e.g., “LINE”, “LOAD”, “NEU”). • Use UL-listed wire nuts rated for the conductor count and gauge (typically 14 AWG for 15A circuits, 12 AWG for 20A). Tighten until wires don’t pull out — but don’t over-torque and shear strands.
Step 1: Identify Line vs. Load The biggest rookie mistake? Swapping line and load. Most dimmers will still ‘work’ — but may buzz, overheat, or fail prematurely. Here’s how to tell: • Turn OFF breaker. • Disconnect all wires from old switch. • Turn breaker ON *temporarily*, then carefully test *each black wire* with your non-contact tester. The one that lights up is your LINE (hot feed). Mark it. • Turn breaker OFF again. • The remaining black (or red) wire going to the ceiling box is your LOAD.
Step 2: Match Wires to Dimmer Terminals Most modern dimmers use standardized labeling: • LINE (or HOT, or BLACK): Connects to your identified hot feed. • LOAD (or SW, or RED): Connects to the wire going to the light. • NEUTRAL (or WHITE): Connect to the white neutral bundle (not just one white wire — tie into the group using a pigtail). • GROUND (or GREEN): Connect to bare/green ground bundle.
💡 Pro tip: If your dimmer includes a green grounding screw *and* a green wire, connect the wire to the ground bundle — do *not* rely solely on the metal yoke contacting the box. Older metal boxes may be painted or corroded, breaking the ground path.
Step 3: Handle the Neutral Bundle Correctly Don’t just twist the dimmer’s neutral wire onto one white wire. Find the existing neutral splice — usually a wire nut holding 3–5 white wires together (feed from panel, onward to other outlets/lights, etc.). Add your dimmer’s neutral to *that group*. If the existing nut is full or loose, replace it with a larger UL-rated nut (e.g., Ideal Twister 65 for up to 5× 14 AWG).
Step 4: Secure & Reassemble Tuck wires deeply but gently — no pinching of insulation. Mount the dimmer with screws (don’t overtighten plastic boxes). Attach the wallplate. Restore power.
Test: Turn breaker on. Flip switch. Does light respond? Does it dim smoothly across full range? Any buzzing, flickering, or delayed response? If yes, read the next section.
H2: Why Your New Dimmer Might Buzz, Flicker, or Refuse to Dim
LEDs changed everything — and most dimmers haven’t caught up cleanly. Here’s what’s really happening:
• Minimum Load Requirement: Mechanical dimmers need ~25W minimum load to function. A single 9W LED bulb? Below threshold → erratic behavior. Solution: Add a Lutron LUT-MLC (minimum load capacitor) across LOAD and NEUTRAL — it fools the dimmer into seeing enough load. (Updated: April 2026 — LUT-MLC remains the only UL-listed device for this purpose.)
• Incompatible LED Drivers: Not all LED bulbs are dimmable — and even ‘dimmable’ labels vary wildly. Cheap bulbs often use trailing-edge (electronic low-voltage) drivers that clash with leading-edge (triac-based) dimmers. Result: pop-on, drop-out, or high-frequency whine. Fix: Use bulbs tested and listed on your dimmer’s compatibility tool (e.g., Lutron LED Compatibility Tool or Leviton’s Dimmer Finder).
• Shared Neutrals (MWBCs): If your circuit shares a neutral with another 120V leg (common in kitchens/bathrooms), connecting a neutral-requiring dimmer can cause breaker trips or unstable operation. Diagnose: Turn OFF both breakers sharing the same neutral; test voltage between their hot wires — should read ~240V. If so, consult an electrician before proceeding.
H2: Smart Switch Wiring Nuances You Can’t Skip
Smart dimmers (e.g., for Alexa or HomeKit control) add layers: • They require neutral *and* stable 120V — no exceptions. Some claim ‘no-neutral’ modes, but those draw leakage current through the light bulb, causing flicker or premature LED failure. • Wi-Fi dimmers generate heat. Don’t cram them into undersized metal boxes (<18 cu in for single-gang). Overheating degrades electronics and voids UL listing. • Firmware updates may reset settings. Always note your SSID/password and cloud account details *before* power cycling.
Also: Smart switches almost always require a hub or bridge (e.g., Lutron Smart Bridge PRO) for full automation. Don’t assume ‘works with Alexa’ means plug-and-play — check integration depth in the manufacturer’s spec sheet.
H2: When to Walk Away (and Call a Pro)
DIY is powerful — but electricity has zero tolerance for guesswork. Stop and call a licensed electrician if you encounter: • Aluminum wiring (silver-colored, brittle, requires COPALUM crimps — not wire nuts); • Two black wires *both* hot when breaker is on (indicates miswired MWBC or bootleg ground); • Voltage readings >125V or <110V at the switch (sign of overloaded neutral or utility issue); • Any sign of burning, melted insulation, or warm faceplates; • A GFCI or AFCI breaker that trips *immediately* upon restoration — indicates ground fault or arc fault not related to your work.
These aren’t ‘maybe later’ items. They’re immediate hazards. Your safety isn’t negotiable — and neither is code compliance.
H2: Real-World Fixture Upgrades That Pair Perfectly
A dimmer is only as good as the light it controls. Here’s how to match your wiring work with practical upgrades:
• Ceiling light replacement: Choose integrated LED fixtures with ≥90 CRI and selectable color temperature (2700K–4000K). Avoid ‘dimmable’ retrofit kits with proprietary drivers — stick with E26 base bulbs from Philips, Cree, or Feit that list compatibility with your dimmer model.
• LED节能灯升级: Yes — that’s ‘LED energy-saving lamp upgrade’ in English keyword form. Translation matters less than performance: aim for ≥100 lm/W efficacy and a 3-year minimum warranty. (Updated: April 2026 — top-tier 12W A19 LEDs now deliver 1400+ lumens, matching old 100W incandescents.)
• Lights flickering troubleshooting: Rule out dimmer-bulb mismatch first. Then check for loose neutral splices at the panel — a leading cause of whole-house flicker.
• Home electrical safety: Install AFCI breakers on all bedroom, living room, and hallway circuits. They detect dangerous arcing *before* it ignites — required by NEC 2023 for new circuits and major renovations.
H2: Comparison Table — Dimmer Types, Requirements & Tradeoffs
| Dimmer Type | Neutral Required? | Min. Load | Smart Features | Best For | Notes |
|---|---|---|---|---|---|
| Lutron Diva DVCL-153P | No | 10W | None (mechanical) | Old homes, no-neutral boxes | UL-listed for LEDs down to 10W; no firmware, no hub |
| Lutron Caseta PD-6WCL | Yes | 10W | Wi-Fi + Hub required | Whole-home automation | Requires Smart Bridge; supports scenes, scheduling, voice |
| TP-Link Kasa HS220 | Yes | 5W | Wi-Fi direct (no hub) | Renters, quick setup | No neutral = no go; 5W min makes it LED-friendly |
| Leviton DW6HD-1BZ | Yes | 15W | Z-Wave (hub required) | Existing Z-Wave ecosystems | Higher min load — verify LED compatibility carefully |
H2: Final Checks Before You Close the Box
Before tightening that last screw: • Double-check torque on wire nuts — tug each wire firmly. None should come loose. • Verify ground continuity: Use a multimeter (continuity mode) between dimmer’s ground terminal and metal box. Should beep. • Confirm no nicks in insulation — especially where wires bend near the clamp. • Snap the dimmer fully into the yoke — partial seating can misalign terminals.
Then — and only then — restore power and test across the full dimming range. Watch for heat buildup on the dimmer face after 10 minutes of full brightness. Warm is OK. Hot-to-touch (>120°F) means overload or poor ventilation — power down and recheck load rating.
H2: Where to Go Next
You’ve just completed a foundational electrical upgrade — safely, correctly, and to code. But lighting doesn’t exist in isolation. Your next logical step is integrating controls, optimizing circuits, or expanding into adjacent tasks like ceiling fan mounting or outlet upgrades. For a complete setup guide covering those interconnected jobs — including AFCI/GFCI coordination, box fill calculations, and rental-safe modifications — visit our full resource hub at /. It’s built for the same audience: hands-on homeowners who value clarity, compliance, and confidence — not shortcuts.