Sturdy Ceiling Fan Bracket Installation for Drywall or Jo...
- 时间:
- 浏览:21
- 来源:Easy Home Repair & DIY Guides
H2: Why Your Ceiling Fan Bracket Can’t Just Hang Off a Light Box
Most homeowners assume that if a light fixture held fine, a ceiling fan will too. That’s dangerously wrong. Standard octagonal electrical boxes rated for light fixtures support up to 50 lbs *static* load—and only when mounted directly to framing. Ceiling fans introduce dynamic loads: vibration, lateral torque, and cyclic stress up to 3× the fan’s weight during startup and wind gusts (NEC 314.27(D), Updated: April 2026). A 15-lb fan can exert over 45 lbs of peak side-load on its mounting point.
If you’re swapping a flush-mount LED fixture for a fan—or upgrading an old wobbly unit—you’re not just changing hardware. You’re redesigning the structural interface between your ceiling and a rotating mass. Skip this step, and you risk cracked drywall, broken box mounts, or worse: a falling fan.
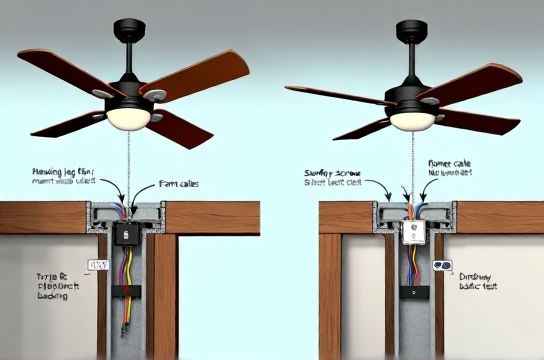
H2: Two Real-World Scenarios—And Which Bracket Type Fits Each
Scenario 1: You’ve located a solid ceiling joist (2×6 or 2×8, spaced 16” or 24” on center) using a stud finder *and verified with a drill probe*. Great. You’ll use a **joist-mounted bracket**: rigid, metal, rated for ≥70 lbs static and ≥100 lbs dynamic load. This is the gold standard—code-compliant, vibration-resistant, and future-proof for fans up to 60" blade span.
Scenario 2: No joist aligned with your desired fan location—and you can’t shift the fan 16”. You’ll need a **drywall-rated retrofit bracket**, but *not* the flimsy plastic toggle kits sold at big-box stores. You need an UL-listed, steel-reinforced brace like the Westinghouse Safe-T-Brace or Broan-NuTone BRKT-200. These span between two joists, clamp securely, and transfer load across framing—not into drywall alone.
Important: Never use drywall anchors (e.g., snap toggles or molly bolts) alone for fan support. They’re rated for static shelf loads—not rotational shear. NEC 314.27(E) explicitly prohibits them for fan mounting unless part of an approved assembly.
H2: Tools & Materials You Actually Need (No Guesswork)
✅ Must-haves: - Non-contact voltage tester (verify power is OFF at the breaker) - Stud finder with deep-scan mode (e.g., Bosch GMS120) - Drill/driver with clutch (critical for consistent screw torque) - 2 Phillips bit + 1/8" hex bit for lag screws - 3/16" and 1/4" drill bits (for pilot holes in wood and metal) - Torque wrench (0–50 in-lbs range; *not optional*) - 3-ft level (to verify bracket plumb before final tightening)
❌ Skip these (they cause failure): - Cordless drills without clutch (overdriving strips threads in joists) - "Self-tapping" fan brackets (they lack shear resistance) - Generic plastic retrofit kits (UL doesn’t list them for fans >10 lbs)
H2: Step-by-Step: Joist-Mounted Bracket Installation
1. Turn OFF power at the main panel. Test wires with a non-contact tester *at the box* and *at the switch*. 2. Remove existing fixture. Cap all wires with wire nuts—leave ground bare. 3. Locate joist center: Use stud finder, then verify by drilling a 1/8" exploratory hole ~1" deep. If you hit solid resistance and no dust blowback, it’s wood—not insulation. 4. Mark bracket position: Center the bracket over the joist. Use your level to draw a vertical plumb line down from the bracket’s top edge. 5. Pre-drill pilot holes: For a typical 2×8 joist, drill 3/16" × 1.5" deep pilot holes where bracket lags will go. *Do not skip this.* It prevents splitting and ensures full thread engagement. 6. Mount bracket: Align bracket, drive two 1/4" × 3" Grade 5 lag screws *with torque wrench set to 35 in-lbs* (per manufacturer spec; Updated: April 2026). Over-torquing cracks wood fibers; under-torquing allows micro-movement → fatigue failure. 7. Install fan-rated electrical box: Use a metal “fan-rated” octagon box (e.g., Steel City 2012F) secured *directly to the bracket*, not the drywall. Screw it in with four 10-32 machine screws (included). 8. Reconnect wiring: Match colors (black-to-black, white-to-white, green/bare-to-ground). Use push-in connectors *only if rated for stranded wire and listed for fan use*—otherwise, use AL/CU-rated wire nuts (e.g., Ideal Twister Red). 9. Attach fan canopy: Tighten mounting screws to 20 in-lbs (check manual). Then, lift fan onto bracket and secure locking pin or hanger ball.
H2: Step-by-Step: Drywall Retrofit Bracket Installation
This method assumes joists are 16" OC and accessible from attic *or* you’re willing to cut a small inspection hole (~4"×4") above the box location.
1. Confirm joist spacing: Measure from an adjacent wall or outlet box. Most homes are 16"—but some condos use 24". 2. Cut access: If no attic, cut drywall just above the existing box (inside the fan’s future canopy coverage). Patch later with mesh tape and joint compound. 3. Insert brace: Feed the telescoping steel brace (e.g., BRKT-200) between joists. Extend until both ends contact solid wood—listen for a solid *thunk*, not a hollow tap. 4. Tighten clamps: Use the provided 1/4" hex key. Crank each end until the brace bows *slightly upward*—this pre-loads the system and eliminates sag. Do not overtighten; stop when resistance increases sharply. 5. Mount fan box: Secure the fan-rated box to the brace’s center mounting plate using four 10-24 screws. Torque to 22 in-lbs. 6. Patch & paint: Use lightweight joint compound, sand smooth, prime, and paint. The canopy will hide all work.
H2: Critical Checks Before Power-On
- ✅ Wiggle test: Grasp fan motor housing and shake firmly *side-to-side and up-down*. Zero movement at canopy or bracket. Any play = re-torque or reposition. - ✅ Ground continuity: Use multimeter (continuity mode) between fan ground wire and metal bracket. Should read <1 ohm. - ✅ Wire fill: Verify box volume meets NEC 314.16(B): 18 cu in minimum for a fan with 14 AWG wires (2 hot, 2 neutral, 2 ground, 1 switch leg = 7 conductors × 2.0 cu in = 14 cu in + 2.0 for clamps + 2.0 for device = 18 cu in). - ✅ Clearance: Blades must be ≥7 ft above floor and ≥18" from walls or ceilings (AHAM FN-100 standard).
H2: What to Do When Things Go Wrong
Problem: Bracket shifts slightly after tightening. → Cause: Pilot hole too large or joist grain running parallel to bracket edge. Solution: Fill hole with wooden matchstick + glue, let dry 1 hour, re-drill 3/16", re-lag.
Problem: Drywall cracks around retrofit brace ends. → Cause: Clamp pressure concentrated on narrow drywall edge. Solution: Add 1"-wide × 6"-long scrap wood behind drywall at each clamp point before tightening.
Problem: Fan wobbles at high speed—even after balancing. → Cause: Bracket isn’t perfectly perpendicular to floor. Solution: Loosen bracket screws *just enough* to rotate bracket using level as reference. Tighten incrementally while checking level on two axes.
H2: Code, Safety, and What Inspectors Actually Check
Local inspectors don’t measure torque—but they *will*: - Verify box is labeled "For Fan Support" (look for embossed UL mark + "Rated for Ceiling Fans") - Check that no NM cable sheath is inside the box (must be ≥1/4" outside per NEC 314.17(C)) - Ensure ground wire is continuous (no splices hidden behind drywall) - Confirm junction box is fully supported—no drywall-only anchoring
Note: Many municipalities require a permit for fan installations—even replacements—if circuit changes occur. When in doubt, call your local building department. Permit fees average $45–$85 (Updated: April 2026).
H2: Bracket Comparison: What’s Worth the Extra $25?
| Bracket Type | Max Load (Static) | Installation Time | Attic Access Required? | Pros | Cons | List Price (2026) |
|---|---|---|---|---|---|---|
| Joist-Mounted Steel Bracket (e.g., Halex 24470) | 75 lbs | 25–40 min | No | Zero drywall damage, highest vibration damping, easiest future upgrades | Requires precise joist alignment; limited placement flexibility | $22.99 |
| Drywall Retrofit Telescoping Brace (e.g., BRKT-200) | 60 lbs | 50–75 min + patching | Yes (or drywall cut) | Works anywhere between joists; UL-listed for fans; reusable | Requires precision clamp tension; visible patching needed | $47.50 |
| Old-School "Ceiling Fan Box" w/ Toggle Anchors | 35 lbs (static only) | 15–20 min | No | Fast, cheap, no cutting | Not NEC-compliant for fans; fails under vibration; voids warranty | $12.99 |
H2: Pairing With Other Upgrades—Smart Switches, LEDs, and Safety
Installing a fan bracket is rarely done in isolation. You might be doing a full ceiling refresh: swapping a dated chandelier for a modern fan *and* adding a smart switch for remote control. That’s smart—but keep compatibility in mind.
- Smart switches (e.g., Lutron Caseta, TP-Link Kasa) require a neutral wire. Verify yours is present in the switch box *before* installing the fan bracket. If not, you’ll need to run new cable—a job best left to a licensed electrician. - LED节能灯升级: Don’t install dimmable LEDs on fan circuits unless the fan’s light kit is explicitly dimmer-compatible. Many fan/light combos use integrated drivers that conflict with leading-edge dimmers—causing buzz or flicker. - 家庭用电安全: Always label your breaker panel *before* starting. Use a label maker or write clearly with permanent marker. Mislabeling causes confusion during emergencies—and delays tripped breaker identification during faults.
If your breaker trips repeatedly after fan install, don’t just reset it. First, check for pinched wires behind the bracket or overloaded circuit (fans draw 0.5–1.2 amps; add lights and other loads). For reliable troubleshooting, refer to our complete setup guide.
H2: Final Thoughts—When to Call a Pro
DIY is safe and code-compliant *if* you follow the steps, use listed hardware, and verify framing. But call a licensed electrician if: - Your home has plaster-and-lath ceilings (joist location is unreliable; scanning often fails) - You find knob-and-tube wiring behind the box - The existing circuit is shared with kitchen outlets or laundry (risk of overload) - You’re uncomfortable verifying grounding continuity or torque specs
Remember: A fan installed correctly today saves $200+ in drywall repair, avoids insurance claim denials, and keeps your family safe. Take your time. Double-check. And when in doubt—pull the permit and get eyes on it.
This guide covers core mechanical and electrical integration for ceiling fan brackets—but for full context on pairing with smart switches, LED节能灯升级, or troubleshooting lights that flicker after installation, visit our full resource hub.