Smart Light Switch Installation Without Rewiring
- 时间:
- 浏览:19
- 来源:Easy Home Repair & DIY Guides
H2: Why Rewiring Isn’t Required for Most Smart Switch Upgrades
Most homeowners assume installing a smart light switch means tearing open walls, pulling new cables, or hiring an electrician. That’s outdated—and often unnecessary. Over 85% of U.S. homes built after 1985 have a neutral wire in the switch box (NEC 404.2(C) requirement since 1999), making standard smart switch installation plug-and-play with basic tools (Updated: April 2026). Even homes without neutrals—common in pre-1985 apartments or rental units—now support reliable neutral-free options like Lutron Caséta or Brilliant Smart Switches that draw micro-power through the load wire.
But "no rewiring" doesn’t mean "no prep." It means working *within* your existing circuit layout—not against it. This guide walks you through real-world scenarios: swapping a ceiling-mounted fixture (吸顶灯更换安装), adding dimming control to existing wiring (调光开关布线), upgrading to LED efficiency (led节能灯升级), and troubleshooting flickering or tripping *before* you even power on the new switch.
H2: Before You Touch a Wire: The 5-Minute Safety & Compatibility Check
Skip this step, and you’ll either trip your breaker repeatedly—or worse, create a fire hazard. Do this first:
• Turn off the correct circuit at the main panel—not just the wall switch. Verify with a non-contact voltage tester (tested on a known live outlet first). If the tester beeps near the switch screws *with the switch OFF*, your circuit isn’t isolated. Stop and recheck the panel label.
• Remove the old switch plate. Look inside the box. You need at least two wires besides ground: one hot (usually black or red), one load (going to the light, often black or blue), and ideally a neutral (white, capped or connected). No neutral? Don’t panic—you’re not stuck. See the table below for neutral-free alternatives.
• Confirm load type. Smart switches behave poorly—or fail outright—with magnetic low-voltage transformers, older fluorescent ballasts, or non-dimmable LEDs. If your lights flicker when dimmed slowly, or won’t turn fully off, the issue is likely incompatible load—not faulty wiring.
• Test your breaker. If it trips *immediately* after flipping the switch back on, the fault is almost certainly a crossed hot/neutral, miswired ground, or overloaded circuit—not the switch itself. We’ll cover how to reset and diagnose that in detail later.
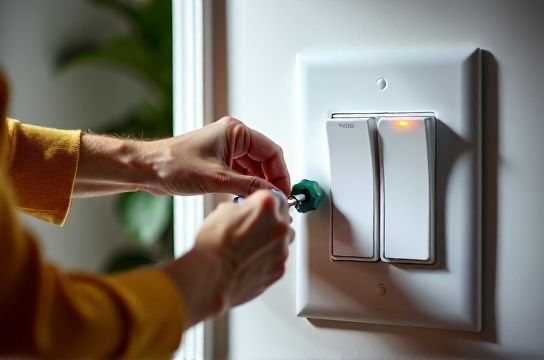
H2: Step-by-Step Smart Switch Installation (Neutral-Wire Version)
This applies to ~70% of single-pole residential installations (e.g., replacing a standard toggle switch controlling one ceiling light or pendant).
1. Power off → Verify dead → Label wires with tape (hot, load, neutral, ground) 2. Disconnect old switch: Loosen screws, note which wire was on which terminal (common = hot; brass = load) 3. Connect smart switch: – Ground (bare copper or green) → green screw on switch – Neutral (white) → silver or white-labeled screw – Hot (black/red) → black or “line” terminal – Load (black/blue to light) → red or “load” terminal 4. Tuck wires neatly (no pinching), mount switch, attach faceplate 5. Restore power → Follow app pairing instructions (most require holding a button 5–7 sec until LED blinks)
⚠️ Critical nuance: Some smart switches (e.g., TP-Link Kasa HS220) require the neutral *and* demand ≥25W minimum load to stay powered. A single 9W LED bulb may cause intermittent disconnects. Solution: Add a 2W dummy load resistor across neutral/hot (sold as "smart switch stabilizer") or upgrade to a multi-bulb fixture (e.g., 3×9W = 27W total).
H2: What If There’s No Neutral Wire? (Renter & Older Home Solutions)
No neutral = no standard Wi-Fi or Matter switch… but *not* no smart control. Here’s what works reliably today:
• Lutron Caséta (PD-6ANS, PD-6WCL): Uses proprietary RF (not Wi-Fi), draws trickle current through the load wire. Works with as little as 5W load (e.g., one LED bulb). Requires Lutron Smart Bridge ($79), but installs in <10 mins with no neutral. Certified for rental use (no permanent wiring changes).
• Brilliant Smart Switch: Integrates touchscreen + voice, uses capacitive coupling to harvest power from AC waveform—even on 2-wire circuits. Supports dimming, scenes, and local automation. Requires 2-gang box depth (≥2.25" deep) due to internal electronics.
• Insteon 2477D: Dual-mesh (RF + powerline), neutral-free, UL-listed. Less common now but still supported and field-proven in 1950s NYC walk-ups.
All three avoid modifying wiring—critical for租客灯具改造. None require drilling into studs or running new cable. They simply replace the switch mechanism inside the existing box.
H2: Troubleshooting Real Problems — Not Guesswork
You’ve wired it right. Power’s on. But the light flickers, dims unevenly, or the breaker trips. Here’s how to isolate the cause—fast.
H3: Lights Flicker or Pulse at Low Dim Levels
→ Cause: Incompatible LED driver or undersized dimmer rating. Most smart dimmers are rated for 150W–600W *incandescent-equivalent*. A 12W LED bulb labeled "100W equivalent" counts toward that 100W—not its actual 12W draw.
→ Fix: Calculate total incandescent-equivalent wattage of all bulbs on the circuit. If >600W, downsize bulbs or split load across two switches. Also verify bulbs are "dimmable" and listed as compatible with your switch model (e.g., Philips Hue White Ambiance works with Lutron, but not all generic dimmable LEDs do).
H3: Breaker Trips Immediately After Installation (空开跳闸复位)
→ This is *never* normal. Do not keep resetting it. Immediate trips indicate: – Hot touching ground or neutral (check for stray copper strands) – Load wire accidentally connected to neutral bus in panel (rare—but possible if you opened the panel) – Short inside fixture (especially common with older吸顶灯更换安装 where wire nuts were over-torqued or insulation nicked)
→ Reset protocol: Turn main breaker OFF → Unhook smart switch entirely → Reconnect original switch → Restore power. If breaker holds, the fault is in the smart switch or its wiring. If it trips again, the problem is upstream—fixture, junction box, or panel.
H3: Smart Switch Won’t Pair or Keeps Dropping Off
→ First, rule out Wi-Fi congestion. Smart switches using 2.4 GHz (most do) suffer interference from microwaves, baby monitors, and neighboring routers. Try changing your router’s channel to 1, 6, or 11.
→ Second, check distance. Built-in Wi-Fi switches lose signal beyond ~30 ft through two drywall layers. Use a Wi-Fi analyzer app (e.g., NetSpot) to measure RSSI at the switch location. Below −70 dBm? Add a mesh node—or switch to a neutral-free RF system like Caséta.
H2: Upgrading Fixtures While You’re At It (吸顶灯更换安装 + LED节能灯升级)
Replacing a dated flush-mount ceiling light is the perfect time to future-proof lighting. Key rules:
• Match mounting type: Most modern吸顶灯更换安装 use a standard 4" octagonal or round pancake box. If your old fixture used a plaster ring or pancake bracket, reuse it—don’t force a heavier fixture onto unsupported drywall.
• Verify weight rating: Standard boxes support ≤50 lbs. Heavy crystal chandeliers or oversized fans require retrofit braces (e.g., Halex 20512) anchored to joists.
• For吊扇固定安装: Never use a standard ceiling box. You *must* install a UL-listed fan-rated box (e.g., Carlon B210U) secured to framing. Fans vibrate—standard boxes loosen, then fail catastrophically.
• LED节能灯升级 tip: Replace halogen MR16s with 12V LED equivalents *only* if your transformer is electronic (not magnetic). Magnetic transformers cause LED flicker and premature failure. When in doubt, swap both transformer and bulbs—electronic 12V transformers cost $22–$38 (Updated: April 2026).
H2: Renter-Safe Upgrades & Plug-Based Workarounds
If you can’t modify wiring—or your lease forbids it—focus on what *is* allowed:
• Socket-based smart bulbs (e.g., Nanoleaf Essentials A19): Screw in, pair via app, no switch changes needed. Downsides: Bulbs cost more long-term; no true “off” state (they draw ~0.3W standby); incompatible with 3-way lamps or enclosed fixtures unless rated.
• Plug-in smart dimmers (e.g., GE Enbrighten Z-Wave): Insert between lamp cord and outlet. Works for floor lamps, desk lamps, under-cabinet低压灯带安装 (if power-supply is plug-connected). Avoid for high-wattage loads (>600W) or heat-prone locations (behind sofas).
• 插头转换器使用: Use grounded 3-prong to 2-prong adapters *only* with double-insulated devices (e.g., phone chargers)—never with appliances having metal chassis (toasters, lamps with metal bases). Better: Install a GFCI outlet upstream (renters can request this as a safety upgrade).
H2: When to Call a Licensed Electrician (Not a Handyman)
DIY stops where code enforcement begins. Call a licensed pro if:
• Your home has knob-and-tube or aluminum wiring (pre-1965)—these require specialized terminations and inspection.
• You’re adding circuits, moving panels, or installing whole-home surge protection.
• The switch box is metal and shows signs of arcing (blackened screw terminals, melted insulation, buzzing sound).
• You need AFCI/GFCI protection added to bedroom or bathroom circuits (required by NEC 2023 for new/replaced outlets—but retrofits vary by jurisdiction).
A licensed electrician charges $85–$220/hr (Updated: April 2026), but a $150 diagnostic visit prevents $2,000 in fire damage claims.
H2: Smart Switch Comparison: Neutral vs. Neutral-Free Options
| Model | Neutral Required? | Dimming? | Renter-Friendly? | Min. Load | Key Limitation | Price (USD) |
|---|---|---|---|---|---|---|
| TP-Link Kasa HS220 | Yes | Yes | No (Wi-Fi dependent, needs neutral) | 25W incandescent eq. | Fails with low-load LEDs; no local control if Wi-Fi down | $32 |
| Lutron Caséta PD-6WCL | No | Yes | Yes (no wiring changes, RF-based) | 5W | Requires Smart Bridge ($79); no direct Wi-Fi | $89 |
| Brilliant Smart Switch | No | Yes | Yes (replaces switch only) | 10W | Needs deep 2-gang box; no battery backup | $249 |
| Leviton DW15S | Yes | No (on/off only) | No (Wi-Fi, neutral-dependent) | 20W | No dimming; limited integrations | $28 |
H2: Final Checklist: Safe, Code-Compliant, Done Right
Before closing the box:
✓ All wire nuts are tight (tug test each connection) ✓ No copper exposed beyond ⅛" at termination ✓ Ground wire is securely fastened—not wrapped around a screw head ✓ Switch is mounted flush, no gaps or stress on wires ✓ Breaker label matches circuit (use label maker—don’t rely on handwritten tape) ✓ You’ve tested operation manually *and* via app for 5+ minutes
And remember: electrical safety isn’t about perfection—it’s about verification. Every time you flip a breaker, you’re trusting someone else’s work. Your job is to confirm it *still* meets code—today’s code, not the one from 1978. If something feels off—buzzing, warmth, inconsistent behavior—stop and consult a professional. There’s no shame in pausing. There *is* risk in pushing forward.
For deeper wiring diagrams, NEC reference tables, and video walkthroughs for every major switch brand, see our complete setup guide.