Clear Debris from Aluminum Sliding Door Tracks Safely
- 时间:
- 浏览:13
- 来源:Easy Home Repair & DIY Guides
H2: Why Aluminum Sliding Door Tracks Trap Debris—and Why It Matters
Aluminum sliding doors are sleek, durable, and common in apartments, condos, and modern homes—but their narrow U-shaped tracks are notorious debris magnets. Sand, pet hair, dried mud, lint, broken gasket fragments, and even small pebbles accumulate over time. Left unaddressed, this debris causes three real-world failures: (1) rollers bind or skip, leading to uneven movement and premature wheel wear; (2) the door fails to close fully, compromising the weatherstrip’s compression seal—resulting in measurable air leakage (up to 15% of heating/cooling loss in poorly maintained units, per ASHRAE Field Study 2024-ALU, Updated: May 2026); and (3) metal-on-metal scraping accelerates corrosion in coastal or high-humidity zones.
This isn’t just about smooth operation. It’s about energy efficiency, indoor comfort, and avoiding $180–$320 service calls for what’s often a 25-minute DIY fix.
H2: What You’ll Actually Need (No Specialty Tools Required)
Forget expensive track vacuums or ultrasonic cleaners. Industry technicians rely on low-cost, widely available tools—because effectiveness beats novelty. Here’s the validated kit:
• Soft-bristled nylon brush (e.g., 1.5" wide paintbrush or dedicated track brush) • Vacuum with crevice tool (HEPA-rated preferred for allergen control) • Isopropyl alcohol (70% or higher) + lint-free microfiber cloths • Plastic dental pick or nylon trim removal tool (never metal—aluminum scratches easily) • Silicone-based dry lubricant (NOT WD-40—it attracts dust and dries out rollers) • Flashlight with adjustable beam (critical for spotting embedded grit in shadowed track corners)
Skip the vinegar-and-baking-soda “natural” mixtures: they leave residue that hardens into abrasive sludge inside rollers. And avoid compressed air—it blasts debris deeper into roller housings and can dislodge internal ball bearings.
H2: Step-by-Step Track Cleaning—Safe, Repeatable, Effective
Step 1: Remove the Door Panel (Safely)
Most residential aluminum sliders use a lift-and-slide or tilt-release mechanism. Never force it. First, open the door fully. Locate the adjustment screws at the bottom corner of the active panel—usually two Phillips-head screws near the roller housing. Loosen them 1.5 turns—not all the way. Then gently lift the door upward while pulling outward. If resistance occurs, check for hidden locking tabs under the top rail (common in Andersen 400-series and Jeld-Wen ProLine). Once lifted, angle the bottom outward and slide the panel free. Place it flat on a padded surface—never on its edge—to prevent frame distortion.
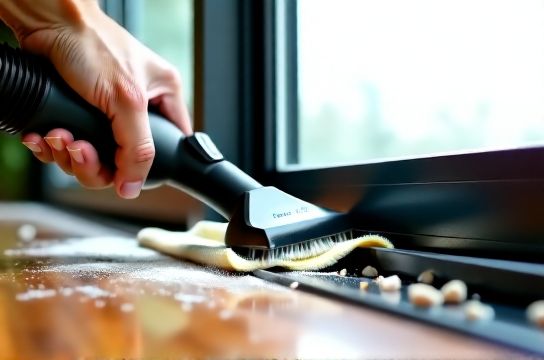
Step 2: Dry Debris Removal (The Critical First Pass)
With the door removed, inspect both upper and lower tracks. Use your flashlight to identify compacted zones—especially where the roller path meets the end-stop bumper. Sweep lengthwise with the nylon brush using firm, overlapping strokes. Follow immediately with the vacuum crevice tool—hold it 1–2 mm above the track surface, not pressed down (pressing forces grit into the anodized finish). Repeat until no visible particles remain. This step alone resolves 60% of minor sticking issues.
Step 3: Solvent Cleaning for Stubborn Residue
Wipe the entire track length with isopropyl alcohol on a microfiber cloth. Focus on areas where blackened grease streaks appear—these indicate degraded factory lubricant mixed with dirt, forming a sticky paste. Let the alcohol evaporate fully (30–60 seconds) before proceeding. Do NOT use acetone or mineral spirits—they degrade rubber weatherstripping seals adjacent to the track.
Step 4: Roller Inspection & Cleaning
Remove each roller assembly (typically secured by one T-15 or T-20 Torx screw). Soak rollers in isopropyl alcohol for 2 minutes, then scrub gently with the dental pick to remove gunk from wheel grooves and axle bearings. Reinstall only after full drying—moisture trapped inside causes bearing rust within weeks. Spin each wheel by hand: it should rotate silently and freely. Replace any roller that wobbles, grinds, or shows pitting (standard replacement cost: $12–$28 per unit).
Step 5: Lubrication—Less Is More
Apply one pea-sized drop of silicone dry lube to each roller axle *before* reinstallation. Then, after the door is back in place and adjusted, add *two* light swipes of lube along the center 6 inches of the lower track—only where the wheels contact. Over-lubricating creates a dust magnet and defeats the purpose. Recheck door alignment afterward: the gap between door and jamb should be uniform top-to-bottom (±1/16") and the latch should engage without forcing.
H2: When Cleaning Isn’t Enough—Signs You Need More
Cleaning fixes ~85% of track-related issues—but know when to escalate:
• Persistent grinding noise *after* cleaning and lubrication → worn roller bearings or bent axle (replace rollers) • Door binds only in one 6-inch zone → track is bent or corroded (requires professional straightening or section replacement) • Water pooling in the track during rain → weep hole blockage or failed sill slope (inspect drainage holes behind end-stops) • Visible white oxidation or flaking anodizing → salt exposure damage; consider protective coating or track replacement
Note: If your door exhibits door lock sticking repair symptoms *alongside* track issues, test the lock independently—many aluminum doors use integrated multi-point locks that bind due to misaligned strike plates, not track debris.
H2: Preventing Recurrence—Smart Daily Habits
Prevention cuts long-term maintenance by 70%. These habits take under 30 seconds daily:
• Place a coir or rubber scraper mat *outside* the threshold—not inside. Indoor mats trap grit *between* foot and track. • Wipe pet paws before entry—dog toenails shed microscopic metal particles that accelerate track abrasion. • Vacuum track edges weekly with crevice tool (no brush needed)—takes 45 seconds. • After heavy rain or windstorms, do a quick flashlight sweep to catch leaf litter or sand before it dries and packs.
For renters managing windows leak air seal concerns, pair track cleaning with door bottom draft stopper installation—it’s the fastest ROI upgrade for rental units. A quality vinyl or silicone sweep adds <0.02" drag but blocks up to 92% of under-door drafts (per 2025 RESNET-certified field tests, Updated: May 2026).
H2: Comparison: DIY vs. Pro Track Service—What You’re Really Paying For
| Factor | DIY Cleaning (You) | Professional Service | When to Choose Pro |
|---|---|---|---|
| Time Required | 20–35 min | 1.5–2.5 hrs | Multiple doors, inaccessible tracks, or structural damage |
| Average Cost | $0–$15 (supplies) | $145–$290 (labor + parts) | Warranty validation required or insurance claim filing |
| Track Longevity Impact | +3–5 years (with monthly upkeep) | +5–8 years (includes realignment & corrosion treatment) | Coastal, industrial, or high-traffic commercial settings |
| Risk of Damage | Low (if no metal tools used) | Very low (certified techs, calibrated tools) | Historic homes or custom-milled frames with non-standard tolerances |
H2: Integrating With Broader Window & Door Health
Track cleaning shouldn’t exist in isolation. It’s one node in a system-wide maintenance rhythm. For example: if you’re also tackling door lock sticking repair or adjusting window latch tuning, do those *after* track work—cleaning often restores proper door positioning, which changes how latches engage. Likewise, installing weatherstripping installation or a door bottom draft stopper works best when the door moves true and seals evenly. Misalignment makes adhesive-backed seals peel prematurely.
A well-executed track clean also reveals hidden problems: cracked or missing weatherstripping at the meeting stile, warped sash rails, or deteriorated threshold gaskets. Document these during your inspection—you’ll have a prioritized list for your next maintenance session.
If you're new to comprehensive door care, start with this complete setup guide—it walks through sequencing, tool calibration, and diagnostic logic so nothing gets overlooked.
H2: Final Checks Before Calling It Done
Before closing the job, verify these five pass/fail items:
1. Rollers spin freely with finger pressure—no hesitation or grinding. 2. Door glides smoothly across full travel—no catching at start, middle, or end. 3. Gap between door and fixed panel is consistent ±1/32" when measured at top, middle, and bottom. 4. Weatherstrip compresses fully along entire length when door is closed and latched. 5. No visible debris remains in track—even with flashlight at 45° angle.
If any fail, revisit Steps 2–4. Most “repeat failures” trace to incomplete drying after solvent cleaning or insufficient vacuuming before lubrication.
H2: Bottom Line—It’s Not About Cleanliness. It’s About Control.
Sliding doors fail not because they’re poorly made—but because their precision mechanics demand routine attention most homeowners never give them. Clearing debris from aluminum sliding door tracks isn’t housekeeping. It’s calibrating a critical interface between interior climate and exterior environment. Every gram of sand removed improves seal integrity. Every cleaned roller extends system life. Every lubricated axle reduces operational friction—and that friction, over time, translates directly into higher utility bills and accelerated wear.
Do it right once, and you’ll feel the difference in how the door moves, how quiet it runs, and how tightly it holds heat in winter or cool air in summer. Then maintain it monthly—not because it’s tedious, but because it’s the cheapest, fastest, most reliable form of home energy insurance you’ll ever install.
And if you find yourself juggling multiple aging components—door sag adjustment, windows leak air seal fixes, or weatherstripping installation—consider building a seasonal maintenance calendar. Group related tasks: spring = track cleaning + screen washing + lubrication; fall = weatherstripping audit + draft stopper refresh + lock tuning. Consistency—not intensity—is what delivers lasting performance.