Tape Measure Markings Decoded: Feet, Inches, Fractions & ...
- 时间:
- 浏览:12
- 来源:Easy Home Repair & DIY Guides
H2: Why Tape Measure Literacy Is Your First Real DIY Skill
You’re hanging a shelf. The stud finder says there’s a stud at 14¾”, but your tape shows tiny black diamonds every 19.2” — and red numbers at 16”. You eyeball the drywall, mark with a pencil, and drive the screw… only to hear that hollow *thunk*. Missed it. Not because you’re unskilled — but because you skipped the most fundamental interface in your toolbox: the tape measure.
Unlike power tools or sealants, a tape measure doesn’t need charging, curing time, or compatibility checks. But it *does* demand fluency. And that fluency isn’t intuitive — especially when inches are split into 16ths, fractions stack on top of feet, and metric ticks sit silently beside them. This isn’t about memorization. It’s about pattern recognition, muscle memory, and knowing which marks matter *for your job*.
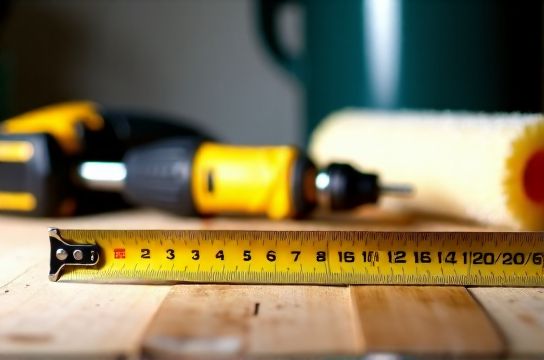
H2: The Anatomy of a Standard 25-Foot Steel Tape (Standard US Construction Grade)
Every reliable tape (e.g., Stanley FatMax, Irwin Quick-Grip, or Kobalt 25') shares core layout logic:
- Blade width: 1 inch (standard for rigidity) - Hook end: Riveted, spring-loaded, with ±1/32" play (designed to compensate for hook thickness when measuring *outward* vs. *inward*) - Graduations: Dual-scale — imperial (feet/inches/fractions) on top, metric (mm/cm) on bottom - Locking mechanism: Slide lock or auto-lock (critical for solo use)
The hook isn’t broken if it wiggles. That’s intentional. When you hook it over an edge and pull, the hook stretches slightly — offsetting its own metal thickness. When you press the hook flush against a surface (e.g., inside a cabinet), it compresses — again canceling error. This is called "true zero" design (Updated: May 2026).
H2: Reading Imperial Units — Feet, Inches, and Fractions (Step-by-Step)
Let’s break down a real measurement: You extend the tape to a point between 5' and 6', and land near the 7/16" mark past 5'. Here’s how to parse it:
1. **Feet**: Large numbered marks with "ft" or tick + number (e.g., "5", "6"). Each foot = 12 inches. 2. **Inches**: Longer unnumbered lines between foot marks — one per inch. Every 12th inch resets the foot count. 3. **Half-inches**: Midpoint between inch lines — longer than quarter-lines, shorter than inch lines. 4. **Quarter-inches**: Two per inch — at ¼" and ¾". Often labeled with small numbers (e.g., "1", "2", "3") below the line. 5. **Eighth-inches**: Four per inch — common on mid-tier tapes. Lines shorter than quarters. 6. **Sixteenth-inches**: Eight per inch — standard on pro-grade tapes. These are the shortest black lines between inch marks. Key: 16 ticks = 1 inch.
Pro tip: Don’t count all 16 ticks. Use grouping. The longest 16th-line is the 8/16" (½") mark — same as the half-inch line. Next longest are 4/16" (¼") and 12/16" (¾"). Then 2/16" (⅛"), 6/16" (⅜"), etc. Train your eye to spot symmetry.
What about the black diamonds? Those appear every 19.2" — used for spacing engineered floor joists or wall studs in advanced framing (not standard 16" or 24" layouts). Ignore unless you’re installing I-joists.
Red numbers? Usually at 16" intervals — the standard stud/truss spacing in North America. Handy for rough framing or drywall layout.
H2: Metric Scale — Simpler, But Still Easy to Misread
Below the imperial scale sits millimeters (mm) — fine, tightly spaced lines — and centimeters (cm) — bold lines marked 0–100+.
- 1 cm = 10 mm - 1 meter = 100 cm = ~39.37 inches - On a 25' tape, metric runs continuously to ~7.6 meters
Key trap: Confusing mm lines with 16ths. A 16th-inch is ~1.5875 mm — so metric lines are *finer* and more numerous. If your project calls for “2.4 cm”, find the 2 cm line, then count *four* mm lines past it. No fractions. No reduction needed.
Metric is dominant in tile setting, European furniture assembly, and any spec sheet from Bosch or DeWalt’s global divisions (Updated: May 2026).
H2: Real-World Reading Drills (Try These Now)
Grab your tape. No phone. No app.
- Find 37 ⅞". Start at 3 feet (36”), then go 1⅞” further. Yes — that’s the 1” line + the 7/8” line (7 ticks past the inch mark, since 8/8 = 1”). - Locate 1.82 m. Go to 182 cm — that’s the “82” mark after “100”. Count mm lines: 1820 mm. - Measure the width of a standard door jamb (typically 4¾”). Confirm the 4' mark, then 9/12" — but wait: 9/12 = ¾, and ¾" = 12/16". So look for the *longer* 12/16" line after the 4' mark.
If you hesitated on any — good. That’s where calibration begins.
H2: Common Errors — And How to Fix Them
• Mistake: Using the *end of the hook* instead of the *inside edge* for inside measurements (e.g., cabinet depth). → Fix: Press hook flush, read from the *first engraved "0"*, not the physical tip.
• Mistake: Assuming all tapes start at true zero — budget tapes under $12 often omit calibrated hook play. → Fix: Test it. Measure a known 6" block both ways: hook-out and hook-in. If readings differ by >1/32", treat it as approximate-only for finish work.
• Mistake: Relying on the tape’s printed "accurate to ±1/16"" label without verifying temperature or tension. → Reality: Steel expands ~0.0000065"/in/°F. At 90°F (vs. 68°F calibration temp), a 25' tape reads ~0.015" long — enough to misalign tile grout lines. For precision tiling or hardwood, use a verified ruler or digital caliper for final checks.
H2: When to Upgrade — Or Just Read Slower
You don’t need a $60 tape to hang shelves. A $14 Stanley PowerLock (25', 1" blade, true-zero hook) handles 95% of rental-unit repairs, picture framing, and baseboard cuts. But if you’re laying laminate with tight expansion gaps, or building a built-in bookcase with butt-joint tolerances under 1/32", step up to a Lufkin 52250 (laser-etched graduations, hardened blade, NIST-traceable cert available).
Budget truth: Tapes under $8 often have blurry ink, flimsy blades that curl, and hooks that shear off after 3 months of apartment projects. Save money elsewhere — not here.
H2: Integrating Tape Literacy Into Your Starter Toolkit
Your first toolkit shouldn’t be a grab bag — it should be a *system*. The tape measure is the anchor. Everything else either verifies it (e.g., a 12" aluminum speed square), extends it (a laser distance measurer for rooms >30'), or acts on it (a quality pencil with soft lead for clean, erasable marks).
That’s why a smart complete setup guide starts not with drills or glue, but with measurement discipline. Because no amount of torque from an entry-level drill kit fixes a hole drilled ⅛" off-layout — and no mold-resistant caulk hides a baseboard gap caused by misreading 32nds.
H2: Steel Tape Measure Reading Method — Quick Reference Table
| Scale Type | Key Marks | Smallest Division | Typical Use Case | Pro Tip |
|---|---|---|---|---|
| Feet | Large numbers: "1", "2", "3"… up to "25" | N/A (12 inches) | Rough framing, room dimensioning | Always verify foot count — it’s easy to lose track past 10' |
| Inches | Long unnumbered lines between feet | 1 inch | Board cutting, stud location | Use red 16" marks for quick stud layout — no math needed |
| 16ths | Shortest black lines; 16 per inch | 1/16" ≈ 1.59 mm | Fine carpentry, trim, finish work | Group by halves: 8/16 = ½", 4/16 = ¼" — reduces counting fatigue |
| Metric (cm/mm) | Bold cm lines ("0", "1", "2"…), fine mm ticks | 1 mm | Tiling, metric hardware, EU plans | Read cm first, then mm — never reverse. 245 mm = 24.5 cm, not 2.45 cm |
H2: Beyond the Blade — What Else Belongs in a Rent-Ready Toolkit?
A tape measure alone won’t fix a leaky faucet. But paired with the right supporting tools — chosen for durability, simplicity, and multi-use value — it becomes the center of gravity for your entire home maintenance system.
- A lithium-ion screwdriver (not a drill/driver combo) — lightweight, variable speed, clutch-controlled. Ideal for assembling IKEA, tightening hinge screws, or swapping outlet plates. Avoid brushed-motor models; they burn out fast under frequent light use (Updated: May 2026).
- A 9-piece household tool kit: Includes Phillips 1/2, flat-head 3/16"/1/4", needle-nose pliers, wire strippers, adjustable wrench, and a 6" level — all in a molded tray. Skip kits with 20+ "bonus" bits you’ll never use.
- Paint roller: 9" frame + 3/8" nap microfiber cover for smooth walls; 1/2" lambswool for textured ceilings. Avoid foam rollers — they load unevenly and shed lint.
- Sandpaper: Keep three grits on hand — 80 (rough shaping), 120 (smoothing wood/metal), 220 (final prep before paint/stain). Store in a ziplock — humidity kills abrasive life fast.
- Structural adhesive: For non-removable bonds (e.g., mounting grab bars, repairing ceramic tile backsplashes), choose a hybrid polymer like SikaBond MS or Loctite PL Premium — not silicone. Silicone lacks shear strength and can’t be painted.
- Glass sealant: For bathroom sinks, showers, and windows, pick a 100% silicone *with mold inhibitor* (e.g., GE Advanced Silicone II or DAP Kwik Seal Plus). Check the label: “Mildew resistant” ≠ “mold inhibiting.” True inhibitors (e.g., zinc pyrithione) last 5+ years in humid conditions (Updated: May 2026).
- Expansion anchors: For brick, concrete, or hollow drywall, match screw diameter to anchor size. Rule of thumb: Use 1/4" toggle bolts for drywall loads >25 lbs; 3/16" plastic anchors for light shelves (<15 lbs). Never guess — check manufacturer pull-out charts.
H2: Final Thought — Precision Is a Habit, Not a Gadget
You’ll see ads for laser measures that “eliminate human error.” They don’t. They just move the error source from your eyes to your wrist angle, battery level, or reflective surface. A well-read tape — held taut, aligned, and verified — beats a mis-aimed laser every time.
So next time you reach for that tape, don’t just extend it. Pause. Look at the first 12 inches. Name each mark aloud: "1 inch… 1/2… 1/4… 1/8… 1/16… 3/16…" Do it twice. Then measure something real — the height of your thermostat, the gap under your bedroom door, the width of a switch plate. Accuracy compounds. And the best ROI in DIY isn’t the cheapest drill or the flashiest caulk — it’s the 60 seconds you spend learning what those tiny lines actually mean.