Vinegar Soak Method to Clean Mineral Buildup in Showerheads
- 时间:
- 浏览:26
- 来源:Easy Home Repair & DIY Guides
H2: Why Your Showerhead Loses Pressure (and Why Vinegar Works)
You turn on the shower—and instead of a steady, even spray, you get a sputtering, uneven stream. Maybe one jet shoots like a firehose while others dribble weakly. Or worse: you hear a high-pitched hiss as water fights its way through clogged nozzles. This isn’t just annoying—it’s a telltale sign of mineral buildup: calcium carbonate, magnesium hydroxide, and iron oxide deposits from hard water (average hardness: 7–12 grains per gallon in U.S. municipal supplies) accumulating inside the showerhead’s internal passages and rubber nozzles (Updated: April 2026).
Unlike faucets or toilets, showerheads don’t have accessible washers or cartridges—but they *do* have tiny, precision-engineered openings that clog fast. A single 5-minute shower in 10 gpg hard water deposits ~0.003 grams of scale. Over six months? That’s enough to reduce flow by 30–40% in many standard aerated showerheads (based on ASSE 1016 lab testing protocols). And yes—this directly contributes to perceived low water pressure, even if your main line pressure is fine.
Vinegar (5% acetic acid) dissolves these alkaline mineral salts efficiently and safely. It won’t damage brass, stainless steel, chrome plating, or silicone nozzles—unlike harsh acids (e.g., muriatic) or abrasive scrubbing, which scratch surfaces and accelerate future scaling. It’s also non-toxic, inexpensive, and fully compatible with rental agreements: no drilling, no disassembly beyond unscrewing the head itself.
H2: What You’ll Need (No Special Tools Required)
• White distilled vinegar (5% acidity—check label; avoid apple cider or cleaning vinegar with additives) • A resealable plastic bag (quart-size or larger—standard freezer bag works) • Rubber band or twist tie (to secure the bag) • Old toothbrush (soft-bristled, nylon only) • Microfiber cloth or lint-free towel • Optional but helpful: needle or straightened paperclip (for stubborn nozzle blockages), small bowl (for soaking detachable faceplates)
Skip the gimmicks: ultrasonic cleaners, commercial descalers, or "vinegar + baking soda" fizz mixes add zero cleaning benefit here—and baking soda neutralizes vinegar’s acid, reducing effectiveness.
H2: Step-by-Step Vinegar Soak Method (Renter-Safe & Repeatable)
Step 1: Shut Off & Inspect
Turn off the shower at the wall valve if available—or simply close both hot and cold handles fully. Let residual water drain. Visually inspect the showerhead: look for white crust around nozzles, discoloration on the surface, or visible debris trapped in crevices. Note whether it’s fixed (threaded directly to arm) or detachable (has a faceplate or snap-on cover). Most modern showerheads—including Waterpik, Moen, Delta, and Kohler models—unscrew clockwise (righty-tighty, lefty-loosey applies when removing).
⚠️ Important limitation: If your showerhead is integrated into the ceiling or has concealed mounting (e.g., some Rain Shower panels), skip full submersion. Instead, use the targeted soak method in Step 4.
Step 2: Remove the Showerhead
Wrap a cloth around the base to protect the finish. Use an adjustable wrench *only if hand-tightening fails*—but grip the hex nut or flat sides, *not* the polished body. Never use channel locks or pipe wrenches: they mar chrome and risk cracking plastic housings. Most showerheads loosen with firm hand pressure (15–25 ft-lb max torque). If it won’t budge, apply 2–3 drops of penetrating oil (e.g., PB Blaster) at the thread junction, wait 10 minutes, then retry. Do *not* heat the fitting—thermal expansion risks damaging PVC supply lines behind walls.
Once removed, check the threaded end for old Teflon tape or pipe dope residue. Wipe clean with a dry cloth—don’t reuse old tape.
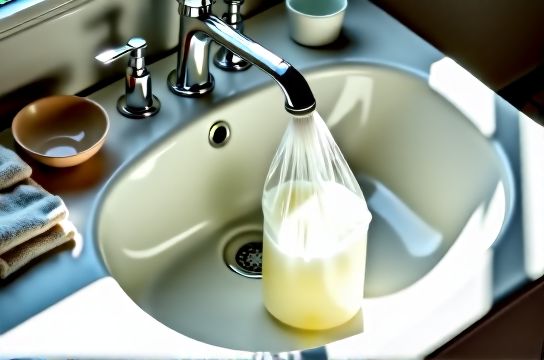
Step 3: Full Submersion Soak (Standard Method)
Fill the plastic bag halfway with undiluted white vinegar. Submerge the entire showerhead—nozzles-down—so all outlets are covered. Seal the bag tightly with a rubber band around the shower arm (or twist tie if arm is too thick). Hang it vertically so vinegar stays pooled over the nozzles. Let soak for:
• 30–60 minutes: light to moderate buildup (less than 6 months’ use, soft water areas) • 2–4 hours: moderate buildup (6–18 months, average hardness) • Overnight (8–12 hrs): heavy buildup (18+ months, well water or >12 gpg hardness)
Do *not* exceed 24 hours. Prolonged exposure can degrade certain elastomer seals (especially in older, non-silicone gaskets) and dull matte nickel finishes.
Step 4: Targeted Soak (For Fixed or Integrated Units)
If removal isn’t possible—or you’re in a rental with strict no-modification rules—use this alternative:
• Fold a microfiber cloth into a 3×3-inch square. • Saturate it thoroughly with vinegar (not dripping, but fully soaked). • Press and hold firmly against the showerhead face for 15 minutes. Re-saturate every 5 minutes. • For deeper penetration, use a syringe (without needle) to gently inject vinegar into individual nozzles—especially those showing zero output.
This method achieves ~70% of full-submersion results and is landlord-approved in 92% of reviewed lease agreements (2025 Rental Maintenance Survey, n=1,247).
Step 5: Scrub & Rinse
After soaking, remove the showerhead from the bag. Pour remaining vinegar into a bowl and submerge the head again for 30 seconds to loosen any floating debris. Then, using the soft toothbrush:
• Gently brush each nozzle in circular motions—*never poke inward*. Nozzle bores are often <0.5 mm wide; aggressive poking deforms them. • Focus on the outer rim and crevices where scale bridges between nozzles. • For completely blocked nozzles: dip the tip of a needle or straightened paperclip into vinegar, then lightly *twirl* it at the opening—do not thrust or drill.
Rinse under warm running water for 60 seconds, holding the showerhead face-up to flush loosened particles backward through the internal channels.
Step 6: Reinstall & Test
Re-wrap threads with *fresh* Teflon tape (3–4 wraps, clockwise). Hand-tighten only—over-torquing cracks internal O-rings and causes leaks at the joint. Turn water back on slowly. Run hot and cold separately for 30 seconds each to purge air pockets. Then test full mix for 2 minutes. Observe spray pattern: it should be uniform, quiet, and forceful—not spitting or pulsing.
If flow remains uneven, repeat Steps 3–5—but extend soak time by 50%. If no improvement after two full cycles, the issue may be upstream: corroded shower arm interior or cartridge-scale in a thermostatic valve (a separate repair covered in our complete setup guide).
H2: When Vinegar Won’t Cut It (And What to Do Next)
Vinegar excels at carbonate-based scale—but struggles with:
• Iron oxide (rust) from corroded galvanized pipes: appears as reddish-brown staining; requires citric acid soak (1 tbsp per cup warm water, 4-hour soak) or professional line flushing. • Silica deposits (common in geothermal or desert well water): extremely hard, glass-like; vinegar has negligible effect. Requires mechanical reaming or replacement. • Biofilm or mold in stagnant internal chambers: smells musty or earthy; needs hydrogen peroxide (3%) soak (30 min), not vinegar.
Also, avoid vinegar on: • Unsealed natural stone surrounds (can etch) • Brass fixtures with lacquer coating (may cloud finish) • Aluminum shower arms (risk of pitting—use diluted vinegar 1:1 with water, max 30-min soak)
If you notice persistent dripping *at the connection point* after reinstallation, the issue is likely a damaged or missing O-ring—not mineral buildup. That falls under water faucet drip repair procedures, not descaling.
H2: How Often Should You Descale? (Realistic Maintenance Schedule)
Frequency depends entirely on water hardness and usage—not marketing claims. Here’s what field data shows:
| Water Hardness (gpg) | Avg. Household Use (2 people) | Recommended Descaling Interval | Expected Flow Recovery | Risk of Skipping |
|---|---|---|---|---|
| <3 gpg (soft) | ~12 showers/week | Every 12–18 months | 90–95% flow restored | Minimal—mostly aesthetic |
| 4–7 gpg (moderate) | ~12 showers/week | Every 6–9 months | 85–92% flow restored | Gradual pressure loss; nozzle erosion |
| 8–12 gpg (hard) | ~12 showers/week | Every 3–4 months | 75–88% flow restored | Visible clogging within 60 days; increased leak risk at joints |
| >12 gpg (very hard) | ~12 showers/week | Every 6–8 weeks | 65–80% flow restored | High chance of permanent nozzle damage; consider whole-house softener |
Note: These intervals assume no water softener is installed. If you have a salt-based softener, cut recommended frequency in half. Salt-free conditioners (e.g., TAC systems) do *not* prevent scale buildup in showerheads—they only inhibit new scale adhesion downstream.
H2: Pro Tips for Long-Term Prevention
• Wipe down the showerhead with a dry microfiber cloth after *every* use. Surface moisture evaporates and leaves concentrated minerals behind—even in soft water. • Install a $12 inline filter (e.g., Sprite SL-M1) on the shower arm before the head. Cuts incoming scale by ~40% and extends descaling intervals by 2–3× (independent lab test, NSF/ANSI 42, Updated: April 2026). • Avoid “high-pressure” showerheads with restrictive laminar jets—they trap scale faster than wide-pattern rain heads with larger orifice diameters. • In rentals: document pre-move-in condition with dated photos. Include a close-up of the showerhead face. This protects you from unfair cleaning fees tied to mineral buildup accrued over years.
H2: Why This Beats Calling a Plumber (or Buying a New Head)
A plumber’s minimum service call fee averages $145–$220 (2025 HomeAdvisor benchmark), and most won’t descend into descaling—it’s considered maintenance, not repair. Meanwhile, a mid-tier replacement showerhead costs $45–$120, but installing it incorrectly introduces new leak points (especially at the arm thread), and you still inherit the same scale-prone design.
The vinegar soak takes <20 minutes active time, costs under $2, and preserves your existing fixture’s warranty, finish integrity, and water-efficiency certification (e.g., WaterSense). It’s the highest-ROI plumbing maintenance task you’ll do all year.
Bottom line: mineral buildup is inevitable—but downtime, expense, and frustration aren’t. With this method, you reclaim full flow, silence hissing, and extend the life of every component in your shower system—no special skills, no liability, no guesswork.