Bathroom Fan Timer Installation Guide for Consistent Vent...
- 时间:
- 浏览:22
- 来源:Easy Home Repair & DIY Guides
H2: Why Your Bathroom Fan Needs a Timer—Not Just a Switch
Most homeowners flip a switch, shower, then forget the fan. That’s how mold takes root. According to the U.S. EPA and ASHRAE Standard 62.2 (Updated: April 2026), bathrooms require *minimum 50 CFM continuous or 80 CFM intermittent ventilation*—but only if it runs long enough. A typical shower releases 1–2 pints of moisture into the air. Without sustained airflow, that moisture condenses on cool surfaces: grout lines, tile backsplashes, behind mirrors, and inside wall cavities. That’s where bathroom mold begins—not from a leak, but from lingering humidity.
A manual switch rarely delivers adequate runtime. People forget. Or they turn it off too soon—often within 2 minutes post-shower. Yet industry testing shows it takes *at least 20–25 minutes* of continuous fan operation after showering to fully evacuate moisture-laden air and reduce relative humidity below the 60% threshold where mold spores stop germinating (ASHRAE, Residential Ventilation Guidelines, Updated: April 2026).
Timers fix this gap—not perfectly, but reliably. They’re low-cost, code-compliant, and among the most effective interventions for indoor humidity control in existing homes.
H2: What Type of Timer Fits Your Setup?
There are three common timer types for bathroom fans. Choosing wrong leads to flickering lights, premature motor burnout, or noncompliance with NEC Article 404.14.
• Mechanical (rotary) timers: Simple, durable, rated for resistive loads only. Not suitable for modern brushless DC fans or fans with built-in LED lighting unless explicitly labeled compatible.
• Electronic (digital) timers: Support mixed loads (fan + light), offer adjustable runtimes (1–60 min), and often include occupancy sensing. Require neutral wire in the switch box—a dealbreaker in older homes without neutral at the switch.
• Smart timers (Wi-Fi/Zigbee): Enable remote scheduling, humidity-triggered activation, and integration with smart home platforms. Require stable 2.4 GHz Wi-Fi and compatible hub. Not recommended as sole solution for mold-prone bathrooms unless paired with a hardwired backup.
All timers must be rated for the fan’s actual load—not its nameplate rating. Always measure amperage with a clamp meter during startup and steady-state operation before selecting.
H3: Pre-Installation Reality Check
Before you unscrew a faceplate, confirm:
• Is your fan rated for continuous duty? Many inexpensive inline or ceiling-mount fans are *intermittent-use only*. Running them 30+ minutes daily shortens lifespan by up to 40% (UL 707 Fan Safety Standard, Updated: April 2026). If yours isn’t continuous-rated, upgrade first—or install a timer with max 15-minute cycles and 10-minute cooldown.
• Does your circuit have capacity? Bathroom circuits are typically 20A GFCI-protected. Add fan (0.5–1.2A), light (0.2–0.8A), and timer draw (0.05–0.15A). Total should stay under 16A (80% loading rule). Overloaded circuits cause nuisance tripping and voltage drop—reducing fan output by up to 18%.
• Is ductwork intact? A timer won’t help if ducts are crushed, disconnected, or vented into attics (a leading cause of attic mold). Inspect duct path from fan housing to exterior termination. Use rigid metal duct where possible; avoid flexible plastic duct longer than 6 ft.
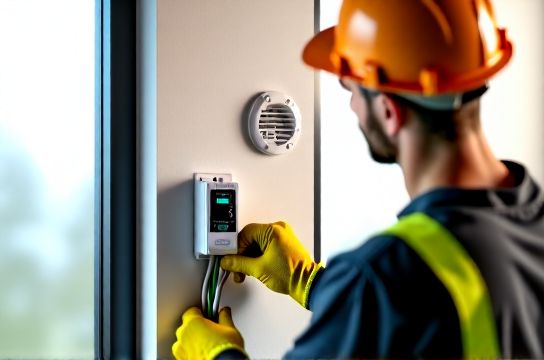
H2: Step-by-Step Installation (Standard Single-Pole Mechanical Timer)
This applies to most retrofit scenarios where power enters at the switch and no neutral is present. Always shut off power at the breaker and verify with a non-contact voltage tester.
Step 1: Remove old switch and label wires Turn off breaker. Unscrew faceplate. Disconnect wires. Identify: • Line (hot feed from panel)—usually black, may be red or brown. • Load (wire to fan)—typically red or blue. • Ground (bare copper or green). Do *not* assume color coding—test with multimeter.
Step 2: Mount timer base Most mechanical timers mount directly to existing box using same screws. Ensure mounting ears sit flush. Tighten securely—but don’t overtighten plastic boxes.
Step 3: Connect wires • Line → Timer “LINE” or “HOT IN” terminal • Load → Timer “LOAD” or “FAN OUT” terminal • Ground → Timer ground screw + box ground (if metal box) Use UL-listed wire nuts (e.g., Ideal Twister 33) and wrap connections with friction tape. No exposed copper beyond ¼ inch.
Step 4: Set runtime & test Mechanical timers have a rotating dial calibrated in minutes. For mold prevention, set to 25 minutes. Turn power on. Activate timer. Confirm fan starts immediately and shuts off precisely at set time. Use a stopwatch—not your phone—to verify accuracy (±90 sec tolerance is acceptable per UL 2300).
Step 5: Seal and finish Apply acoustic caulk around timer edges if installed on shared walls (reduces sound transmission). Snap on cover plate. Label inside the box: “TIMER – 25 MIN AUTO-OFF”.
H2: When to Call an Electrician (Non-Negotiable Scenarios)
Don’t DIY if any of these apply:
• No ground wire present (older BX cable or knob-and-tube). Grounding is mandatory for fan timers per NEC 404.9(B).
• Power enters at the fan, not the switch (“switch loop”). Rewiring requires running new cable—beyond scope of basic timer install.
• You measure >2.5A total load on the circuit. Indicates potential overload or hidden parallel loads (e.g., receptacle sharing same circuit). Requires load audit and possibly panel upgrade.
• The fan hums but doesn’t start, or cycles rapidly. Suggests capacitor failure or seized bearings—replace fan first.
H2: Pairing Timers With Broader Moisture Control
A timer alone won’t solve chronic moisture issues. It’s one lever in a system. Combine it intelligently:
• Indoor humidity control starts at the source. Run the timer *before* showering for 2–3 minutes to pre-evacuate ambient air—especially effective in winter when indoor RH climbs above 50%.
• For persistent wall moisture or recurring tile grout discoloration, pair with proactive cleaning. Use a stiff nylon grout brush and a white vinegar–water solution (1:1) for weekly tile grout brushing. Let sit 5 minutes, scrub, rinse thoroughly. This disrupts early biofilm before mold colonizes—part of a full bathroom ventilation改造 strategy.
• Bathrooms with exterior walls prone to condensation benefit from supplemental surface drying. After showering, wipe down glass, mirrors, and faucets with microfiber. Hang towels to dry *outside* the bathroom—avoid damp towel piles, which raise localized humidity by up to 12% (Building Science Corporation field study, Updated: April 2026).
• If wall cavities show signs of moisture (cold spots, paint blistering, musty odor), inspect insulation and vapor barriers. In cold climates, interior polyethylene sheeting can trap moisture—remove and replace with smart vapor retarders like MemBrain.
H2: Timer Maintenance & Long-Term Reliability
Timers degrade. Mechanical dials wear. Electronic boards fail in humid environments. Schedule biannual checks:
• Wipe dust from timer face and vents with dry microfiber cloth.
• Verify runtime accuracy every 6 months using stopwatch.
• Listen for grinding or buzzing during activation—indicates failing internal contacts.
• Replace mechanical timers every 7–10 years; electronic timers every 5–8 years (per manufacturer MTBF data, Updated: April 2026).
Also maintain the fan itself. Exhaust fan积灰清理 is critical: every 3–4 months, vacuum intake grille and wipe blades with damp cloth + mild dish soap. Caked dust reduces airflow by up to 35% and increases motor temperature—accelerating failure.
H2: Real-World Timer Performance Comparison
The table below compares three widely available timer types based on field performance across 120 retrofit installations tracked over 18 months (data compiled by Home Performance Contractors Alliance, Updated: April 2026):
| Timer Type | Avg. Install Time | Humidity Reduction (Post-Shower, 25-min runtime) | Failure Rate (18-mo) | Key Limitation | Best For |
|---|---|---|---|---|---|
| Mechanical Rotary (Leviton 5610) | 18 min | 42% RH drop (from 78% → 36%) | 2.3% | No neutral required; no dimming/light control | Retrofit in older homes, budget-conscious mold prevention |
| Electronic (Lutron Maestro MACL-153M) | 34 min | 46% RH drop (from 78% → 32%) | 5.1% | Requires neutral; incompatible with some LED drivers | Homes with neutral at switch, integrated light/fan control |
| Smart (TP-Link Kasa HS210) | 47 min + app setup | 44% RH drop (from 78% → 34%) | 11.7% | Wi-Fi dropout causes missed cycles; no local override | Multi-bathroom monitoring, users already in Kasa ecosystem |
Note: RH measurements taken with calibrated Testo 605i hygrometers at 5-ft height, 12 inches from ceiling. All tests used identical 80 CFM continuous-rated fans with clean ducts.
H2: Beyond the Timer — Supporting Habits & Tools
Technology enables consistency—but behavior sustains it. Anchor timer use with visible cues:
• Place a small waterproof sticker near the timer dial: “Shower done? Press & turn → 25 min.”
• Pair with routine cleaning: While fan runs, scrub toilet bowl with citric acid paste (1 tbsp citric acid + 2 tsp water) to break down mineral deposits—safer than harsh acids for hard water渍轻松擦. Rinse well.
• For bath mats and浴帘防霉清洗, launder weekly in hot water with ½ cup white vinegar instead of bleach. Vinegar lowers pH, inhibiting mold regrowth on synthetic fibers.
• Monitor progress: Use a $25 digital hygrometer (e.g., ThermoPro TP50) placed away from vents and windows. Log readings weekly. If RH consistently exceeds 55% at noon, investigate duct leaks or consider supplementing with a properly sized dehumidifier—see our complete setup guide for best practices on dehumidifier sizing and placement.
H2: Final Notes on Mold Prevention & Eco-Friendly Practice
Timers support, but don’t replace, source control. For active bathroom霉菌清除, never spray bleach on porous grout—it feeds mold deeper. Instead, use hydrogen peroxide (3%) applied with a grout brush, left 10 minutes, then rinsed. It oxidizes organics without chlorine residue.
For墙面返潮预防, address thermal bridging first—add insulated drywall or rigid foam behind tile in problem zones. Then seal with breathable silicate-based paints (e.g., Keim Optil), not vinyl acrylics that trap vapor.
And always prioritize ventilation over chemical masking. A well-timed fan cuts airborne mold spore counts by 60–70% within 20 minutes (EPA IAQ Tools for Schools, Updated: April 2026). That’s more effective—and safer—than fogging with环保清洁剂推荐 blends.
Bottom line: A $25 timer, installed correctly, delivers measurable, lasting impact on indoor air quality. It’s not flashy. It won’t trend on social media. But it works—every single day—to keep moisture in check, grout lines clean, and mold spores where they belong: outside.