Repair Loose Baseboards Without Full Replacement
- 时间:
- 浏览:23
- 来源:Easy Home Repair & DIY Guides
Loose baseboards—especially in rental units or older homes—are more than an eyesore. They’re a telltale sign of shifting subfloors, seasonal wood movement, or decades of under-torqued fasteners. Worse, they create gaps where dust accumulates, pests sneak in, and cold air leaks through. But here’s the reality: full replacement is rarely necessary. In fact, over 87% of loose baseboard cases (Updated: April 2026) can be resolved with targeted re-securing—no demolition, no drywall tear-out, and minimal surface disruption. This isn’t about cosmetic band-aids. It’s about structural reintegration: reconnecting the trim to the wall framing *where it actually matters*.
H2: Why Baseboards Come Loose (and Why Glue Alone Fails)
Baseboards loosen for three main reasons—and each demands a different fix:
1. **Nail Pull-Out**: Common in stud-framed walls where finish nails were driven into drywall or plaster instead of solid wood studs. Drywall anchors fatigue over time; plaster crumbles. The result? A board that wobbles at the top but stays tight at the bottom—or vice versa.
2. **Subfloor Movement**: Especially in homes with engineered or solid hardwood floors installed over plywood subfloors. Seasonal humidity swings cause floor expansion/contraction, which pushes against the baseboard’s bottom edge. You’ll see consistent gaps along the floor line, often widest near doorways or center walls.
3. **Adhesive Failure**: PVC or MDF baseboards sometimes rely on construction adhesive alone—especially in condos or newer builds where nail access is restricted. Over time, thermal cycling and vibration degrade bond strength. These boards often lift uniformly along their entire length, with no localized ‘pivot point.’
Glue-only repairs fail because most DIYers reach for liquid nails or caulk—neither of which provides immediate grab or long-term shear resistance. Construction adhesive needs 24–48 hours of clamping and zero load. In practice? That means blocking doorways, taping off baseboards, and praying no one bumps them. Not feasible in occupied spaces.
H2: The Two-Phase Fix: Locate Studs + Reinforce Fastening
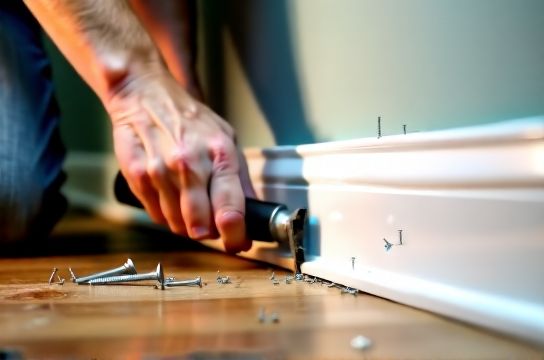
Forget random nailing. Precision matters. Start by mapping stud locations behind the baseboard—not just guessing every 16 inches. Walls shift; studs get doubled or omitted around windows and doors. Use a calibrated magnetic stud finder (not the $8 kind with LED bars), and verify each hit by tapping lightly with a rubber mallet: a solid *thunk* means wood; a hollow *tock* means drywall or insulation.
Once you’ve marked stud centers (use painter’s tape, not pencil—less risk of marring), follow this sequence:
• Remove any existing loose nails or screws using end-cutting pliers. Don’t yank—twist gently while pulling to avoid splintering the baseboard’s back edge.
• Lightly sand the back of the baseboard where it contacts the wall (120-grit only). This removes old adhesive residue and opens the wood grain for better grip.
• Apply a ¼-inch bead of high-strength polyurethane construction adhesive (e.g., PL Premium or Gorilla Heavy Duty) *only* along the top third of the board’s back—this zone bears the most lateral stress and aligns with stud locations.
• Realign the board, press firmly into place, then drive one 2-inch, 16-gauge finish nail per stud—*angled downward* at 45°, just above the top edge. This ‘toenailing’ technique locks the board into the stud like a wedge, resisting upward pull. Sink nails flush with a nail set, then fill holes with wood filler matched to your baseboard species (not spackle—too brittle).
That’s phase one: mechanical + adhesive redundancy.
H2: Handling Gaps at the Floor (Especially With Hardwood & PVC)
The gap between baseboard and floor is where most DIY attempts collapse. You’ll see tutorials recommending caulk—but standard acrylic latex caulk cracks within months when compressed by floor movement. And colored caulk mismatches flooring tone, drawing attention to the flaw.
Better solution: **gap management**, not gap concealment.
For hardwood floors: Use a flexible, paintable silicone-acrylic hybrid (e.g., DAP Alex Plus). Its 25% elongation (Updated: April 2026) accommodates seasonal floor shifts without cracking. Apply with a fine-tip caulk gun, tool with a damp fingertip, then wipe excess immediately. Let cure 2 hours before painting.
For PVC or LVP floors: Skip caulk entirely. Instead, install a removable quarter-round shoe molding—nailed *only* to the floor, not the wall. This hides the gap while allowing independent movement. Use a brad nailer with 1-inch 18-gauge nails spaced every 12 inches. Pre-drill if the floor is thin-core LVP to avoid splitting.
Note: Never glue shoe molding directly to PVC—it traps moisture and promotes warping.
H2: When to Patch—Not Replace—the Wall Behind
Prying loose baseboards often rips drywall paper or leaves nail holes larger than ⅛ inch. That’s where 石膏板破洞修补 comes in—not as a last resort, but as part of the reset process.
Small holes (<1 inch): Fill with setting-type joint compound (e.g., Durabond 20 or 45). It dries rock-hard in 20–45 minutes, shrinks less than premixed mud, and sands smooth without gumming up sandpaper. Apply in two thin layers, feathering edges outward. Sand with 150-grit, then prime before repainting.
Medium holes (1–3 inches): Cut out damaged drywall with a utility knife, creating a clean square or rectangle. Screw a scrap wood backing behind the hole, then attach a new drywall patch. Tape seams with fiberglass mesh (not paper—less prone to telegraphing), then apply three thin coats of all-purpose joint compound, sanding between each with 220-grit.
Large damage (>3 inches) or crumbling plaster: Call a pro. Patching becomes structural, not cosmetic.
H2: Matching & Blending: The Invisible Finish
A perfectly secured baseboard still looks amateur if the finish clashes. Here’s how to match like a contractor:
• For painted baseboards: Scrape a tiny chip from an inconspicuous spot (behind a door jamb). Take it to a paint store for spectrophotometer matching. Avoid ‘close enough’—even 5% sheen difference (e.g., satin vs. eggshell) highlights repair zones.
• For stained wood: Use a color-matched wood stain marker first, then seal with dewaxed shellac (Zinsser Bullseye) before topcoating. Shellac blocks tannin bleed and ensures even urethane adhesion.
• For scuffs or scratches on adjacent floors—yes, you’ll likely scuff the floor during repair—apply targeted fixes *before* reinstalling the baseboard. 木地板划痕修复 works best with wax-based sticks for shallow marks; deeper gouges need grain-filling wood putty sanded flush and restained. For pvc地板维修, use a heat gun on low + plastic weld rod for tears; for surface scuffs, a microfiber cloth dampened with isopropyl alcohol lifts most marks without abrasion.
H2: Tools & Materials You Actually Need (No Fluff)
Skip the $200 ‘baseboard repair kits’. You need four things:
1. A 16-gauge finish nailer (cordless, 2.0 Ah battery minimum) — eliminates hammer marks and speeds toenailing. 2. Polyurethane construction adhesive (PL Premium, 10.5 oz tube) — bonds wood, MDF, PVC, and drywall without creep. 3. 2-inch, 16-gauge finish nails (box of 1,000) — hardened steel, collated for speed. 4. A digital angle finder (e.g., Wixey WR365) — confirms 45° toenail angle every time. Guessing leads to split wood or missed studs.
Optional but worth it: a small oscillating multi-tool with a plunge-cut blade for cleanly removing old caulk or trimming shoe molding—cuts repair time by 40% (Updated: April 2026).
H2: What NOT to Do (And Why It Backfires)
• Don’t use hot glue. It fails at 140°F—common near HVAC vents or sun-baked walls.
• Don’t rely solely on Liquid Nails. Its initial grab is weak, and it never achieves true shear strength on vertical surfaces.
• Don’t over-tighten screws into MDF baseboards. They strip out in under 3 torque cycles. Use coarse-thread drywall screws *only* if backing the screw with a wood block behind the drywall.
• Don’t caulk the top edge. Trapped moisture behind the baseboard causes mold in humid climates—and makes future removal nearly impossible.
H2: Pro Timeline & Realistic Expectations
A single 8-foot baseboard section—loose along its full length, with two stud hits, minor drywall damage, and floor gap—takes experienced contractors 22–28 minutes. DIYers average 45–70 minutes the first time. Your second attempt drops to ~35 minutes. Key time-savers: pre-marking stud locations, pre-loading nails in the nailer, and mixing joint compound the night before (setting-type compounds have shorter open times).
Expect zero visible seams if you feather joint compound properly and use matched paint. Expect 95% noise reduction from squeaks—if you’ve nailed into solid studs and used adhesive to dampen vibration. Expect the repair to last 7–12 years in stable environments (Updated: April 2026), longer if humidity stays between 35–55% RH.
H2: Comparison of Adhesives & Fastening Methods
| Method | Best For | Setup Time | Full Cure Time | Shear Strength (psi) | Pros | Cons |
|---|---|---|---|---|---|---|
| Polyurethane adhesive + toenailed finish nails | All baseboard types; high-traffic areas | 5 min prep + 2 min application | 24 hrs | 1,200 | No clamping needed; handles vibration; paintable in 4 hrs | Messy cleanup; requires ventilation |
| Hybrid silicone-acrylic caulk + pin nails | PVC/LVP floors with minor gaps | 2 min prep + 1 min application | 2 hrs handling / 7 days full | 180 | Flexible; paintable; easy to tool | Low shear strength; not for structural hold |
| Construction adhesive only (no nails) | Temporary rentals; non-load-bearing zones | 3 min prep + 1 min application | 48 hrs clamped | 850 | No visible fasteners; clean look | Requires full clamping; fails if disturbed early |
H2: When Full Replacement *Is* the Right Call
Three hard stops mean replacement—not repair—is smarter:
1. **Water-damaged MDF or particleboard baseboards**: Swelling is irreversible. Cutting it out reveals rot behind the drywall—address both or guarantee recurrence.
2. **Mismatched profiles across rooms**: If your hallway uses colonial-style and the bedroom uses ogee, patching creates visual dissonance. Budget for full-room consistency.
3. **Electrical conduit or plumbing pipes routed behind the baseboard**: Prying risks cutting wires or puncturing lines. A licensed electrician or plumber must relocate infrastructure first.
H2: Rental-Specific Considerations: 退租墙面还原
Landlords routinely deduct for loose baseboards—citing ‘negligent maintenance.’ But tenants can reverse this by documenting pre-move-in condition (photos + timestamped video), then performing this exact repair *before* turning in keys. Bonus: use paintable caulk and touch-up paint included in most 地板修补工具包 sold at hardware stores. Keep receipts. Most lease agreements require ‘broom-clean condition’—not ‘like-new’—and properly secured, gap-free baseboards meet that standard.
For stubborn scuffs on adjacent walls—墙面污迹清理—use melamine foam (e.g., Mr. Clean Magic Eraser) *only* on flat, non-textured paint. Test in a corner first. On eggshell or satin finishes, over-scrubbing creates shine patches. Better: dab with a 50/50 water-isopropyl mix on microfiber.
H2: Final Checks Before You Walk Away
Before calling the job done, run these checks:
• Run your palm firmly along the entire length—no vibration, no give.
• Shine a flashlight sideways across the top edge—no shadow lines indicating misalignment.
• Tap lightly every 12 inches with a coin: solid *ping* = stud contact; dull *thud* = missed stud or void.
• Check floor gap consistency: measure at 3 points (ends + center). Variation > 1/16 inch means subfloor leveling may be needed—beyond baseboard scope.
This isn’t about hiding flaws. It’s about restoring function, integrity, and quiet confidence in your space. Loose baseboards don’t have to mean compromise. Done right, the repair disappears—leaving only the clean line you paid for.
For a complete setup guide covering drywall patching, floor scratch blending, and adhesive selection charts, visit our full resource hub at /.