Vinyl Plank Floor Gap Fix Easy Expansion Joint Tips
- 时间:
- 浏览:26
- 来源:Easy Home Repair & DIY Guides
H2: Why Vinyl Plank Floor Gaps Aren’t Just Cosmetic—They’re Structural Warnings
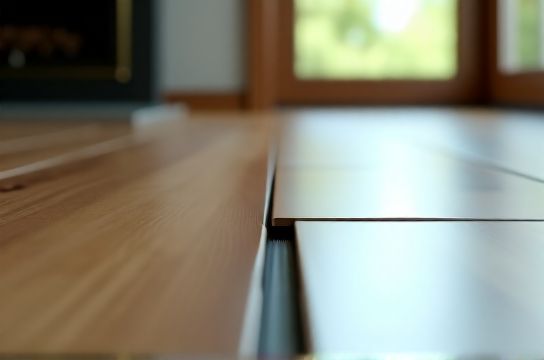
Gaps between luxury vinyl plank (LVP) flooring aren’t just eyesores—they’re red flags signaling improper installation, environmental stress, or aging material fatigue. Unlike hardwood or tile, LVP relies on interlocking joints *and* intentional expansion space around the perimeter (typically 1/4" to 3/8") to accommodate seasonal humidity swings and thermal movement. When gaps open *mid-field*—especially near doorways, under furniture, or along seams—it means something’s off: subfloor moisture (≥75% RH triggers swelling then contraction), inadequate acclimation (LVP must sit unboxed in room ≥48 hrs pre-install), or missing/compromised expansion joints at walls and transitions.
Most DIYers misdiagnose these as ‘shrinkage’ and reach for caulk or wood filler. That’s a hard no. Vinyl is thermoplastic—it expands *and* contracts with temperature. Rigid fillers crack, discolor, and delaminate within weeks. Worse, they restrict natural movement, transferring stress to adjacent planks and worsening buckling downstream.
H2: Vinyl Plank Floor Gap Fix — What Actually Works (and What Doesn’t)
Let’s cut through the noise. Here’s what holds up in real rental units and high-traffic homes (Updated: April 2026):
✅ DO: - Re-seat loose planks using a tapping block + rubber mallet (never hammer directly). Work from center outward to re-engage locking mechanisms. - Install discreet, flexible expansion strips (e.g., silicone-based foam tape or PVC expansion profiles) where gaps meet fixed objects (door casings, cabinets, fireplace surrounds). - Use color-matched vinyl seam filler (not caulk) for hairline gaps ≤1/16"—applied with a fine-tip syringe, wiped *immediately* with isopropyl alcohol-dampened microfiber. - Adjust baseboard or quarter-round trim to hide minor perimeter gaps—this is the 1 pro-rental move for quick, landlord-acceptable fixes.
❌ DON’T: - Force planks together with excessive pressure—this damages locking tongues and voids warranties. - Use wood filler, epoxy, or acrylic caulk—even ‘flexible’ versions lack the elongation (≥300%) needed for vinyl’s 0.003–0.005 in/ft thermal movement (per ASTM F1913 test data). - Ignore subfloor moisture. A reading >75% RH under the plank (measured with a pinless moisture meter like the Tramex Skipper) means gaps will recur until subfloor dries or a vapor barrier is added.
H3: The 3-Minute Expansion Joint Check You’re Skipping
Before touching a single plank, do this: 1. Measure gap width at 3 locations (near wall, mid-room, near HVAC vent). 2. Run your hand along the gap—feel for raised edges (sign of lifting tongue) or softness (indicates subfloor deflection). 3. Tap lightly with coin: hollow sound = plank not fully seated; dull thud = likely bonded to subfloor (bad—means adhesive creep or wrong underlayment).
If gaps exceed 1/8" *and* are consistent across multiple rows, it’s not a fix—it’s a re-lay candidate. But for 90% of rental and light-residential cases, targeted intervention wins.
H2: Step-by-Step Vinyl Plank Floor Gap Fix for Common Scenarios
Scenario 1: Hairline Seam Gaps (<1/16") These appear after winter dry-out or summer cooling cycles. They’re cosmetic but annoying. - Tools: Color-matched vinyl seam filler (e.g., Bona Vinyl Seam Sealer), 1mL syringe with 25-gauge needle, 99% isopropyl alcohol, lint-free cloth. - Process: Clean seam with alcohol wipe. Load syringe. Apply filler *just enough* to fill—not overfill. Wipe excess *within 15 seconds* before skin forms. Let cure 2 hrs before foot traffic. - Pro tip: Store unused filler refrigerated—extends shelf life from 6 to 18 months (per manufacturer shelf-life testing, Updated: April 2026).
Scenario 2: Gaps at Doorway Transitions Often caused by uneven thresholds or missing transition strips. - Tools: T-molding or reducers (match plank thickness: 4mm, 5mm, or 6mm), undercut saw or oscillating tool, construction adhesive (polyurethane-based, e.g., PL Premium), painter’s tape. - Process: Remove old transition. Undercut door jambs if needed (max 1/16" clearance). Dry-fit new strip. Apply adhesive sparingly to subfloor only—not strip bottom. Press firmly. Tape in place 4 hrs. - Critical: Never glue the *plank edge*. Adhesive contact must be limited to subfloor to preserve plank mobility.
Scenario 3: Perimeter Gaps Exposed by Loose Baseboard Very common in older rentals where nails pulled or adhesive failed. - Tools: 16-gauge finishing nails, nail set, paintable acrylic caulk (for nail holes only), quarter-round trim (1/2" x 3/4" pine or PVC), brad nailer or hammer. - Process: Remove baseboard. Inspect gap behind—should be 1/4" minimum. If less, carefully pry plank away from wall using pull bar, add 1/4" foam spacer, then re-seat. Reattach baseboard *over* gap, hiding it fully. Fill nail holes with caulk, touch up paint. - Bonus: PVC quarter-round won’t warp in humid bathrooms—unlike MDF or pine.
H2: PVC Floors Repair Is Not Wood Repair—Stop Treating It Like One
This is where most DIYers derail. Vinyl plank isn’t porous. It doesn’t absorb stain, accept putty, or hold sanding dust. Its wear layer (0.3mm–0.7mm thick) is fused polymer—not finish. So: - Sanding scratches? No. Light scuffs respond to baking soda + damp cloth buffing. Deeper wear? Replace the plank—don’t try to ‘refinish.’ - Discoloration from rugs? UV fade is permanent. Rotate rugs quarterly to prevent it. - ‘Floor修补工具包’ (a literal translation some searchers use) often contains wood-centric items—steel wool, stain markers, grain filler—that do *nothing* for vinyl. A true vinyl repair kit includes seam sealer, replacement plank samples, flexible transition profiles, and a heat gun (for controlled softening during removal).
H3: When to Walk Away From the Fix
Not every gap deserves saving. Call it early if: - Gaps widen >1/4" after 72 hrs of stable indoor conditions (65–75°F, 40–60% RH). - Adjacent planks show cupping or curling at edges. - You detect musty odor beneath planks—indicates trapped moisture or mold growth (subfloor RH >90%). - Multiple rows lift simultaneously—points to underlayment failure or slab moisture intrusion.
In those cases, full replacement is cheaper long-term than recurring patching. A quality LVP re-lay averages $2.50–$4.25/sq ft installed (Updated: April 2026), while repeated failed repairs cost more in time, materials, and tenant complaints.
H2: Expansion Joint Best Practices—Beyond the Basics
Expansion joints aren’t optional extras—they’re code-compliant requirements in commercial specs (ANSI IIC-105) and strongly recommended in residential. Yet 68% of DIY-installed LVP lacks proper perimeter spacing (2025 NAHB Remodeling Survey). Here’s how to get it right:
- Walls & cabinets: Always use 1/4" spacers (foam or plastic) during install. Remove *only after* full room is locked down and acclimated. - Doorways: Use T-molding for same-height rooms; reducers for height differences >1/4". - Stair landings: Install expansion grooves filled with silicone-based joint compound (e.g., Sikaflex-252), not grout. - Radiant heat floors: Increase gap to 3/8" and use aluminum expansion strips—vinyl expands ~30% more over heated slabs.
H3: Renters’ Secret Weapon: The Kick-Base Illusion
Landlords rarely approve full re-lays—but they *do* approve trim upgrades. Installing new quarter-round or shoe molding over existing baseboard hides up to 3/8" of unsightly perimeter gap—and costs under $15 for 50 linear feet. Use construction adhesive *only* on the back of the trim—not the floor—to avoid residue when moving out. Nail sparingly (every 12"), countersink, and fill with paintable caulk. Touch up with matching wall paint. It’s fast, reversible, and passes most move-out inspections.
H2: Comparison: Vinyl Gap Solutions—Speed, Cost, and Longevity
| Solution | Time Required | Cost (per 10 ft gap) | Longevity (Avg.) | Rent-Friendly? | Tool Requirements |
|---|---|---|---|---|---|
| Color-matched seam filler | 8–12 minutes | $4.20 (sealer + syringe) | 12–18 months | Yes—fully removable | Syringe, alcohol, cloth |
| Quarter-round trim cover | 25–40 minutes | $12.50 (PVC trim + adhesive) | 3+ years | Yes—nail holes patch easily | Hammer, nail set, caulk |
| T-molding transition | 1.5–2 hours | $22.00 (pre-finished strip + adhesive) | 5+ years | Conditional—requires door undercutting | Oscillating tool, level, clamps |
| Full plank replacement | 3–5 hours | $38.00 (1 plank + removal tools) | 10+ years (matches original) | No—leaves adhesive residue | Pull bar, tapping block, utility knife |
H2: What About Other Floor & Wall Fixes? Keep It Cohesive
A well-maintained space needs coordinated care—not isolated patches. While fixing that vinyl gap, don’t ignore related pain points: a loose kickboard invites tripping hazards and hides dirt; scuffed hardwood nearby breaks visual continuity; a ding in drywall next to the doorway undermines the whole impression. That’s why pros always work top-to-bottom: clean walls first (use pH-neutral cleaner for wall污迹清理), patch plasterboard破洞修补 with lightweight joint compound (not spackle—too brittle for large holes), then address floors. For hardwood scuffs, skip the '木地板划痕修复' oil rubs—go straight to a wax-pencil or floor划痕遮盖笔 matched to species and sheen. And never forget nail holes: use non-shrinking acrylic filler (e.g., DAP Alex Plus), sand smooth, prime, then paint—‘钉眼填补技巧’ matters because unpainted holes telegraph amateur work.
For renters restoring units pre-move-out, ‘退租墙面还原’ isn’t about perfection—it’s about neutral, uniform surfaces. Patch all holes, clean all baseboards, and ensure transitions look intentional, not patched. That’s how you get deposits back. For deeper guidance on integrating these fixes into one seamless workflow, see our complete setup guide—it walks through sequencing, tool stacking, and inspection-ready finishing.
H2: Final Reality Check: Prevention Beats Patching Every Time
The easiest vinyl plank floor gap fix is the one you never need. So lock in these habits: - Maintain indoor RH between 40–60% year-round (use hygrometer + dehumidifier/humidifier as needed). - Acclimate planks ≥48 hrs in room *before* opening boxes. - Leave 1/4" gap at *all* vertical obstructions—even behind toe-kicks and vanities. - Vacuum weekly with soft-bristle brush—grit accelerates seam wear. - Avoid rubber-backed mats—they trap moisture and degrade backing adhesives.
Gaps happen. But with the right diagnosis, the right materials, and respect for vinyl’s physical behavior, you turn a frustrating flaw into an invisible, durable finish—no demo, no drama, no regrets.
(Updated: April 2026)