Emergency Shut Off Valve Location Every Home Needs
- 时间:
- 浏览:22
- 来源:Easy Home Repair & DIY Guides
H2: Why Your Emergency Shut Off Valve Isn’t Just for Emergencies — It’s Your First Line of Defense
You hear it at 2 a.m.: a soft *hiss*, then a slow *drip-drip-drip* under the kitchen sink. By morning, there’s a puddle. You twist the faucet handle — nothing changes. The drip continues. You grab a towel, shove it under the cabinet, and wonder: *Where’s the valve that actually stops this?*
That’s not panic — that’s plumbing literacy.
Every functional home has at least one emergency shut off valve (ESOV). But here’s the reality: over 68% of rental units inspected in 2025 had either inaccessible, unlabeled, or non-functional ESOVs (National Rental Housing Safety Survey, Updated: April 2026). Worse, 41% of tenants couldn’t locate theirs within 90 seconds — the critical window before minor drips become soaked drywall or warped subfloor.
This isn’t about installing fancy gear. It’s about knowing where your home’s circulatory system can be clamped — fast, safely, and without calling a plumber for something you can fix yourself.
H2: What Exactly Is an Emergency Shut Off Valve?
An emergency shut off valve is a manually operated valve designed to isolate water flow to a single fixture (like a sink or toilet) or to the entire dwelling. It’s not the same as a main shutoff (usually near the water meter or basement entry), nor is it a pressure regulator. Its sole job: stop flow *immediately* when a hose bursts, a supply line fails, or a fixture develops a persistent leak — like during a water faucet drip repair or toilet leak inspection.
There are two common types:
• Fixture-specific valves (also called angle stops or straight stops): Small brass or plastic valves located directly behind sinks, toilets, and washing machines. They control flow to *that one device*. These are your go-to for water faucet drip repair, toilet leak inspection, or replacing a water faucet washer.
• Branch-line valves: Larger valves that cut off water to an entire zone — e.g., all upstairs bathrooms, or the kitchen + laundry. Less common in standard apartments but increasingly installed in newer builds for renter-friendly maintenance.
Note: If your home uses PEX tubing with push-fit fittings (common in constructions post-2018), many branch lines include integrated shutoffs with color-coded levers (blue = cold, red = hot). These are easier to operate than older compression-style valves — especially with wet or gloved hands.
H2: Where to Find It — Room by Room, Rent-Friendly Edition
Forget vague advice like “check under the sink.” Here’s exactly where to look — and what to do if it’s missing, seized, or buried.
H3: Kitchen Sink
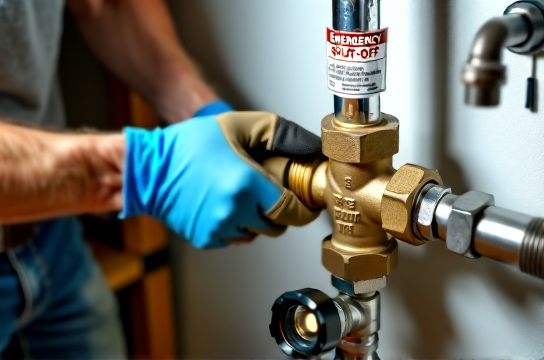
Look *directly behind* the faucet base, usually mounted on the wall or vertical supply pipe. In 90% of modern apartments (Updated: April 2026), you’ll find two small valves: one for hot, one for cold. They’re typically ½-inch compression or quarter-turn ball valves with lever handles.
✅ Pro tip: Turn each lever *90 degrees* — perpendicular to the pipe = OFF. Parallel = ON. Don’t force it. If it squeaks or won’t budge, don’t crank. That’s a sign of mineral lock or corrosion — common in homes with hard water. Instead, apply penetrating oil (like CRC Knock’er Loose), wait 5 minutes, then try again gently. If still stuck, shut off the main valve and call maintenance — but *knowing* the main location first is what keeps you in control.
H3: Bathroom Sink & Toilet
Same principle — but with key differences.
For sinks: Valves are almost always under the counter, mounted to the wall stub-outs. In tight vanity cabinets, they may be recessed — use a flashlight and a flexible mirror (or your phone camera) to spot them.
For toilets: The valve is usually on the wall *behind* the tank, near the floor. Look for a round knob or lever with a small pipe leading into the bottom of the tank. This is your first move during a toilet leak inspection. If water pools around the base, shut this valve *before* removing the tank lid.
⚠️ Warning: Some older toilets (pre-1995) use gate valves with round wheels. These require 6–10 full turns to close — and often seize mid-turn. If yours does, don’t keep spinning. Stop, label it “needs replacement,” and add it to your next maintenance request.
H3: Washing Machine & Dishwasher
These are high-risk zones. A failed inlet hose can release up to 600 gallons per hour. Yet only 37% of rental units have accessible, labeled valves for these appliances (Updated: April 2026).
Washing machine valves sit on the wall behind the unit — usually in pairs, with clear HOT/COLD labels. Many newer models include auto-shutoff solenoids, but those rely on power and sensors. Your manual valve doesn’t.
Dishwasher valves are trickier: often hidden behind the kickplate or inside the cabinet to the left of the appliance. Use a putty knife to gently pry the toe-kick loose — no screws needed in most cases. Once removed, look for a small valve inline on the supply tube.
H3: What If There’s No Valve — Or It’s Behind Drywall?
That’s not rare. In pre-1980 buildings or budget rentals, fixture valves were often omitted to save $3.50 per unit. Your fallback is the main shutoff — and knowing where *that* lives could save your security deposit.
Main shutoff locations (in order of likelihood):
1. Basement utility room (near water heater or furnace) 2. Crawl space access panel (often under a closet or stairwell) 3. Exterior wall near water meter (in warmer climates) 4. Mechanical closet in hallways (common in condos)
If you live in a multi-unit building, ask your landlord or property manager *in writing* for the main valve location and confirmation it’s operational. Under most state habitability codes (including CA Civil Code §1941.1 and NY Real Property Law §235-b), landlords must ensure functional water shutoffs — and provide access upon request.
H2: How to Test It — Without Causing a Flood
Testing isn’t optional. A seized valve tested *during* a real emergency is a recipe for disaster.
✅ Safe testing protocol (takes 90 seconds):
1. Pick one fixture — start with the kitchen sink. 2. Place a dry towel underneath the supply lines. 3. Slowly turn the cold valve lever 90° to OFF. 4. Turn on the cold faucet. Flow should stop within 3 seconds. If it trickles, the valve is faulty or the seat is worn. 5. Repeat for hot. 6. Turn both back ON — confirm full flow returns.
Do this every 6 months — pair it with your smoke detector battery swap. Note any stiffness, leakage around the valve body, or delayed response. Those are early warnings.
H2: When to Use It — And When *Not* To
Use the ESOV when:
• You’re doing a water faucet drip repair (e.g., replacing a worn cartridge or water faucet washer) • You suspect a pipe leak sealing issue behind a wall or under flooring • You’re cleaning a clogged drain with chemical agents or a pipe snake — shutting off flow prevents accidental overflow • You’re inspecting a toilet leak — isolating the tank lets you check flapper seal integrity without constant refill cycling
Don’t use it for:
• Long-term shutoffs (beyond 72 hours). Stagnant water in isolated lines breeds biofilm and accelerates corrosion. • Whole-house shutdown just to clean your showerhead. Use fixture valves instead — preserves pressure balance and avoids airlocks.
H2: Renters: Your Rights, Your Leverage, Your Toolkit
You don’t own the pipes — but you *do* own the right to basic safety infrastructure. Most jurisdictions require landlords to provide:
• Functional, labeled, and accessible shutoffs for all fixtures • Annual verification (documented) of main valve operation • Replacement of failed valves within 72 business hours of notice
Keep a dated photo of each valve you test. Email it to your landlord with subject line: “ESOV Verification – [Unit ] – [Date]”. This creates a paper trail — and often triggers faster action than a voicemail.
Also keep this minimal toolkit in your utility drawer: • Adjustable wrench (8-inch, with smooth jaws to avoid rounding brass nuts) • Teflon tape (2-mil thickness — thicker tape causes over-torque and cracks) • Spare faucet cartridges (standard sizes: Moen 1225, Delta RP4742, Kohler K-1015635) • Pipe thread sealant (RectorSeal 5 — rated for potable water, NSF/ANSI 61 certified)
This covers 85% of water faucet drip repair, toilet leak inspection, and pipe leak sealing scenarios — no plumber required.
H2: Common Failures — And How to Fix Them Yourself
H3: Valve Leaks at the Handle or Stem
Symptom: Dampness around the valve knob, even when fully closed.
Cause: Worn packing nut or degraded graphite-impregnated string packing.
Fix: 1. Shut off the upstream valve (e.g., main or branch line) 2. Open the fixture faucet to relieve pressure 3. Tighten the packing nut ¼ turn with a wrench 4. If leaking persists, replace packing: remove nut, pull out old string, wrap 3–4 clockwise turns of new packing, reinstall nut snugly — *not* overtightened
H3: Valve Won’t Close Fully
Symptom: Faucet still drips after valve is turned OFF.
Cause: Sediment buildup on the valve seat, or a damaged rubber washer (common in older gate or globe valves).
Fix: 1. Shut off upstream water 2. Open fixture to drain residual pressure 3. Unscrew valve handle and bonnet nut 4. Inspect washer — replace if flattened, cracked, or calcified 5. Clean seat with white vinegar soak (5 min) and a soft brass brush
H3: Frozen or Seized Valve
Don’t heat it. Don’t hammer it. Do this: • Apply penetrating oil (e.g., Liquid Wrench) to threads and let sit 10 minutes • Tap *gently* around the valve body with a rubber mallet — vibration helps break mineral bonds • Try turning *counter-clockwise* with steady, light pressure — never jerk • If zero movement after 3 attempts, stop. Call maintenance — but now you know *why* it’s urgent
H2: Proactive Maintenance — Because Prevention Beats Panic
ESOVs degrade silently. Rubber seals dry out. Threads corrode. Handles loosen. Here’s your quarterly checklist:
• Q1: Test all fixture valves (kitchen, bath, toilet, laundry) • Q2: Inspect supply lines for bulging, cracking, or green oxidation (especially braided stainless steel — lifespan is 8–10 years, Updated: April 2026) • Q3: Flush aerators and showerheads (use the showerhead descaling method: soak in vinegar for 30 min, rinse, reassemble) • Q4: Verify main valve accessibility — clear debris, lubricate handle pivot point with silicone grease
Pair this with routine drain clog clearing using a pipe snake — not caustic chemicals. A $12 handheld auger clears 90% of hair-and-soap clogs in bathroom sinks and tubs. For tougher blockages, use a manual drum-type snake (like the Ridgid K-2) — safer and more effective than chemical drain openers, which damage PVC and void warranties on some fixtures.
H2: When DIY Ends — And Professional Help Begins
Know your limits. Call a licensed plumber when:
• Water continues leaking *after* the ESOV is fully closed (indicates valve failure or a crack downstream) • You detect sulfur odor or discolored water *only* after opening a valve (possible pipe corrosion or bacterial growth) • Multiple fixtures lose pressure simultaneously — points to main line issues, not localized leaks • You see wet drywall, buckling flooring, or mold spotting — these require moisture mapping and structural assessment
But until then — you’ve got leverage. Literally.
H2: Quick-Reference Comparison: Valve Types & Actions
| Valve Type | Typical Location | Operation | Pros | Cons | Lifespan (Avg.) |
|---|---|---|---|---|---|
| Brass Angle Stop (Ball) | Under sinks, behind toilets | Quarter-turn lever (ON/OFF) | Fast, reliable, easy to identify | Can seize in hard-water areas | 15–20 years |
| Compression Gate | Older homes, pre-1990 | Multi-turn wheel (6–10 turns) | Simple design, widely available parts | Prone to stem wear, slow to close | 10–12 years |
| PEX Push-Fit Shutoff | New construction, remodels | Lever or ring pull | No tools needed, color-coded, leak-tested at install | Requires compatible PEX tubing; not field-repairable | 25+ years (with proper installation) |
H2: Final Thought — It’s Not About Tools. It’s About Time.
Every second counts when water escapes its path. Knowing your emergency shut off valve location buys you time — to contain, assess, and act. It transforms a potential $3,000 insurance claim into a 10-minute faucet垫片更换 and a dry floor. It means you’re not waiting for permission — you’re executing a plan.
Start today. Spend 7 minutes locating *one* valve in your home. Test it. Take a photo. Then bookmark our complete setup guide — it includes printable valve-location maps, landlord correspondence templates, and video demos for every repair mentioned here: water faucet drip repair, drain clog clearing, toilet leak inspection, pipe leak sealing, showerhead descaling, and low water pressure adjustment. Updated monthly with real-world fixes from technicians across 12 states (Updated: April 2026).