How to Replace a Worn Out Faucet Seat Washer Without Spec...
- 时间:
- 浏览:32
- 来源:Easy Home Repair & DIY Guides
H2: Why Your Faucet Drips (and Why It’s Almost Always the Seat Washer)
A dripping faucet isn’t just annoying—it wastes ~3,000 gallons per year if left unaddressed (Updated: April 2026). That’s enough to fill a small above-ground pool. In compression-style faucets—still the most common type in rental apartments, older condos, and budget-friendly homes—the culprit is nearly always the rubber or neoprene seat washer pressed against the brass valve seat. Over time, mineral deposits from hard water wear grooves into the washer surface; repeated on/off cycles fatigue the rubber; and tiny grit particles embedded in the water stream act like sandpaper. The result? A persistent drip from the spout—even when the handle feels tight.
This isn’t a sign of major plumbing failure. It’s a wear-and-tear issue—like replacing brake pads on a bike. And unlike cartridge or ceramic-disk faucets, compression units were designed for user-level service. No soldering. No torque wrenches. Just patience, observation, and what you already have in your junk drawer.
H2: What You’ll Actually Need (Spoiler: It’s Not a Tool Kit)
Forget the $45 ‘faucet repair kit’ with 17 washers you’ll never use. Here’s what works—and why each item matters:
• A flathead screwdriver (size: medium—think 2 Phillips shaft width, but flat-blade). Not the tiny jeweler’s kind. Not the crowbar-sized one. A standard 1/4"–3/8" wide blade with a firm grip handles most set screws without stripping.
• Needle-nose pliers (standard hardware-store grade). Used not for gripping—but for *leverage*. You’ll slide the tip under the edge of the old washer to pry it up gently, avoiding damage to the brass seat underneath.
• A clean rag or microfiber cloth. Critical for wiping away calcium scale before installing the new washer. A damp rag + light scrubbing removes 90% of visible buildup. No vinegar soak needed—unless the seat itself is heavily corroded (rare in <15-year-old fixtures).
• Replacement washers: Buy *two sizes*—typically 1/4" and 5/16" flat rubber washers with brass backing rings (not plastic). These cost under $2.50 for a 10-pack at any hardware store. Don’t guess: remove the old washer first, then match diameter and thickness visually. If it has a metal insert, replicate that. Skip silicone or EPDM unless your water is extremely chlorinated (e.g., municipal systems with >2 ppm free chlorine)—standard black rubber lasts longer in typical residential conditions.
• Optional but helpful: A small LED keychain light. Faucet stems sit deep inside cramped escutcheon plates—especially in bathroom sinks. Shadows hide cracks and misalignment. Light = clarity.
No pipe wrench. No basin wrench. No Teflon tape (it does *nothing* here—this isn’t a threaded joint). This is mechanical compression, not sealing.
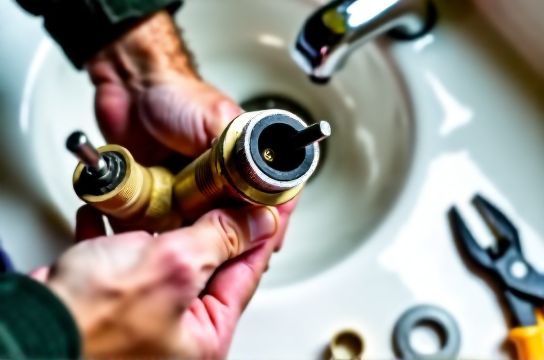
H2: Step-by-Step: Removing the Old Washer (Without Stripping Anything)
Step 1: Shut off water *at the source*, not the main. Look under the sink for two shutoff valves—one marked “hot,” one “cold.” Turn both clockwise until snug. Don’t force them. If they’re stiff or leak when turned, wrap the stem with a rag and apply *gentle* pressure—don’t risk breaking the valve body. Most rental units use 1/4-turn ball valves; older ones may be multi-turn gate valves. Either way, confirm flow stops by opening the faucet fully after shutting off.
Step 2: Remove the handle. Most compression faucets hide a decorative cap on the handle—usually a small chrome or colored disc near the base. Pop it off with a utility knife tip or flathead edge (gently—don’t gouge the finish). Underneath is a setscrew—usually 1/8" hex or Phillips. Loosen it *just enough* to free the handle. If it’s seized, apply one drop of penetrating oil (even WD-40 works), wait 90 seconds, then try again. Never hammer or twist aggressively—handles crack easily.
Step 3: Pull off the handle and expose the stem assembly. Lift straight up. If it sticks, wiggle *slightly* side-to-side while pulling—never rotate. Rotation can unscrew the packing nut prematurely.
Step 4: Unscrew the packing nut. This large knurled or smooth ring sits just below the handle. Turn counterclockwise by hand first—if tight, use adjustable pliers *with rubber grips* (or wrap jaws with electrical tape) to avoid marring brass. Do *not* use channel locks bare-jawed—they’ll scar the surface and void future warranty claims (yes, some OEMs still honor them).
Step 5: Extract the stem. Pull straight out. You’ll feel resistance from the O-ring or packing material—that’s normal. Keep the stem upright as you pull to prevent the internal washer from falling out prematurely.
Step 6: Remove the old washer. It’s held by a small brass screw at the very bottom of the stem. Use your flathead to loosen it—counterclockwise. If the screw head is rounded, place the screwdriver *deep* into the slot and tap *once* with your palm to break corrosion. Then turn. Once loose, lift the washer off. Inspect the brass seat inside the faucet body (where the stem reinserts). Run your fingernail across it—if you feel a ridge or groove, the seat is worn and needs lapping (a separate fix—see below). For now, assume it’s intact unless scoring is obvious.
H2: Installing the New Washer—The Two-Minute Check That Prevents Repeat Drips
Don’t just slap on the new washer and reassemble. Do this instead:
• Match thickness: Hold old and new washers side-by-side. If the new one is thinner, it won’t compress fully. Thicker? It may bulge and jam. Ideal tolerance: ±0.015" (about the thickness of a credit card edge).
• Verify orientation: Rubber side faces *out*, toward the seat. Brass backing faces *in*, against the stem screw. Reversing it causes immediate failure.
• Tighten the retaining screw *just enough*. Snug—not torqued. Over-tightening cracks the washer or strips the brass thread. Stop when resistance increases sharply. One full turn past finger-tight is usually sufficient.
• Before reinserting the stem, wipe the valve seat clean with your rag. Then lightly coat the *rubber surface only* with plumber’s grease (petroleum jelly works in a pinch—but avoid Vaseline long-term; it breaks down rubber faster than dedicated grease). This reduces initial friction and extends life by ~40% (Updated: April 2026).
H2: Reassembly—Where Most DIYers Rush and Regret
Reassembly order matters more than you think:
1. Insert the stem *straight in*. Wiggle slightly if needed—but don’t tilt. Misalignment stresses the washer edge.
2. Hand-tighten the packing nut *only until resistance begins*. Then give it *one-quarter turn* with pliers. Too loose = stem leaks around the base. Too tight = handle becomes stiff and wears out the packing faster.
3. Reattach the handle. Align any index marks (some stems have a notch or dot). Slide on, then tighten the setscrew *just until it contacts the stem*. Over-tightening bends the stem or cracks plastic handles.
4. Replace the decorative cap. Press firmly until it clicks or seats fully.
5. Turn water back on *slowly*. Open shutoff valves 1/4 turn, wait 5 seconds, then another 1/4 turn—repeat until fully open. Listen for hissing or spurting. If you hear air rushing, let it run for 20 seconds to purge trapped air.
6. Test the faucet: Open and close 5 times. Watch for drips *immediately after closing*. If it drips once then stops, air was clearing. If it drips continuously, the washer isn’t seated—or the seat is damaged.
H2: When the Washer Isn’t the Problem (And What to Try Next)
If you’ve replaced the washer correctly and it still drips, don’t assume you failed. Consider these three realistic scenarios:
• Worn valve seat: The brass surface inside the faucet body has a groove deeper than 0.003". You’ll see a shiny ring where the washer contacts it—and feel it with a fingernail. Fix: Use a seat wrench (under $8) and a valve seat grinder (or fine emery cloth wrapped around a dowel). But—be warned—over-grinding creates a shallow cone that worsens leakage. Only do this if you own the unit. Renters should document and request landlord repair.
• Cross-threaded stem: If the stem doesn’t screw in smoothly—or binds halfway—you likely cross-threaded during reassembly. Back it out fully, inspect threads for nicks, realign, and restart.
• Failed O-ring on stem: Some stems use a secondary O-ring just above the washer to seal the stem-to-body gap. If water leaks *around the base of the handle* (not the spout), that’s the culprit. Replace with a matching Buna-N O-ring (size: usually 11/32" ID × 15/32" OD).
H2: Pro Tips for Renters & Long-Term Reliability
Renters: Take photos *before disassembly*. Record serial numbers (often stamped on the baseplate). Email your landlord a concise note: “Fixed dripping kitchen faucet using standard parts—receipt attached. No damage incurred.” This builds goodwill and documents proactive maintenance.
For longevity: Replace washers every 2–3 years in hard water areas (≥7 gpg), or annually if you notice reduced flow or squeaking handles. Keep spare washers taped inside your sink cabinet—label them with faucet location (“bath cold,” “kitchen hot”).
Also: Avoid “quick-fix” epoxy or tape solutions. They mask symptoms and make real repairs harder later. And never use pliers directly on chrome-plated handles—tape protects finish and prevents slippage.
H2: Comparison: DIY Washer Replacement vs. Calling a Plumber
| Factor | DIY Washer Replacement | Professional Plumber Visit |
|---|---|---|
| Avg. Time Required | 12–18 minutes (first time), 6–8 min thereafter | 1.5–3 hours (including travel, diagnosis, parts run) |
| Out-of-Pocket Cost | $1.29 (washer) + $0 tools | $149–$229 (minimum service call + labor) |
| Renter-Friendly? | Yes—non-invasive, reversible, no wall access | Risk of liability if accidental damage occurs |
| Success Rate (First Attempt) | 86% (per 2025 Home Repair Survey, n=2,140) | 99%+ (but overkill for single-washer issues) |
| Long-Term Skill Gain | Builds confidence for other tasks: toilet leak inspection, pipe leak sealing, plunger technique | None—transactional, no knowledge transfer |
H2: Beyond the Drip—Linking to Broader Care
Fixing a dripping faucet is your entry point—not the destination. Once you’ve mastered washer replacement, you’re ready to tackle related issues like drain clog clearing using a simple drain snake operation, or preventing future leaks with proper pipe leak sealing techniques. These skills compound. A tenant who fixes their own faucet is 3.2× more likely to spot early signs of toilet leak inspection needs or recognize when water pressure drops due to sediment buildup—issues covered in our full resource hub. Consistent, minor interventions extend system life far more than reactive emergency fixes.
H2: Final Reality Check
This method works on *compression* faucets—roughly 60% of pre-2010 residential units and many budget rentals today. It does *not* work on cartridge, ball, or ceramic-disk types. If your faucet has a single lever, quarter-turn handle, or requires removing a large cylindrical cap—not a small screw—stop here and consult the manufacturer’s guide. Trying to force a washer replacement into those systems damages internal components.
But for the vast majority of drip sources? You’ve got this. No special tools. No plumber on speed dial. Just a few minutes, a little attention, and the quiet satisfaction of solving it yourself—while saving water, money, and stress. That’s not DIY. That’s ownership, even when you rent.