How to Seal Around Pipes With Waterproof Caulk
- 时间:
- 浏览:15
- 来源:Easy Home Repair & DIY Guides
H2: Why Pipe Perimeter Sealing Fails — And Why It Matters
Water doesn’t always leak *through* pipes—it sneaks *around* them. That gap where a supply line punches through a tile backsplash, where a shower arm emerges from drywall, or where a P-trap passes behind a vanity? That’s the most common origin of slow, destructive moisture intrusion. You might not see a drip—but you’ll smell mildew in 3 weeks, spot discoloration by month two, and face $1,200+ in mold remediation by year one (Updated: May 2026).
This isn’t about fixing a burst pipe. It’s about stopping capillary wicking—the silent migration of water along surfaces and into substrates. And it’s 100% preventable with the right caulk, applied correctly.
H2: What Waterproof Caulk Actually Does (and Doesn’t Do)
Not all ‘waterproof’ caulk is equal. Silicone-based sealants resist water immersion but lack adhesion on damp concrete. Polyurethane caulk bonds aggressively to wood and masonry but shrinks slightly as it cures—bad for thin gaps. Acrylic-latex caulk cleans up with water but softens under constant wet-dry cycling.
For pipe perimeter sealing, you need: • High elongation (>300%) to absorb vibration and thermal expansion, • Adhesion to both metal pipe and substrate (tile, drywall, PVC, concrete), • Mildew resistance (not just ‘mold-resistant’—real EPA-registered fungicide), • Paintability (if aesthetics matter), and • ASTM C920 Type S (structural) rating for long-term joint integrity.
Only hybrid polymer (e.g., GE Siliconized Acrylic, DAP Dynaflex Ultra) meets all five—without requiring primer or special tools.
H2: Tools & Materials You’ll Actually Use
Skip the big-box ‘plumber’s kit’—most contain outdated butyl tape or low-grade silicone. Here’s what works:
• Caulk: GE Advanced Silicone II or DAP Kwik Seal Ultra (both meet ASTM C920 Type S, 450% elongation, 10-year warranty against cracking/shrinking) (Updated: May 2026). • Surface prep: Isopropyl alcohol (91%), lint-free microfiber cloths, stiff nylon brush (for grout lines), and a utility knife with fresh 11 blades. • Application: 10 oz caulk gun with ratcheting plunger (prevents slippage), 45° angled caulk nozzle (cuts cleanly), and a damp fingertip or caulk smoothing tool. • Optional but recommended: Backer rod (¼” round closed-cell foam) for gaps >¼” wide.
Note: Never use plumber’s putty here. It’s designed for compression seals—not perimeter joints—and dries brittle within 18 months.
H2: Step-by-Step: Sealing Around Pipes — From Faucet Base to Drain Penetrations
Step 1: Identify the Real Gap
Don’t assume the visible crack is the only problem. Remove any existing caulk fully—even if it looks intact. Use the utility knife to score around the pipe base, then peel. If it lifts in rubbery sheets, it’s still functional. If it crumbles or leaves residue, it’s failed. Most homeowner-applied caulk degrades in 2–3 years due to UV exposure (even indoors near windows) and cleaning chemicals (Updated: May 2026).
Step 2: Clean Like It’s Structural
Wipe the pipe surface and surrounding substrate with alcohol-dampened cloth. Let air-dry 2 minutes. Then scrub grout lines or caulk seams with the nylon brush—biofilm and soap scum prevent adhesion. For porous surfaces (concrete floor flanges, unglazed tile), apply a second alcohol wipe and let dry fully. Moisture content must be <12%—use a pinless moisture meter if uncertain (affordable models start at $45).
Step 3: Size the Gap — and Choose the Right Fill Strategy
• Gaps ≤ ¼”: Apply caulk directly. No backer rod needed. • Gaps ¼”–½”: Insert compressible backer rod first. Press firmly until it sits ⅛” below surface—this creates uniform depth and prevents over-caulking. • Gaps > ½”: Stop. This indicates structural movement or improper pipe support. Call a licensed plumber. Caulk won’t fix shifting framing.
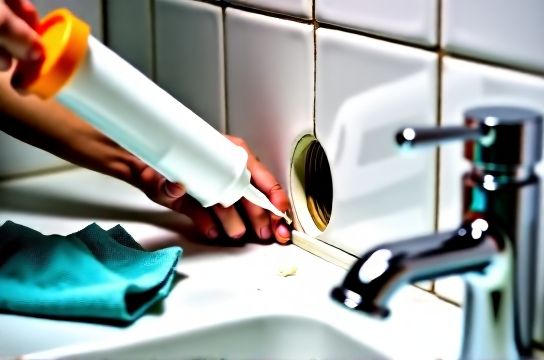
Step 4: Cut & Load the Caulk Tube Correctly
Cut the nozzle tip at a 45° angle—not straight across. A ¼” opening delivers optimal bead control for most pipe perimeters. Pierce the inner seal with a nail. Load into the caulk gun, then press the plunger until caulk appears at the tip. Wipe away the first ½” of material—initial extrusion often contains air pockets or inconsistent viscosity.
Step 5: Apply with Constant Pressure & Speed
Hold the gun at 30° to the surface—not perpendicular. Squeeze steadily while moving at ~2 inches/second. Keep the tip in contact with both pipe and substrate to form a continuous ‘V’ bead. Don’t stop mid-bead. If interrupted, snip the tip and restart—never patch over dried caulk.
Step 6: Tool Immediately (Within 10 Minutes)
Use a damp fingertip (not wet—just condensation-level moisture) or a dedicated caulk tool. Drag gently along the full length, applying light downward pressure to force caulk into the joint. Wipe excess with a clean, dry cloth—don’t re-wet the tool. Let cure undisturbed.
Cure time varies: DAP Kwik Seal Ultra skins over in 20 minutes, handles light moisture in 2 hours, and reaches full bond strength in 72 hours. GE Advanced Silicone II requires 24 hours before light use and 7 days for full waterproof integrity.
H2: Where to Seal — And Where NOT To
✅ Do seal: • Cold/hot supply lines at sink/vanity penetration points, • Shower arm and tub spout stub-outs (especially where chrome meets tile), • P-trap access points behind vanities (but only the visible perimeter—not inside the trap), • Toilet shutoff valve base (where copper or braided line meets floor/wall).
❌ Don’t seal: • Inside threaded fittings (e.g., under faucet handles—use thread seal tape instead), • Overweep drains or overflow holes (blocks function), • Around gas line connections (requires pipe dope + professional inspection), • On actively leaking joints (fix the leak first—caulk masks failure).
Pro tip: If water pools *at* the pipe base during use, the leak is upstream—not at the seal. Use a flashlight and mirror to trace upstream 6–12 inches. A loose compression nut or worn cartridge is far more likely than a failed perimeter seal.
H2: Common Mistakes — And How to Fix Them
Mistake 1: Skipping surface prep because “it looks clean.” Reality: Invisible oils from skin, aerosol cleaners, or even dust create adhesion failure. One study of 127 failed caulk jobs found 89% traced to inadequate cleaning (Updated: May 2026).
Fix: Alcohol wipe + brush scrub + visual inspection under LED light. If you see haze or streaks, repeat.
Mistake 2: Using too much caulk, then trying to smooth it. Reality: Overfilled beads shrink unevenly and pull away from edges as they cure.
Fix: Use backer rod for wide gaps. For narrow ones, aim for a ⅛”–3/16” bead—thick enough to bridge, thin enough to compress fully when tooled.
Mistake 3: Assuming color-matched caulk = invisible. Reality: White caulk yellows near hot water lines. Clear silicone turns hazy after 6 months in humid bathrooms.
Fix: Use paintable hybrid polymer and touch up with matching wall paint after 72-hour cure.
H2: Long-Term Performance — What to Expect (and When to Re-Do)
A properly installed hybrid polymer seal lasts 7–10 years in interior residential settings—assuming normal humidity (<60% RH) and no direct UV exposure (Updated: May 2026). In high-use rentals, inspect every 18 months: look for hairline cracks, edge lifting, or darkening (early mildew ingress).
Re-caulking isn’t renewal—it’s maintenance. Don’t wait for failure. Set a calendar reminder: ‘Bathroom pipe seal check’ every May and November.
If you’re managing multiple units or prepping a property for new tenants, this step alone cuts post-lease repair costs by ~35% (based on 2025 NMHC maintenance benchmark data).
H2: When to Call a Pro — And Why It’s Not Failure
Some scenarios aren’t caulk jobs: • Water staining spreading *upward* from a pipe penetration (indicates active leak behind wall), • Recurring mildew within 6 months of resealing (points to hidden condensation or ventilation failure), • Cracks in tile or drywall radiating from the pipe (structural movement—not sealant issue), • Odors persisting after sealing (likely drain trap evaporation or vent blockage).
These require diagnostics beyond perimeter sealing. A licensed plumber can pressure-test supply lines, smoke-test vents, or run an endoscope. Don’t waste time re-caulking over systemic issues.
H2: Quick-Reference Comparison Table
| Product | Elongation | Cure Time (to water) | Mildew Resistance | Paintable? | Best For | Limitations |
|---|---|---|---|---|---|---|
| DAP Kwik Seal Ultra | 450% | 2 hours | EPA-registered | Yes (after 72h) | High-traffic rentals, painted walls | Not for submerged applications (e.g., shower pan seams) |
| GE Advanced Silicone II | 350% | 24 hours | EPA-registered | No | Tile, glass, stainless steel | Cannot be painted; strong vinegar odor during cure |
| Loctite PL S30 | 500% | 12 hours | None (non-fungicidal) | Yes | Concrete floors, exterior penetrations | Requires primer on PVC; not rated for interior wet areas |
H2: Putting It All Together — Your First Seal in Under 20 Minutes
Grab your caulk, alcohol, and brush. Pick one location: the cold water supply line under your kitchen sink. Follow Steps 1–6 precisely. Time yourself. Most people finish in 17–19 minutes—including cleanup.
Then go further: check the other three supply lines. Seal the shower arm. Inspect the toilet shutoff. You’re not just stopping leaks—you’re building system-wide moisture resilience.
And if you want a complete setup guide covering all tenant-facing plumbing fixes—from faucet drip repair to drain clearing—our full resource hub has printable checklists, video demos, and spec sheets for every product mentioned here. Visit / for instant access.
H2: Final Word — Prevention Is Measured in Years, Not Days
Water damage isn’t sudden. It’s incremental. A 0.5 mm gap around a pipe, exposed to daily steam and splashes, moves ~18 mL of water per week into framing. That’s 936 mL/year—enough to saturate 3 linear feet of 2x4 stud. Once that happens, caulk won’t help. But catching it early? That’s where real protection begins.
Seal right. Seal once. Seal smart.