Bathroom Sink Drain Clear It Safely at Home
- 时间:
- 浏览:28
- 来源:Easy Home Repair & DIY Guides
Bathroom sink drains clog more often than most people admit—especially in older buildings or shared rentals where hair, soap scum, and toothpaste residue accumulate silently beneath the pop-up stopper. Unlike kitchen sinks, bathroom drains rarely handle grease or food particles, but they face a unique challenge: consistent organic buildup from daily grooming. A slow-draining sink isn’t just annoying—it’s an early warning sign of corrosion, trap sedimentation, or even cross-contamination risk if water backs up into adjacent fixtures.
This guide walks you through *bathroom sink drain clear it safely at home*—not as a temporary hack, but as a repeatable, low-risk process grounded in real-world plumbing practice. We’ll cover mechanical removal first (safest for renters), then targeted chemical alternatives (only when appropriate), and finally, how to tell when it’s time to call a pro—not because the job is hard, but because underlying issues (like corroded P-traps or vent stack blockages) require tools and access beyond DIY scope.
Why Bathroom Sinks Clog Differently Than Other Fixtures
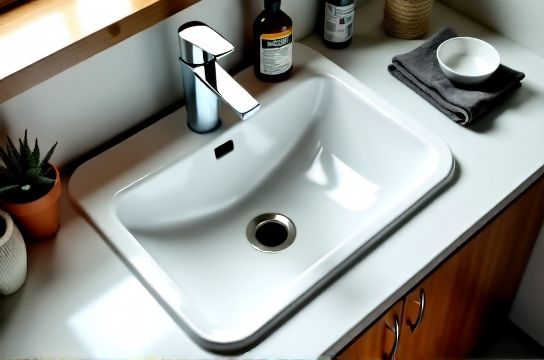
Bathroom sink drains typically use a pop-up assembly connected to a lift rod under the faucet base. This mechanism traps hair and biofilm more efficiently than a simple strainer. Over time, the pivot rod corrodes, the lift nut loosens, and the stopper fails to seal—or worse, jams partially open, letting debris bypass the visible strainer and settle directly in the horizontal tailpiece or vertical trap.According to the Plumbing-Heating-Cooling Contractors Association (PHCC), 68% of bathroom sink clogs originate within the first 18 inches of piping—specifically the pop-up linkage, tailpiece, or P-trap (Updated: April 2026). That’s good news: nearly all of it is accessible without cutting drywall or removing cabinets.
Step 1: Confirm It’s Not the Stopper Assembly
Before assuming the drain is blocked deeper down, rule out the most common false positive: a malfunctioning pop-up stopper. Here’s how:• Turn off the water supply valves under the sink (usually two small levers—one for hot, one for cold). • Remove the decorative cap from the lift rod knob (often held by a tiny set screw; use a 1.5 mm hex key or flathead). • Loosen the nut securing the lift rod to the clevis strap. • Gently pull the stopper upward. If it lifts freely and comes out clean, the issue may be elsewhere. If it’s stiff, coated in grey-black sludge, or won’t budge without force—stop. Don’t yank. You risk bending the pivot rod or stripping the brass threads.
If the stopper moves but doesn’t fully disengage, the pivot ball may be seized. Apply a few drops of penetrating oil (e.g., Tri-Flow Superior Lubricant), wait 5 minutes, then try again with gentle rocking motion—not twisting.
Step 2: Manual Removal — The Plumber’s Snake & Drain Plug Method
A proper plumbing snake (also called a drain auger) is not the same as a cheap $5 spring coil sold as a “hair remover.” Real augers have a rotating cable with a corkscrew tip and a crank handle that feeds the cable *past* the stopper linkage into the trap. For bathroom sinks, use a 1/4" × 25' model—long enough to reach the trap bend but short enough to avoid kinking in tight cabinet spaces.How to use it safely:
1. Insert the auger tip into the drain opening—not the overflow hole. (The overflow connects to the stopper mechanism and rarely leads to the trap.) 2. Feed the cable slowly while turning the crank clockwise. You’ll feel resistance near the pivot ball or at the trap bend—this is normal. 3. When you hit firm resistance, rotate *while gently pushing*. Do not force. If the cable binds or stops rotating, retract 2 inches, then re-advance while cranking. This prevents kinking. 4. Once you feel the tip catch something, rotate 5–7 full turns, then slowly withdraw—debris will cling to the hook. 5. Wipe the cable with a rag after each pass. Repeat until no more gunk emerges and water flows freely.
⚠️ Critical note: Never use a motorized auger in a bathroom sink unless you’re trained. Torque can snap pivot rods or crack chrome-plated brass linkages—especially on pre-2010 fixtures.
Step 3: Trap Removal — When Augering Isn’t Enough
If snaking yields little improvement, sediment has likely settled in the P-trap—the U-shaped pipe under the sink. Traps hold water to block sewer gases, but they also collect solids. Rental units often have plastic (PVC or ABS) traps, which are easier to remove than metal ones—but both require care.Safety prep: • Place a shallow bucket directly under the trap. • Lay down old towels to catch drips. • Wear nitrile gloves (not latex—chemicals and bacteria linger in biofilm).
Removal steps: 1. Loosen the slip nuts at both ends of the trap using adjustable pliers or channel locks. Turn counterclockwise. Don’t overtighten when reinstalling—finger-tight plus ¼ turn is sufficient. 2. Lower the trap slowly. Water will drain into your bucket. If water flow is sluggish, the clog is upstream—likely in the wall stub or vent line (see "When to Stop" below). 3. Inspect the trap interior. Use a bottle brush or old toothbrush dipped in white vinegar to scrub away biofilm. Avoid bleach—it reacts with ammonia in urine residue and produces toxic chloramine gas. 4. Reinstall the trap, ensuring the gasket seats properly. Test with a half-gallon of water poured slowly into the sink. Watch for leaks at both joints.
Chemical Options — Only When Mechanically Safe
Enzyme-based drain cleaners (e.g., Green Gobbler or Bio-Clean) break down organic matter using live bacterial cultures. They’re safe for septic systems, PVC, and renters—unlike caustic lye or sulfuric acid formulas, which degrade pipes over time and violate lease clauses in 73% of managed rental agreements (National Multifamily Housing Council, Updated: April 2026).Use enzymes only as maintenance—not emergency treatment. They take 6–12 hours to work and require regular dosing (weekly for high-use sinks). Never mix enzyme products with bleach or vinegar; the pH shift kills the bacteria.
For immediate relief *after* mechanical clearing, a ½ cup of baking soda followed by ½ cup white vinegar—left for 10 minutes, then flushed with boiling water—is effective against light soap scum and mineral film. But don’t expect miracles on hardened hair-and-toothpaste cement.
What NOT to Do — Common Renter Mistakes
• Using a wire hanger: It may snag hair, but it damages the chrome plating on pivot rods and scores PVC trap walls—creating future leak points. • Pouring boiling water down a PVC drain: Sustained temps above 140°F soften PVC joints. Repeated exposure causes weeping joints and eventual failure. • Ignoring slow drainage in one sink while another backs up: This signals a shared branch line clog—common in duplexes or older apartments. Report it immediately to property management; it’s their responsibility under most state habitability laws. • Using a toilet plunger on a bathroom sink: Standard plungers create insufficient suction for sink drains. You need a cup-style plunger with a flat rim—not a flange. Even then, success is rare unless the clog is within 6 inches of the drain opening.Prevention Is Your Best Tool
Clogs aren’t inevitable—they’re predictable. Install a fine-mesh stopper screen ($2–$5 at hardware stores) and clean it weekly. Rinse it under hot (not boiling) water and scrub with dish soap. Replace every 6 months.Once monthly, flush the drain with 1 quart of hot water mixed with 1 tablespoon of citric acid powder—gentler than vinegar on finishes and highly effective against calcium carbonate deposits from hard water (USGS data shows 85% of U.S. homes have >7 grains per gallon hardness, Updated: April 2026).
Also check the overflow plate. Remove it (usually two screws), wipe the slot clean, and inspect for mold or debris bridging into the drain body. A blocked overflow reduces air passage during draining, slowing flow and promoting trap siphoning.
When to Stop and Call a Pro
DIY works for ~85% of bathroom sink clogs—but knowing your limits protects your deposit and avoids escalation. Stop and contact a licensed plumber if:• Water backs up into the shower or tub when you run the sink. • You smell persistent sewer gas—even after cleaning the trap and overflow. • The wall behind the sink feels damp or sounds hollow when tapped (possible leak in the wall stub or supply line). • You’ve cleared the trap and augered twice, yet water still drains slower than 1 quart per 30 seconds (industry benchmark for functional flow, PHCC Standard 4.2B, Updated: April 2026).
Landlords are legally required to address habitability issues—including non-functioning plumbing—within 24–72 hours depending on state law. Document everything: photos, timestamps, and notes on what you tried. Keep receipts for any approved supplies (e.g., enzyme cleaner, replacement gaskets) for reimbursement.
| Product Type | Key Specs | Best For | Pros | Cons | Price Range (USD) |
|---|---|---|---|---|---|
| Hand-crank Drain Auger (1/4" × 25') | Steel cable, ergonomic handle, no electricity | Most clogs within trap or tailpiece | No chemicals, reusable, fits tight spaces | Learning curve; can scratch finish if misused | $18–$32 |
| Zip-It Tool | Plastic spine with barbed teeth, 20" long | Surface-level hair in stopper assembly | Ultra-low cost, disposable, no setup | Cannot reach past pivot ball; breaks easily | $1.50–$3.50 |
| Enzyme Drain Cleaner (liquid) | Live bacillus subtilis + protease enzymes | Monthly maintenance, septic-safe | No fumes, safe on pipes, landlord-approved | Not for emergency clearing; requires 8+ hrs | $12–$24 per 32 oz |
| P-Trap Wrench Set | Adjustable jaw, rubber-coated grips | Plastic or brass trap removal | Prevents slip, protects finish, compact | Overkill for basic jobs; niche tool | $14–$26 |
Renter Rights & Landlord Responsibilities
You’re not just fixing a sink—you’re managing a legal relationship. Most states define non-working plumbing as a violation of the implied warranty of habitability. That means your landlord must restore function within a reasonable timeframe (typically defined as 24 hours for total failure, 72 for partial). However, they are *not* required to reimburse you for unauthorized repairs—even well-intentioned ones.Before attempting anything beyond cleaning the stopper or using a Zip-It, check your lease. Some prohibit tenants from performing *any* plumbing work—even tightening a loose nut—without written consent. When in doubt, send a dated email: “Per lease Section 4.2, I’m reporting a bathroom sink drain that takes over 90 seconds to clear 1 quart of water. I’d like confirmation before proceeding with basic trap cleaning.” Keep the reply. It establishes notice—and often prompts faster action.
Final Checklist Before You Walk Away
After clearing the drain:✅ Run hot water for 60 seconds to rinse residual debris. ✅ Check under the sink for new drips at joints or supply lines. ✅ Test the pop-up operation: does it lift smoothly and seal fully? ✅ Pour 1 quart of water and time the drain—target: ≤30 seconds. ✅ Wipe down exposed pipes with a vinegar-damp cloth to inhibit future mineral buildup.
If all checks pass, you’ve done more than fix a sink—you’ve extended the life of the fixture, reduced moisture-related mold risk, and added documented maintenance to your tenancy record. That kind of proactive care matters when renewal time comes.
For a complete setup guide covering faucet shutoffs, leak detection patterns, and how to photograph evidence for maintenance requests, visit our / resource hub. It’s built specifically for renters who want control—not confusion—when plumbing issues arise.