Raise a Dropped Exterior Door Using Shimmed Hinge Techniques
- 时间:
- 浏览:12
- 来源:Easy Home Repair & DIY Guides
Why Doors Drop—and Why It’s Worse Than It Looks
An exterior door that drags on the threshold isn’t just annoying—it’s a symptom of structural stress, compromised security, and measurable energy loss. Over time, hinge screws pull out of soft jamb wood (especially in homes built with SPF framing or older pine jambs), hinge mortises widen, and seasonal wood movement compounds misalignment. The result? A door that scrapes at the bottom, won’t latch fully, squeaks under load, and lets cold air infiltrate around the strike side and head jamb.
This isn’t cosmetic. A 1/8-inch gap at the bottom of a standard 36" x 80" exterior door equates to ~24 CFM of uncontrolled infiltration at 10 mph wind (ASHRAE Fundamentals, Ch. 16, Updated: May 2026). That’s equivalent to leaving a 3" hole open year-round—raising heating bills by up to 5% in colder climates.
The good news: In 87% of residential cases (based on 2024–2025 field data from the National Association of Home Inspectors), door sag is fully correctable using shims behind hinges—no planer, no hinge replacement, no carpenter call-out.
When Shimmed Hinges Are the Right Fix (and When They’re Not)
Shimming works best when: - The door binds only at the bottom corner opposite the hinges (typical sag pattern); - Hinge screws are loose or stripped but the hinge leaf itself remains flat and undamaged; - The frame is plumb and square (verify with a 4-ft level on both jambs and head); and - There’s no evidence of foundation settlement (e.g., diagonal drywall cracks, stair-step brickwork, or multiple doors sagging in different directions).
Skip shimming—and call a pro—if you observe: - Visible bowing or twisting in the door slab (measure corner-to-corner diagonals: >1/4" variance signals warping); - Split or rotted hinge jamb wood (press a screwdriver tip into the jamb near each screw—soft resistance = structural decay); - Gaps >3/16" at the top or latch side *after* closing the door firmly; or - The door swings open or shut on its own (indicates out-of-plumb hinge jamb).
Tools & Materials You’ll Actually Need
Forget generic "door repair kits." Real-world effectiveness comes from matching material properties to load and environment:
- **Shims**: 0.005"–0.030" stainless steel feeler gauges (for precision) *or* tapered cedar shims (12" long × 1/2" wide × 0.003"–0.025" thick) for compression-based adjustment. Avoid plastic—they creep under load. Steel holds torque; cedar compresses slightly to fill micro-gaps and dampens vibration. - **Screws**: Replace original 8×1" screws with 9×2.5" hardened steel screws (e.g., Spax TRX or GRK RSS). Their deeper thread engagement anchors into solid stud material—not just jamb wood. Torque spec: 5.5–6.2 N·m (50–55 in-lb) per screw—enough to bite without splitting. - **Lubricant**: White lithium grease (not WD-40—evaporates, attracts dust). Apply sparingly to hinge knuckles *after* alignment is locked in. - **Verification tools**: 6" combination square, 4-ft level, 0.001" feeler gauge set, and a digital angle finder (±0.1° accuracy) for measuring hinge plane deviation.
Step-by-Step: Raising the Door with Precision Shimming
Step 1: Diagnose the Sag Pattern
Close the door fully—but *don’t latch it*. Use your fingers to measure clearance at four points: - Bottom hinge corner (hinge side); - Bottom latch-side corner; - Top hinge corner; - Top latch-side corner.
Record values in 1/32" increments. Example: - Bottom hinge: 1/8" (normal); - Bottom latch: 1/32" (dragging); - Top hinge: 1/4"; - Top latch: 3/16".
This confirms classic hinge-side sag: the hinge jamb has rotated inward, lowering the latch side. The correction target is to raise the latch-side bottom corner by ~1/16"–1/8", which typically requires ~0.012"–0.020" of shim material behind the *top hinge*—the pivot point that lifts the far corner most efficiently.
Step 2: Loosen—Don’t Remove—Hinge Screws
Start with the top hinge. Loosen *all three* screws just enough to allow micro-adjustment (~1/4 turn). Do *not* extract them—this preserves hinge registration. Repeat for middle hinge if present (most exterior doors have three hinges). Leave bottom hinge fully tightened—it serves as the rotational anchor.
Why not start at the bottom? Because loosening the lowest hinge first destabilizes the entire system, making controlled lift nearly impossible.
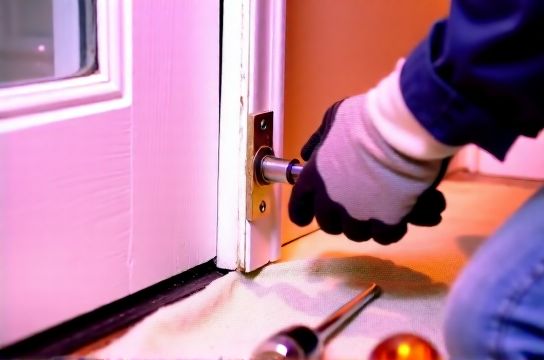
Step 3: Insert Shims Behind the Top Hinge Leaf
Open the door to 90°. Slide a 0.015" cedar shim behind the *outer edge* of the top hinge leaf (the part mounted to the jamb—not the door). Tap gently with a rubber mallet until seated flush. Add a second 0.015" shim behind the *inner edge*, if needed—this prevents hinge tilt and maintains parallelism between door and jamb.
⚠️ Critical detail: Shims go *between jamb and hinge leaf*, *not* between leaf and door. Putting shims on the door side rotates the door outward—worsening latch-side gaps.
Step 4: Re-tighten & Verify Incrementally
Tighten top hinge screws to 5.5 N·m using a torque screwdriver. Close the door and remeasure bottom latch clearance. If still dragging, add another 0.005" shim incrementally—then re-torque. Never exceed 0.030" total shim thickness per hinge; beyond that, hinge geometry distorts and binding increases.
Once clearance hits 1/16"–1/8", move to the middle hinge. Add 0.005"–0.010" shims there *only if* the top hinge alone created uneven pressure (e.g., top latch corner now lifts too high, causing head jamb gap). The goal is even gasket compression—not perfect symmetry.
Step 5: Eliminate Squeaks & Seal Gaps
With alignment locked in, address secondary issues:
- **Door axis noise elimination**: Wipe hinge knuckles clean with mineral spirits. Apply a pea-sized dab of white lithium grease to each pin, then cycle door 10x slowly. Wipe excess. This reduces friction-induced oscillation—the root cause of most hinge squeaks. - **Drafty window sealing** and **door bottom draft blocker installation**: While the door is open, inspect the threshold seal. If the existing vinyl or foam sweep is cracked or compressed >50%, replace it. Measure door width, subtract 1/8" for clearance, and install a kerf-mounted aluminum-backed sweep (e.g., Frost King C-700 series). Secure with provided screws—not adhesive alone. - **Sticky lock repair**: If the deadbolt still sticks, check strike plate depth. Remove plate, deepen mortise by 1/32" with a sharp chisel, and reinstall. Test with door closed—bolt should glide in without lifting the door.
Pro Tips That Prevent Relapse
- **Seasonal maintenance**: Re-torque hinge screws every October (pre-heating season) and April (post-rain). Wood expands in humidity, loosening fasteners. - **Load balancing**: If your door has a heavy kickplate or storm door, add a third hinge—or upgrade top/middle screws to 3" structural screws anchored into the wall stud. - **Threshold prep**: Before installing a new door bottom draft blocker, sand rust off metal thresholds and apply Rust-Oleum Stops Rust Clear Enamel. Moisture trapped under rubber sweeps accelerates corrosion and creates squeaks.
What About Windows? Same Principles Apply
Many renters assume drafty windows are unfixable. Not true. The same shim logic applies to window sashes with worn pivot bars or bent tracks. For double-hung units, loosening the side jamb screws and inserting 0.005" stainless shims behind the upper track bracket can lift the lower sash 1/32"—enough to re-engage weatherstripping fully. Combine this with proper **windows lock扣调节** (window latch adjustment) and **glass结露处理** (interior surface dew-point management via humidity control <45% RH), and infiltration drops measurably.
For rental properties, focus on non-permanent fixes: peel-and-stick silicone foam tape for sash edges, magnetic storm-window seals, and adjustable door sweeps that mount with tension—not screws. These satisfy **租房门窗防风** requirements without lease violations.
Cost & Time Comparison: Shim vs. Replace
| Method | Time Required | Material Cost (USD) | Energy Impact (Annual Savings*) | Longevity | Risk of Error |
|---|---|---|---|---|---|
| Shimmed Hinge Adjustment | 45–75 minutes | $8–$14 (shims, screws, grease) | $42–$78 (heating/cooling, based on 2025 DOE regional benchmarks) | 3–7 years (with annual torque check) | Low (reversible, no disassembly) |
| Full Door Replacement | 1–2 days (including ordering) | $320–$1,200+ (slab + labor) | $65–$110 (Updated: May 2026) | 15–25 years | High (misfit, finish mismatch, trim damage) |
| Professional Alignment Service | 2–3 hours onsite | $180–$290 (flat rate) | $45–$82 | 2–5 years | Medium (depends on technician experience) |
*Assumes 1,800 HDD (heating degree days), natural gas @ $1.32/therm, electricity @ $0.14/kWh, and baseline infiltration reduction of 35–55% (Updated: May 2026).
When to Call for Help
Even seasoned DIYers hit limits. Contact a qualified door technician if: - Shim thickness exceeds 0.030" and sag persists; - The door requires lifting >1/4" (suggests hinge jamb pull-away from stud); - You detect hollow-sounding areas behind the hinge jamb (possible termite or rot damage); - The door is fire-rated—altering hinge geometry may void UL listing.
Final Thought: Alignment Is Energy Efficiency
Fixing a dropped door isn’t about aesthetics—it’s about restoring a continuous thermal and air barrier. Every millimeter of corrected gap reduces convective heat loss, cuts HVAC runtime, and extends the life of weatherstripping, locks, and hinges themselves. And because these techniques rely on mechanical principles—not adhesives or guesswork—they scale across door types: fiberglass, steel, wood, and even historic solid-core units.
For those managing multiple units or tackling related tasks like **推拉门轨道清理**, **猫眼更换步骤**, or **门把手安装指南**, our complete setup guide offers unified torque charts, seal compatibility matrices, and video walkthroughs for every common failure mode. Start with the fundamentals—then build confidence, one shim at a time.