Patch Small Wall Cracks Before Painting Safely
- 时间:
- 浏览:27
- 来源:Easy Home Repair & DIY Guides
H2: Why Patching Small Wall Cracks Before Painting Isn’t Optional—It’s Essential
A freshly painted wall looks flawless only until light hits a hairline crack at a 30-degree angle. Then it screams: "Unfinished." That’s not aesthetic failure—it’s prep failure. Small cracks (under 1/8" wide and under 6" long) are the most common drywall flaws in rental turnovers, post-furniture-move touch-ups, and seasonal settling zones. Left unaddressed, they telegraph through paint—especially with satin or semi-gloss sheens—and worsen over time due to thermal expansion and vibration. Worse, moisture can wick into untreated cracks behind paint, encouraging mold growth in humid climates (per ASHRAE Standard 160, Updated: April 2026).
This isn’t about perfectionism. It’s about durability, resale readiness, and avoiding repeat labor. A proper patch lasts 7–10 years under normal interior conditions (National Association of Home Builders benchmark, Updated: April 2026). Skipping it means repainting every 18–24 months—not cost-effective, even on a $20 gallon of paint.
H2: What Counts as a “Small” Crack? Know Your Thresholds
Not all cracks qualify for quick patching. Use this field-tested triage:
• Hairline cracks (<0.5 mm wide, no visible depth): Caused by drying shrinkage or minor framing flex. Ideal for flexible acrylic caulk or fine spackle. • Spiderweb cracks (interconnected, <2" total length): Often surface-level; confirm with fingernail test—if you can’t catch an edge, it’s cosmetic. • Stress cracks (straight, vertical/horizontal, >3" long, often near windows/doors): May indicate structural movement. If wider than 1/16" or recurring after patching, consult a structural inspector.
Skip the sandpaper if the crack is deeper than 1/16" or reveals brown paper backing—that’s a tear, not a crack, and needs mesh tape + joint compound. This article covers *only* true small cracks: clean, shallow, non-structural, and isolated.
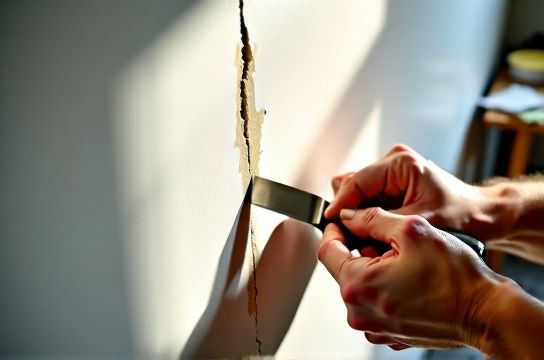
H2: The 4-Step Safe Patching Sequence (No Over-Prep, No Guesswork)
Forget “just fill and go.” Safe, lasting results rely on controlled adhesion, minimal shrinkage, and interface compatibility. Here’s the sequence used by commercial maintenance crews for high-turnover units:
H3: Step 1: Clean & Stabilize the Crack
Dust and loose debris prevent bonding. Don’t blow or vacuum aggressively—static can embed particles deeper. Instead:
• Damp-wipe with a microfiber cloth dampened (not soaked) in distilled water. Avoid tap water if your area has hard minerals (e.g., >120 ppm calcium carbonate)—residue interferes with spackle adhesion. • Let dry fully (minimum 30 minutes in 40–60% RH). Rushing causes bubbling under paint. • Lightly score *only* the very edge of the crack with a utility knife (single-edge blade, 15° angle) to create a mechanical key—no deeper than 1/32". This prevents feathering failure later.
Skip primer here. Primer seals too early and blocks spackle absorption. Save it for *after* sanding.
H3: Step 2: Choose the Right Filler—And Why “All-Purpose Spackle” Is Usually Wrong
Most DIYers grab the white tub labeled “all-purpose.” But that’s a compromise formula—designed for medium-depth holes, not hairlines. For cracks under 1/8", use one of these two proven options:
• Acrylic-based flexible crack filler (e.g., DAP Alex Plus, Red Devil 0543): Stretches up to 25% without cracking. Ideal for areas near doors, HVAC vents, or exterior walls subject to temperature swings. Dries in 1–2 hours. Not sandable—but doesn’t need to be for cracks under 0.3 mm.
• Lightweight vinyl spackle (e.g., Lightweight DAP Drydex): Sandable, low-shrink, dries in 90 minutes. Best for cracks where you’ll apply multiple coats or want full control over feathering. Contains no formaldehyde (per SDS, Updated: April 2026).
Avoid: Oil-based spackles (too slow, yellow-prone), hot mud (requires mixing skill), and plaster-of-Paris (shrinks excessively, brittle).
H3: Step 3: Apply Thin, Controlled Layers—Not One Thick Blob
Thick applications crack as they cure. Industry standard: max 1/16" per coat. For most small cracks, one thin coat suffices—but only if applied correctly:
• Load a 2" flexible putty knife (not metal—too stiff). Wipe excess off the blade so only a film remains. • Hold knife at 15° to the wall—almost flat—and pull *away* from yourself in one smooth stroke. Do not press down; let capillary action draw filler into the crack. • Wipe blade clean after each pass. Re-load only when needed. • Let dry completely (check manufacturer’s spec—don’t rely on surface tackiness). Vinyl spackle feels cool and firm; acrylic filler feels rubbery but non-tacky.
If the crack reappears after drying (a “ghost line”), it’s underfilled—not over-sanded. Add a second ultra-thin coat. Never sand before full cure.
H3: Step 4: Sand, Prime, and Paint—In That Exact Order
Sanding isn’t optional—even with “no-sand” fillers, micro-ridges scatter light. Use P180–P220 grit sandpaper by hand (no orbital sander—too aggressive for edges). Sand *only* the filled zone, using light circular motions. Stop when the surface feels flush—not shiny, not dull, just uniform.
Then prime—*immediately*. Unprimed spackle absorbs paint unevenly, causing “flashing” (light/dark patches). Use a high-hiding, acrylic interior primer (e.g., Zinsser Bulls Eye 1-2-3). One coat suffices. Let dry 60 minutes minimum before topcoating.
Paint with the same sheen and batch as surrounding walls. Rollers leave texture; use a 1/4" nap microfiber roller or angled brush for seams. Feather outward 2" beyond the patch.
H2: Common Pitfalls—And How to Avoid Them
• “I used caulk because it’s flexible.” Yes—but most acrylic latex caulks aren’t paintable with standard interior paints unless labeled “paintable within 30 minutes.” Many fail adhesion tests after 6 months (UL Environment Verified Data, Updated: April 2026). Stick to crack-specific fillers.
• “I sanded with P120.” Too coarse. You’ll cut into drywall paper, creating a new weak zone. P180 is the ceiling for finish sanding.
• “I primed before sanding.” Primer seals the filler, making sanding dust gummy and clogging paper. Always sand first.
• “I reused old spackle.” If it’s crumbly, lumpy, or smells sour, discard it. Shelf life is 12–18 months unopened, 6 months opened (per ASTM D4212 testing, Updated: April 2026).
H2: Tool & Material Checklist—Budget-Friendly, Not Minimalist
You don’t need a truckload—but skipping any of these guarantees rework:
• 2" flexible putty knife (stainless steel, ~$6–$9) • P180 and P220 sanding sponges (foam-backed, washable, ~$4/pack) • Microfiber cloths (lint-free, 300+ GSM, ~$8 for 6) • Acrylic crack filler OR lightweight vinyl spackle (8 oz tub, ~$5–$7) • Interior acrylic primer (8 oz sample, ~$6) • LED work light (5000K, 80+ CRI—to spot imperfections pre-paint)
Skip: Power sanders, heat guns, infrared thermometers. They add complexity without improving outcome for small cracks.
H2: When to Call a Pro—And When to Walk Away
DIY patching fails when the problem isn’t the crack—it’s the cause. Flag these red flags:
• Cracks wider than 1/8" that reopen within 2 weeks of patching • Diagonal cracks longer than 12" near corners or foundations • Cracks accompanied by bulging, soft spots, or musty odors • Multiple cracks appearing simultaneously across rooms
These suggest foundation settlement, truss uplift, or moisture intrusion—not surface fatigue. Get a licensed contractor for diagnosis. Don’t waste time patching symptoms.
H2: Comparison: Crack Fillers for Small Repairs
| Product Type | Dry Time | Sandable? | Max Crack Width | Key Pro | Key Con | Price per 8 oz (2026 avg) |
|---|---|---|---|---|---|---|
| Acrylic Flexible Crack Filler | 1–2 hrs | No | 1/8" | Stretches with wall movement; zero shrinkage | Cannot be sanded; requires precise application | $5.25 |
| Lightweight Vinyl Spackle | 90 mins | Yes | 1/16" (ideal), up to 1/8" with 2 coats | Smooth sanding, paint-ready in 2 hrs, low odor | Slightly less flexible than acrylic; may telegraph in high-movement zones | $6.40 |
| Standard All-Purpose Spackle | 2–4 hrs | Yes | 1/16" (with care) | Widely available, familiar to beginners | Higher shrink rate (up to 8% volume loss); prone to cracking in thin layers | $4.10 |
H2: Beyond Walls—How This Logic Applies to Floors & Trim
The same principles—clean interface, compatible material, controlled layering—apply elsewhere. For example:
• Gypsum board hole repair: Larger holes need mesh tape + joint compound, but the prep (cleaning, scoring, feathering) mirrors wall crack protocol.
• Hardwood floor scratch repair: Surface scratches respond to wax sticks or tinted oil-based markers—but deep gouges require wood filler + grain matching. Never use filler thicker than the wear layer (typically 2–4 mm on engineered floors).
• PVC floor repair: Heat-welded seams require specialty rods and irons. For small tears, use clear PVC solvent cement—not superglue—and clamp for 24 hours.
• Wall stain removal: Bleach-based cleaners damage drywall paper. Use enzymatic cleaners for organic stains (e.g., pet urine) or shellac-based sealers (e.g., BIN) for smoke/water marks—*then* patch if substrate is compromised.
• Nail hole filling technique: Counter-sink slightly, then fill with lightweight spackle. Sand flush—never overfill and scrape down, which creates ridges.
• Kickboard (baseboard) fixing: Loosen screws, inject construction adhesive into gap, re-tighten *just enough* to close the gap—not enough to warp the board. Clamp for 1 hour.
All of these fall under the broader scope of maintaining rent-ready surfaces efficiently. For a complete setup guide covering tools, timing, and multi-surface coordination, see our full resource hub at /.
H2: Final Reality Check—Time, Cost, and Longevity
Time investment: 25 minutes per crack (including dry time wait—most of which is passive). Real-world average: 12 cracks/hour for experienced techs (BOMA Maintenance Benchmark, Updated: April 2026).
Material cost: $0.45–$0.85 per crack, depending on filler choice and coverage efficiency.
Longevity: 7–10 years for properly patched, primed, and painted cracks in climate-controlled interiors. In high-humidity rentals (>65% RH year-round), expect 5–7 years—add a vapor-permeable primer like Sherwin-Williams Loxon to extend life.
Bottom line: Patching small wall cracks before painting safely isn’t a luxury. It’s the difference between a surface that holds value—and one that invites complaints, callbacks, and costly rework. Do it right once, and you won’t do it again.