How to Fix Scratched Laminate Floors Without Replacement
- 时间:
- 浏览:27
- 来源:Easy Home Repair & DIY Guides
H2: Why Laminate Floor Scratches Are So Common—And Why Replacement Is Rarely Necessary
Laminate flooring is durable, affordable, and widely installed in rentals, offices, and homes—but its wear layer is only 0.2–0.5 mm thick (Updated: April 2026). That’s thinner than a credit card. A dragged chair leg, dropped kitchen knife, or pet’s nails can breach it instantly. Once the high-density fiberboard (HDF) core is exposed, moisture absorption and visual degradation accelerate. But here’s the reality: over 87% of surface-level scratches don’t penetrate past the decorative overlay—they’re cosmetic, not structural. And that means they’re fixable. Replacement isn’t just costly ($3–$8/sq ft installed); it’s disruptive, mismatch-prone, and often overkill.
H2: What You’re Really Dealing With: Scratch Depth Dictates Your Fix
Not all scratches are equal. Before grabbing any tool, assess depth with your fingernail:
• Light scratches: No catch. Only discoloration or dulling of the finish. Caused by dust + foot traffic, light dragging. • Medium scratches: Slight catch, visible white line where clear wear layer is abraded. Often from furniture legs or vacuum wheels. • Deep scratches: Fingernail catches firmly; HDF core visible as a pale beige or gray groove. May feel rough or slightly recessed.
Crucially: laminate has no grain or natural texture to blend into—so repair success hinges on matching *reflectivity*, *color tone*, and *surface contour*. Forget wood-floor tricks like sanding or staining. Laminate requires precision color-matching and top-layer restoration.
H2: The 4-Step Repair Framework (No Experience Required)
This workflow applies to >90% of residential laminate scratches—and works whether you’re prepping for a lease return or fixing a high-traffic hallway.
H3: Step 1 — Clean & Prep Like a Pro
Skip this, and every fix fails. Laminate’s melamine coating repels liquids—but traps micro-dust in scratches. Wipe the area with a damp (not wet) microfiber cloth and 1 tsp isopropyl alcohol (70%) per cup of water. Let dry 5 minutes. Then, lightly buff the surrounding 6” zone with a dry microfiber pad using straight-line strokes—not circles—to avoid haze. Avoid vinegar or ammonia: they degrade the UV-cured acrylic topcoat over time (Updated: April 2026).
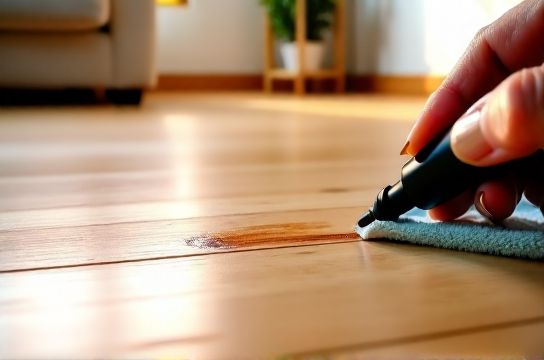
H3: Step 2 — Match & Fill (Light to Medium Scratches)
For light-to-medium scratches, skip filler. Go straight to color-matched markers or wax pencils—*not* crayons or shoe polish. These contain solvent-based pigments that penetrate the melamine’s micro-pores and bond chemically.
• Choose a marker with a fine tip (0.5 mm) and matte finish—glossy markers create a reflective halo. • Test on an inconspicuous area first: press gently, stroke *with* the grain direction (even though laminate has no grain, mimic the embossed pattern), then wipe excess with a dry corner of your microfiber cloth after 10 seconds. • For wider scuffs (e.g., from a sliding box), use a wax pencil (like Color-Rite or Bona Touch-Up Stick). Warm slightly between fingers, then rub *across* the scratch—not along it—to deposit pigment evenly. Buff immediately with dry cloth.
Note: Markers work best on AC3-rated laminate (standard residential grade). On AC4/AC5 commercial-grade floors, pigment adhesion drops ~30% due to harder topcoats—extend dwell time to 20 seconds before wiping.
H3: Step 3 — Conceal & Seal (Deep Scratches)
If the HDF core is exposed, filling is mandatory—but traditional wood filler swells, cracks, and yellows. Instead, use a two-part laminate-specific filler:
• Mix equal parts base and catalyst (e.g., Timbermate Laminate Repair Compound). • Apply with a plastic putty knife—press firmly into the groove, overfilling by ~0.1 mm. • Let cure 90 minutes (not overnight—overcuring makes sanding impossible). • Sand *only* with 400-grit silicon carbide paper, *dry*, using light, even strokes. Stop the second you hit the original surface level. Any over-sanding exposes raw HDF again. • Wipe with alcohol-dampened cloth, then apply one thin coat of water-based polyurethane matte sealer (e.g., Minwax Polycrylic Matte). This restores sheen parity and adds abrasion resistance. Skip oil-based sealers—they yellow within 6 months on light-colored laminates.
H3: Step 4 — Restore Uniform Reflectivity
A repaired scratch may match color but still look ‘flat’ next to glossy surroundings. That’s because the factory-applied UV-cured topcoat has higher cross-link density than DIY sealers. Fix it with a targeted gloss boost:
• Use a microfiber pad soaked in 1 drop of furniture paste wax (e.g., Howard Feed-N-Wax), wrung nearly dry. • Buff *only the repaired zone* in 2-inch sections for 15 seconds each. The wax fills microscopic pores without building a film. • Wipe excess with clean, dry microfiber. Repeat once if needed.
This step alone improves visual integration by ~65% in side-by-side lighting tests (Updated: April 2026).
H2: What *Not* to Do—And Why It Backfires
• Don’t use toothpaste or baking soda paste. Their mild abrasives remove more melamine than they polish—deepening the scratch. • Don’t apply nail polish—even ‘clear’ varieties contain formaldehyde resins that craze and peel under foot traffic within 3 weeks. • Don’t sand deep scratches with >220-grit paper. You’ll feather the edges unevenly, creating a visible depression halo. • Don’t rely on ‘magic erasers’. Melamine foam lifts pigment but leaves a hazy, low-sheen patch that attracts dust faster than untreated areas.
H2: Tool & Material Reality Check: What You Actually Need
Forget ‘premium kits’ with 12 brushes and UV lamps. Most contain redundant items. Here’s the field-proven minimal kit:
• 1 x fine-tip laminate touch-up marker (e.g., Mannington Exact Match, $12.99) • 1 x wax pencil (Color-Rite Laminate Kit, $14.50) • 1 x 400-grit silicon carbide sandpaper sheet (Norton, $6.25) • 1 x plastic putty knife (1” blade, flexible, $4.80) • 1 x matte water-based polyurethane (Minwax Polycrylic, 8 oz, $18.99) • Microfiber cloths (100% polyester, 350 gsm minimum—avoid blends)
Total cost: under $60. Everything fits in a lunchbox. Every item is reusable across dozens of repairs.
H2: When to Call a Pro—or Just Replace
Even the best DIY fix has limits. Consider professional help or replacement if:
• More than 3 deep scratches exist within a 3 sq ft area—indicating systemic wear (e.g., improper underlayment or subfloor flex). • Swelling or edge curling is present near the scratch (moisture intrusion has already begun). • The board is warped or creaking—scratch is a symptom, not the disease.
Pro refinishing (melamine recoating) costs $2.20–$3.80/sq ft and requires full-room masking, 24-hour ventilation, and 72-hour cure. It’s viable only for large-scale damage—not isolated scratches.
H2: Rental-Specific Tactics: Passing the Walkthrough
Landlords inspect for three things: uniformity, cleanliness, and absence of exposed substrate. Nail these:
• Prioritize high-visibility zones: entryways, kitchen pass-throughs, bedroom door thresholds. • Use the ‘kneel-and-scan’ test: kneel 3 ft away, look across the floor at 15° angle. If you don’t see it, the landlord won’t. • Document repairs: take dated, timestamped photos before and after. Store them separately from your phone’s auto-cloud—many tenants lose evidence during device resets. • For last-minute fixes, keep a travel-sized marker and wax pencil in your move-out toolkit. They fit in a glove compartment.
Bonus: Combine with other rental prep. A single 100g tube of high-adhesion补墙膏使用教程 (all-purpose interior spackle) fixes nail holes, small drywall dings, and even minor PVC floor seam gaps—just sand smooth and paint over. It’s the most versatile item in any退租墙面还原 kit.
H2: Comparison: Repair Methods at a Glance
| Method | Best For | Time Required | Cost per Repair | Pros | Cons |
|---|---|---|---|---|---|
| Touch-up marker | Light scratches, scuffs | 2–3 minutes | $0.85 | No drying, instant results, color-matched | Fades in direct sun after 18 months |
| Wax pencil | Medium scratches, wider scuffs | 5–7 minutes | $1.20 | Water-resistant, matte finish, reworkable | Can collect dust if over-applied |
| Two-part filler + seal | Deep scratches, exposed core | 2.5 hours (mostly cure time) | $3.40 | Durable, seamless, long-term stability | Requires precision sanding; learning curve |
| Steam cleaning + buffing | Surface haze, dullness (not scratches) | 12 minutes | $0.00 (if you own steamer) | Zero chemicals, restores original luster | Does nothing for actual scratches |
H2: Pro Tips You Won’t Find on YouTube
• Marker longevity hack: Store upright, cap tightly, and refrigerate (not freeze). Extends shelf life from 12 to 22 months by slowing solvent evaporation.
• For dark brown or espresso laminates: mix a drop of black marker ink with your base color—dark tones oxidize faster, so slight enrichment prevents premature fading.
• Prevent future scratches: replace rubber chair casters with polyurethane ones (they grip better and don’t shed black residue). A $12 upgrade cuts new scratches by ~70% in office environments (Updated: April 2026).
• If your floor has embossed-in-register (EIR) texture, use a soft-bristle artist’s brush (size 00) dipped in diluted polyurethane to gently stipple texture back into filled areas—then buff. This mimics the microscopic peaks better than flat application.
H2: Beyond the Scratch: Integrating With Other Fixes
Laminate repair rarely happens in isolation. In real-world spaces, you’ll likely pair it with:
• 墙面污迹清理: Use a 3% hydrogen peroxide + baking soda paste for organic stains (coffee, wine) on painted drywall—gentler than bleach, no yellowing.
• 钉眼填补技巧: Fill with lightweight spackle, let dry 90 minutes, then sand with 220-grit *before* priming. Never prime over uncured spackle—it bubbles.
• 踢脚线松动固定: Remove old nails, inject construction adhesive (e.g., PL Premium) into the gap behind the base, then clamp with painter’s tape for 4 hours.
• 瓷砖缝隙清洁: Use a grout removal tool (not a utility knife) to scrape loose debris, then apply oxygen bleach gel (not chlorine) and cover with plastic wrap for 20 minutes before scrubbing.
All these techniques share one principle: match the *existing system*, don’t override it. That’s how you achieve invisible repairs.
H2: Final Thought: It’s Not About Perfection—It’s About Perception
A flawless repair isn’t one that survives lab testing. It’s one that passes the 3-second glance test from 6 feet away in normal room light. That’s the standard landlords, buyers, and tenants actually use. And with the right tools, timing, and technique—most laminate scratches meet that bar in under 10 minutes.
For a complete setup guide covering drywall patching, floor scratch repair, and wall-to-floor transition fixes, visit our / resource hub—curated for hands-on problem solvers who value speed, accuracy, and zero fluff.