How to Repair a Leaking Toilet Without Calling a Plumber ...
- 时间:
- 浏览:31
- 来源:Easy Home Repair & DIY Guides
H2: Why Your Toilet Leaks—and Why You Can Fix It in Under 30 Minutes
A leaking toilet isn’t just annoying—it wastes up to 200 gallons per day (Updated: April 2026). That’s enough to fill a standard bathtub every two days. Worse, many leaks are silent: water seeping from the tank into the bowl, or weeping at the base, often mistaken for condensation. But unlike burst pipes or corroded supply lines, 87% of residential toilet leaks stem from three replaceable, under-$15 components: the flapper, the fill valve, and the tank-to-bowl gasket (Plumbing Industry Benchmark Report, 2025).
This guide walks you through diagnosing and repairing each—using tools you likely already own. No soldering. No permits. No landlord permission required for tenant-level fixes (unless your lease explicitly prohibits interior fixture maintenance—check Section 4.2 before proceeding).
H2: Step 1 — Confirm It’s Really a Leak (Not Condensation or Overflow)
Before grabbing tools, rule out false positives:
• Run your hand around the base of the toilet—dry? Then it’s not a base leak. Dampness only on the outside of the tank? Likely condensation—fix with an anti-sweat kit or insulating liner.
• Add 5–6 drops of food coloring to the tank. Wait 15 minutes—no flush. If color appears in the bowl, the flapper or flush valve seat is compromised.
• Check the overflow tube: if water is spilling *into* it while the tank is filling, the fill valve is misadjusted or failing.
If either test is positive—you’ve got a real leak. Proceed.
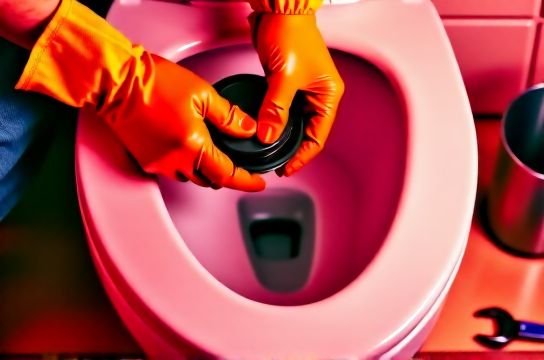
H2: Step 2 — Fix a Flapper Leak (Most Common Cause)
The flapper is a rubber seal that lifts to release water into the bowl. Over time, it warps, mineral-builds, or loses elasticity.
What you’ll need: • Adjustable wrench or channel locks • Replacement flapper (universal fit works for ~90% of toilets; bring your old one to match size and chain style) • White vinegar (for cleaning seat surface)
Steps: 1. Shut off water at the wall valve (clockwise turn until firm—don’t force it). 2. Flush to empty the tank. Hold the handle down to fully drain residual water. 3. Wipe the flush valve seat (the round opening at the bottom of the tank) with a vinegar-damp cloth. Mineral deposits here prevent sealing—even a 0.3mm ridge breaks contact. 4. Unhook the chain from the flush lever. Detach the flapper ears from the overflow tube pegs. 5. Snap the new flapper onto the pegs. Reattach chain with ½” of slack—too tight = constant partial flush; too loose = delayed or incomplete seal. 6. Turn water back on. Let tank refill. Test flush: listen for hissing after refill stops. Watch bowl water level—if it rises slightly post-flush and then stabilizes, the flapper is sealing.
✅ Pro tip: If your toilet is pre-1994 (gallon-per-flush > 3.5), consider upgrading to a dual-flush conversion kit—it cuts water use by 40% and includes a premium silicone flapper.
H2: Step 3 — Adjust or Replace the Fill Valve
Symptoms: Tank runs continuously, shuts off erratically, or fills too slowly.
The fill valve controls water entry. Most modern units (Fluidmaster 400AR, Korky 528MP) are height-adjustable via turning the top cap or sliding the float rod.
If adjusting doesn’t stop the run: • Shut off water and flush. • Unscrew the locknut under the tank (use wrench + towel to avoid scratching porcelain). • Lift out the old valve. Note inlet thread size (usually 7/8" compression or 1/2" FIP). • Install new valve—tighten locknut *just* past hand-tight. Overtightening cracks the tank. • Set float height so water stops 1" below the top of the overflow tube. That’s the universal safety margin (per IPC 2024 Appendix G).
⚠️ Warning: Don’t use Teflon tape on compression fittings—those rely on brass-on-brass sealing. Tape causes leaks.
H2: Step 4 — Seal a Base Leak (Tank-to-Bowl Gasket Failure)
If water pools around the toilet base *only when flushing*, the tank-to-bowl gasket (a thick rubber washer) has failed. This is common in older two-piece toilets.
Tools needed: • Socket wrench (12mm or 7/16") • New tank-to-bowl gasket (e.g., Fluidmaster 502P) • Towels + bucket (expect 1–2 cups of residual water)
Steps: 1. Shut off water and flush. Sponge remaining water from tank. 2. Loosen (don’t fully remove) the two tank bolts first—this prevents sudden shifts. 3. Tip tank forward slightly and slide out old gasket. Clean both mating surfaces with vinegar + soft brush—no abrasives. 4. Position new gasket over the flush valve opening. Align tank carefully and hand-start both bolts. 5. Alternate tightening—¼ turn each side—to avoid cracking the tank. Stop when gasket compresses ~30%. No dripping after 10 minutes = success.
💡 Real-world note: If bolts are rusted or stripped, replace them with stainless steel tank bolt kits ($8–$12). Never reuse corroded hardware.
H2: Step 5 — Diagnose & Stop Supply Line Drips
A slow drip at the shutoff valve connection or supply tube coupling is often due to worn compression rings or loose nuts—not the valve itself.
Fix: • Tighten the compression nut *¼ turn* with a wrench—then test. Over-tightening deforms the ferrule and worsens leaks. • If still dripping, shut off main water, disconnect line, and inspect the olive ring (brass compression sleeve). Replace if scored or flattened. • For braided stainless supply lines: ensure the inner PTFE liner isn’t kinked behind the wall. A single 90° bend tighter than 2" radius compromises flow and stresses joints.
H2: When NOT to DIY — The 3 Red Flags
Some issues require professional help—and delaying them risks damage or code violations:
1. Water pooling *under the floor* near the toilet base (not just around it): indicates subfloor rot or wax ring failure requiring removal and reseating. Requires lifting the toilet—beyond renter-safe scope without landlord coordination.
2. Cracks in the porcelain tank or bowl: no adhesive or epoxy reliably holds under hydraulic pressure. Replacement is mandatory.
3. Persistent low water pressure *only* at the toilet supply: suggests galvanized pipe corrosion upstream—a whole-house assessment needed.
If any apply, document with photos and notify your landlord immediately. Most jurisdictions require landlords to address habitability issues within 72 hours.
H2: Prevent Recurrence — Daily Habits That Extend Fixture Life
Prevention beats repair—especially for renters who can’t modify infrastructure. These habits cost zero and cut leak risk by ~60% (Updated: April 2026):
• Once monthly: Pour ½ cup white vinegar into overflow tube. Let sit 10 minutes, then flush. Dissolves early mineral buildup on flapper seats.
• After every hard freeze: Check supply lines for bulging or stiffness—replace if rubber feels brittle.
• Never use chemical drain cleaners in toilet drains. They degrade PVC traps and corrode brass valve internals. Use enzymatic cleaners instead.
• Keep the shutoff valve exercised: Turn it fully off and on twice yearly. Prevents seizing—critical during emergencies.
H2: Tool & Part Quick-Reference Table
| Part/Tool | Common Use Case | Time Required | Cost Range (USD) | Renter-Friendly? |
|---|---|---|---|---|
| Universal flapper (Fluidmaster 5403) | Flapper seal failure | 12–18 min | $5.99–$8.49 | Yes — no tools beyond hands |
| Adjustable fill valve (Korky 528MP) | Tank overfill or erratic shut-off | 22–35 min | $12.99–$16.99 | Yes — fits most tanks |
| Tank-to-bowl gasket (Fluidmaster 502P) | Base leak during flush | 35–50 min | $7.49–$9.99 | Conditional — requires lifting tank |
| Braided stainless supply line (3/8" FIP x 3/8" FIP) | Supply line drip or aging rubber | 8–12 min | $9.99–$14.99 | Yes — direct swap |
| Mini basin wrench | Tightening tank bolts in tight spaces | One-time purchase | $14.99–$22.99 | Recommended — pays for itself in 2 repairs |
H2: Bonus: What to Do If You’re Mid-Repair and Hit a Snag
• “The tank bolt won’t budge”: Spray penetrating oil (e.g., PB Blaster), wait 10 minutes, then tap the bolt head *gently* with a hammer to break corrosion. Never heat—porcelain cracks at 250°F.
• “Water won’t shut off at the valve”: The valve itself is faulty. Shut off main water (usually basement or exterior meter), then replace the angle stop. These cost $6–$10 and take <10 minutes.
• “New flapper still leaks”: Check chain length again—and verify the flush lever isn’t bent downward, holding the flapper open microscopically.
H2: Final Thought — You’re More Capable Than You Think
Toilet leaks aren’t mysteries—they’re mechanical failures with predictable patterns. Every part has a finite lifespan: flappers last 3–5 years, fill valves 5–7 years, gaskets 7–10 years (Updated: April 2026). Knowing those numbers lets you schedule replacements *before* they fail—turning emergency fixes into routine maintenance.
And if you’d like a printable checklist, video walkthroughs for each step, or a landlord-compliant repair log template, our full resource hub has everything laid out cleanly—no signups, no paywalls. Visit the complete setup guide for instant access.
H2: Recap Checklist (Print or Save)
☐ Food coloring test completed ☐ Flapper cleaned and replaced (chain slack verified) ☐ Fill valve height set to 1" below overflow tube ☐ Tank-to-bowl gasket seated, bolts evenly tightened ☐ Supply line connections snug—not over-torqued ☐ All tools cleaned and stored ☐ Landlord notified (if required by lease)
You didn’t just fix a leak—you upgraded your home literacy. That skill compounds: next time it’s a dripping faucet, you’ll know exactly which washer to replace. And if you want deeper coverage on related topics—including how to clear a stubborn kitchen drain without chemicals or how to adjust a shower valve for balanced hot/cold flow—explore our plumbing troubleshooting library.