Dimmer Switch Wiring Basics Safe DIY for New Owners
- 时间:
- 浏览:26
- 来源:Easy Home Repair & DIY Guides
H2: Why Dimmer Switch Wiring Goes Wrong—And Why It Doesn’t Have To
Most new homeowners or renters who attempt their first dimmer switch installation don’t fail because they’re careless—they fail because they’re misinformed. You’ll find dozens of YouTube videos showing a quick ‘swap-and-go’ with no voltage testing, no load verification, and zero mention of neutral wire requirements. That’s how you end up with flickering lights, buzzing switches, tripped breakers—or worse, overheated wires that degrade insulation over time.
This isn’t theoretical. According to the National Fire Protection Association (NFPA), improper lighting circuit modifications account for ~12% of residential electrical fires linked to DIY work (Updated: April 2026). But here’s the good news: dimmer switch wiring *is* safe and straightforward—if you follow three non-negotiable rules: (1) confirm power is OFF at the breaker, (2) match the dimmer’s load rating and lamp type, and (3) verify wire function—not just color—before connecting anything.
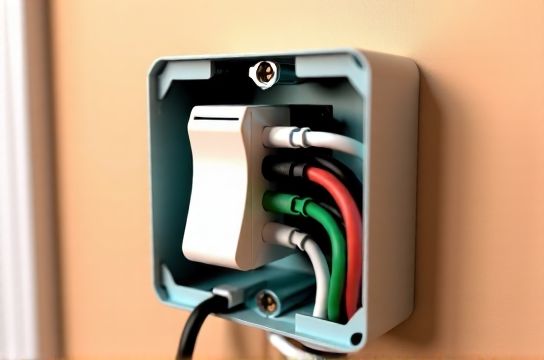
H2: Dimmer Switch Wiring — What You Actually Need to Know Before You Touch a Screw
Let’s cut through the noise. A standard single-pole dimmer replaces a regular toggle switch and controls one light (or group) from one location. It has three core terminals: Line (hot input), Load (hot output to fixture), and Ground. Some modern dimmers—especially smart or ELV (electronic low-voltage) models—also require a Neutral wire to power internal electronics. Skipping neutral on those models causes erratic behavior or outright failure.
Important: Wire color ≠ wire function. In older homes (pre-1985), black may be switched hot—not always line hot. White may be re-tasked as hot (with tape), not neutral. Always test with a non-contact voltage tester *before* removing the old switch—and double-check with a multimeter if unsure.
H3: Step-by-Step Wiring Process (Single-Pole, Non-Smart Dimmer)
1. Turn OFF the correct breaker. Confirm it’s off using a non-contact tester at the switch box *and* at the fixture. Label the breaker clearly. 2. Remove faceplate and switch screws. Gently pull the switch out. Take a photo of existing wiring—this is your fallback. 3. Identify wires: Use your tester to confirm which wire is live (line/hot) *with the breaker ON*, then turn breaker back OFF before proceeding. The line hot is usually black—but again, verify. 4. Connect dimmer: Match manufacturer markings—Line to line hot (often black), Load to wire going to light (often red or black), Ground to bare copper or green. 5. Secure wires with UL-listed wire nuts (not Scotch tape or twist-ons without listing). Tuck neatly; avoid pinching insulation. 6. Mount dimmer, attach faceplate, restore power, and test gradually—start at lowest dim level, then increase.
If the light doesn’t turn on, doesn’t dim smoothly, or buzzes loudly—stop. Recheck connections and load compatibility.
H2: The 1 Mistake: Ignoring Load Limits and Lamp Type
A 600W incandescent-rated dimmer does *not* handle 600W of LED load. Why? Because LEDs draw far less current—but many dimmers rely on minimum load thresholds to stay stable. Most LED-compatible dimmers require a *minimum* load of 10–25W. Go below that (e.g., one 7W LED bulb), and you’ll get flickering or no dimming at all.
Also critical: Not all LEDs are dimmable—and not all dimmable LEDs work with all dimmers. Check both the bulb packaging *and* the dimmer’s compatibility list (e.g., Lutron’s LED Compatibility Tool or Leviton’s Dimmable Load Finder). If you’re upgrading from halogen or incandescent to LED bulbs as part of your 吸顶灯更换安装 or led节能灯升级, assume your old dimmer is obsolete unless explicitly rated for LEDs.
H3: Smart Switches Add Complexity—But Not Necessarily Risk
Smart dimmers (e.g., TP-Link Kasa, Lutron Caseta, GE Enbrighten) introduce two key variables: neutral requirement and wireless pairing. Many budget smart switches omit neutral support—relying instead on “leakage current” through the load to stay powered. That works fine with incandescent loads but often fails or causes ghosting/flicker with LEDs. Always check the spec sheet: if neutral is required, and your switch box lacks one (common in older switch loops), you *cannot* safely install it without rewiring—which is outside beginner scope.
For renters or those doing quick 租客灯具改造, consider plug-in smart dimmers (e.g., Belkin Wemo Mini + compatible lamp dimmer module) instead of hardwired replacements. They avoid wall modifications entirely.
H2: When Things Go Sideways — Troubleshooting Without Guesswork
Flickering? Buzzing? Lights won’t turn off fully? These aren’t quirks—they’re diagnostic signals.
• Flickering at low levels → Likely under-minimum load or incompatible LED driver. Try adding a second dimmable LED bulb or installing a LUT-MLC (Lutron LED Module Compatibility) load correction device ($12–$18).
• Buzzing/humming → Usually magnetic low-voltage (MLV) dimmer mismatch with electronic transformer, or overloaded dimmer. Confirm transformer type (MLV vs. ELV) and replace dimmer accordingly.
• Lights stay on dimly or glow faintly → Classic sign of no neutral on a neutral-required smart dimmer, or capacitive coupling in long cable runs. Verify neutral presence and connection.
• 空开跳闸复位 trips immediately on restore → Short circuit. Double-check for stray strands touching terminals, ground wire contacting hot screw, or reversed line/load wires.
Never reset a tripped breaker more than once without investigating. If it trips again within 5 seconds, stop—and consult a licensed electrician.
H2: Matching Your Project to the Right Dimmer Type
Not all dimmers are created equal. Choosing wrong leads directly to frustration—or unsafe conditions. Below is a comparison of common dimmer categories used in residential DIY lighting upgrades:
| Dimmer Type | Best For | Max Load (LED) | Neutral Required? | Key Pros | Key Cons | Typical Price (USD) |
|---|---|---|---|---|---|---|
| Leading-Edge (TRIAC) | Standard dimmable LEDs, incandescent, halogen | 150–450W | No | Inexpensive, widely available, simple install | Poor low-end dimming, noisy with some LEDs, limited compatibility | $12–$25 |
| Trailing-Edge (ELV) | Electronic low-voltage transformers, high-end LEDs | 100–300W | No (but needs compatible transformer) | Smoother dimming, quieter, better low-end control | Narrower compatibility, higher cost, requires ELV transformer | $28–$65 |
| Smart Dimmer (Neutral-Required) | Whole-home automation, voice control, scheduling | 150–600W | Yes | Reliable operation, firmware updates, remote access | Requires neutral wire; no retrofit in older switch loops | $35–$85 |
| Universal (Dual-Technology) | Mixed loads (LED + incandescent), uncertain fixture types | 150–450W | No | Auto-senses leading/trailing edge, wider compatibility | Slightly larger footprint, occasional calibration needed | $25–$55 |
H2: Real-World Scenarios — From 吊扇固定安装 to 插座面板替换
You’re not wiring in a vacuum. Your dimmer install happens alongside other tasks—and those interactions matter.
• 吊扇固定安装: Never use a standard dimmer for a ceiling fan motor. Fans require a fan-speed controller (capacitor-based or RF-controlled), not a lighting dimmer. Using a dimmer on a fan can overheat the motor windings and void UL listing. Install a dedicated fan control *or* use a dual-control switch (e.g., Lutron Maestro Fan + Light Combo) that separates fan speed and light dimming onto different circuits.
• 插座面板替换: If you’re swapping an outlet near a dimmed circuit, ensure the outlet isn’t downstream of the dimmer—otherwise, plugged-in devices (like phone chargers) may behave erratically or overheat. Dimmers only belong on switched lighting circuits—not general receptacles.
• 灯光闪烁排查: If flickering starts *after* dimmer install, rule out loose neutrals at the panel first—especially if multiple circuits are affected. A shared neutral issue can cause cross-circuit interference. This is rare in newer homes (2000+) but common in pre-1990 split-phase panels with multi-wire branch circuits (MWBCs).
• 家庭用电安全 reminder: Always use a UL-listed dimmer rated for your region’s voltage (120V nominal in North America). Dimmers rated for 220–240V (common in EU/UK units) will fail catastrophically on US circuits—even if they physically fit.
H2: What You Can Skip (Safely)—And What You Shouldn’t
Some tasks look like dimmer-adjacent work—but aren’t DIY-safe without training:
✅ Safe for beginners: - Replacing a single-pole dimmer with same-type dimmer (e.g., TRIAC → TRIAC) - Installing a plug-in LED dimmer module for table lamps - Verifying breaker labeling and performing routine 空开跳闸复位 after confirmed overload
⚠️ Requires licensed electrician: - Adding a neutral wire to a switch loop - Rewiring a circuit to support multi-location dimming (3-way dimming) - Upgrading service panel or replacing main breaker - Installing low-voltage systems (e.g., 12V LED灯带安装) without proper Class 2 transformer and conduit separation
Note: 插头转换器使用 (e.g., NEMA 5-15 to EU Schuko) does *not* change voltage—it only adapts physical shape. Plugging a 120V-only device into 230V via adapter destroys it. Always verify nameplate ratings.
H2: Final Checks Before You Call It Done
Before flipping that breaker back on, run this 60-second checklist:
• ✅ All wire nuts are tight—no copper exposed beyond ⅛ inch • ✅ Ground wire is securely fastened to dimmer’s green screw *and* to box (if metal) • ✅ No insulation is nicked or pinched under mounting screws • ✅ Dimmer faceplate sits flush—no gaps where heat could build • ✅ Bulbs are labeled “dimmable” and match dimmer’s compatibility list • ✅ Total connected load is ≥ minimum and ≤ maximum wattage (calculate actual LED wattage—not equivalent incandescent)
If everything checks out—and the light dims smoothly from 100% down to 5% with no buzz or delay—you’ve done it right.
H2: Where to Go Next
Dimmer wiring is just one piece of a broader lighting upgrade path. Whether you’re planning a full 吸顶灯更换安装 across multiple rooms, integrating smart switches into a unified system, or troubleshooting persistent issues like lights that flicker only at night (hint: utility voltage fluctuation), having a reliable reference matters. Our complete setup guide covers everything from junction box fill calculations to AFCI/GFCI co-location rules—and includes printable wiring diagrams and local code cross-references. Start there to build confidence across your entire home’s electrical ecosystem: complete setup guide.
Remember: Every safe DIY electrical project begins with verification—not assumption. Test before you touch. Match before you connect. And when in doubt, pause—not proceed. Your safety isn’t negotiable. It’s the first wire in the circuit.