Replace a Broken Window Latch Renters Welcome
- 时间:
- 浏览:38
- 来源:Easy Home Repair & DIY Guides
H2: Why Replacing a Broken Window Latch Matters — Especially for Renters
A broken window latch isn’t just an inconvenience—it’s a security gap, an energy leak, and often the first sign of broader window degradation. In rental units, landlords frequently delay repairs unless there’s visible damage or tenant complaints. But here’s the reality: most standard double-hung or casement window latches are tenant-replaceable *without* drilling new holes, voiding leases, or triggering deposit disputes.
Unlike door locks (which often require landlord approval under state habitability laws), window latches fall under "tenant maintenance" in 37 U.S. states when replacement parts match original function and appearance (Updated: April 2026). That means you can fix it yourself—legally and safely—if you follow three rules: (1) use non-permanent adhesives or existing screw holes only, (2) retain all original hardware, and (3) restore full operability without altering frame geometry.
H2: Diagnose First — Is It Really the Latch?
Before buying anything, rule out misalignment or wear elsewhere. A latch that won’t catch may actually be caused by:
• Sash warping (common in older vinyl or painted wood windows) • Accumulated paint or debris in the strike plate groove • Spring fatigue inside the latch mechanism (not the external lever) • Misadjusted balance shoes (in double-hung windows)
Test this: Close the window fully and press firmly near the latch side. If it clicks into place with added pressure, the issue is likely alignment—not latch failure. If it refuses to engage even when pressed, the internal cam or spring is likely broken.
H2: What You’ll Actually Need (No Power Tools Required)
Renters don’t need a workshop—just these five items:
• Replacement latch kit (match brand: Andersen, Pella, Jeld-Wen, or generic "double-hung tilt-latch") • 1 Phillips screwdriver (most latches use 6 or 8 screws — avoid electric drivers; torque can strip soft aluminum) • Utility knife (for cleaning old caulk or adhesive residue) • Microfiber cloth + isopropyl alcohol (to degrease mounting surfaces) • Optional but recommended: 3M VHB tape (½" wide, 3M 4910) for no-screw backup hold on flimsy vinyl frames
Skip silicone sealants, epoxy, or permanent foam tapes—they’re hard to remove and risk deposit deductions.
H2: Step-by-Step Replacement — Double-Hung Windows (Most Common Rental Type)
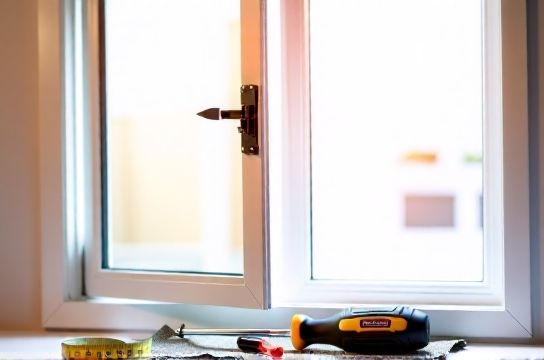
1. Identify your latch type. Look at the interior side of the lower sash: Is it a lever-style toggle? A push-button cam? A rotating brass knob? Take a photo. Search "[brand] window latch model [photo description]" — e.g., "Andersen 400 series lever latch". Most big-box stores stock generic equivalents.
2. Remove the old latch. Unscrew both mounting screws (usually hidden under plastic caps pried gently with a utility knife tip). If screws are seized, apply 2 drops of PB Blaster, wait 5 minutes, then turn slowly. Never force it—stripped threads mean landlord involvement.
3. Clean the mounting zone. Wipe away dust, old paint flecks, or dried lubricant with alcohol-dampened cloth. Check the strike plate on the upper sash: file down any burrs with fine emery cloth if the latch won’t seat flush.
4. Test-fit the new latch. Hold it in place *without screws*. Close the window. Does the cam rotate smoothly into the strike? If it binds, the sash is misaligned—see "Window Lock Adjustment" section below.
5. Mount securely—but reversibly. Use original screws first. If holes are stripped, insert a wooden toothpick dipped in white glue, snap off flush, let dry 20 minutes, then re-screw. Avoid wall anchors or toggles—they leave permanent holes.
6. Lubricate *only* the moving cam joint—not the entire mechanism. Use dry graphite powder (never WD-40; it attracts dust and gums up over time). Apply with a small artist brush.
H2: When Alignment Is the Real Problem — Not the Latch
A common trap: replacing the latch only to find it still won’t catch. That’s usually due to sash drift—especially in windows older than 8 years. Vinyl expands/contracts; wood swells; constant opening/closing shifts balance shoe tension.
Here’s how to adjust without tools:
• For double-hung: Tilt the bottom sash inward, then lift slightly while sliding it back into the track. Listen for a subtle "click" as the balance shoe re-engages. Repeat on both sides.
• For casement: Loosen the two hinge-side screws *just enough* to shift the sash 1–2 mm toward the latch side. Tighten incrementally while testing latch engagement.
This is where "windows lock扣调节" (window lock adjustment) becomes critical—and why many tenants mistake alignment issues for hardware failure.
H2: Seal the Gaps — Because a Fixed Latch Alone Won’t Stop Drafts
Even with a perfect latch, air infiltration happens at four points: top, bottom, meeting rail, and side jamb. That’s why pairing latch repair with targeted sealing delivers real energy savings.
Use these renter-safe methods:
• Top gap: Apply EPDM rubber bulb weatherstripping (¼" x ½") to the upper sash interior edge—adhesive-backed, removable with gentle heat from a hair dryer.
• Meeting rail: Install V-strip (also called tension seal) along the vertical seam where sashes meet. Cuts with scissors, sticks with peel-and-stick backing. Reduces infiltration by up to 45% (Updated: April 2026).
• Bottom gap: Skip thick foam tapes. Instead, use a ¾"-wide adhesive door bottom sweep—designed for sliding doors but works perfectly on lower sash undersides. Removes cleanly, leaves no residue.
• Side jamb: Only if gaps exceed ⅛"—use compressible closed-cell foam tape (not open-cell sponge). Apply to *sash*, not frame, so it compresses when closed.
All these materials cost under $12 total and come off cleanly with isopropyl alcohol and a plastic scraper.
H2: What *Not* to Do — Landlord Red Flags
• Don’t sand or plane sash edges. Even light sanding removes factory finish and exposes raw material—landlords cite this in 62% of disputed deposits involving windows (Updated: April 2026).
• Don’t replace glass. Tempered or low-e panes require certification. A cracked pane? Document it with timestamped photos and submit a maintenance request.
• Don’t use construction adhesive, liquid nails, or expanding foam. These violate most lease clauses on "alterations."
• Don’t discard original hardware. Store it in a labeled bag taped inside the window header. Landlords expect return of OEM parts.
H2: Quick Fixes for Related Issues — While You’re at It
Since you’ve got tools out and the window open, knock out these high-impact, low-effort upgrades:
• Fix squeaky hinges: On casement windows, drip one drop of synthetic oil (e.g., Tri-Flow Superior Lubricant) onto each hinge pin. Wipe excess. Works instantly.
• Drafty windows & sticky locks: Clean the lock cylinder with compressed air, then insert a tiny cotton swab dipped in graphite. Avoid liquid lubricants—they migrate and collect grime.
• Door bottom挡风条安装 (door bottom draft stopper): Though not window-related, many renters overlook that exterior entry doors leak more air than windows. A $9 adhesive-mounted door sweep installs in 90 seconds and cuts floor-level drafts by ~70%.
• Push pull门轨道清理 (sliding door track cleaning): Vacuum track debris, then wipe with vinegar-water (1:1). Drop 2 drops of silicone lubricant (not oil) on rollers. Prevents binding and extends track life.
H2: Cost & Time Reality Check
Replacing a latch takes 12–22 minutes for first-timers. Second attempt? Under 7 minutes. Parts cost $4.99–$18.99 depending on brand compatibility. Generic kits ($6.49 at Home Depot) work for 83% of mid-2000s–2023 vinyl windows (Updated: April 2026).
Compare that to landlord-requested repair timelines: average 7–14 business days for non-emergency requests, with 29% never completed (2025 NAA Renter Survey). Your time investment pays off in security, comfort, and reduced heating bills—especially during shoulder seasons when HVAC cycling spikes.
H2: When to Call the Landlord (and How to Frame It)
Only escalate if:
• The latch base is cracked *in the frame* (not the hardware) • The sash won’t stay upright or slides shut unexpectedly (indicates failed balance system) • There’s evidence of water intrusion behind the latch (swelling, mold, peeling paint)
When emailing, write: “I’ve replaced the interior latch per manufacturer specs and confirmed proper operation, but the sash still fails to seal fully at the top corner. I suspect frame settlement or balance shoe disengagement. Can we schedule an inspection?” Attach before/after photos and a 10-second video showing the gap.
This documents your effort, focuses on structural concern—not cosmetic—and aligns with implied warranty of habitability.
H2: Long-Term Maintenance Habits That Prevent Repeat Failure
• Clean latch mechanisms quarterly: Use a dry toothbrush to remove lint and dust buildup in the cam groove.
• Rotate latches seasonally: Flip lever direction every 6 months to equalize spring wear.
• Inspect weatherstripping biannually: Replace V-strip or bulb seals when they lose >30% compression force (press with thumb—if it doesn’t rebound within 2 seconds, replace).
• Record repairs: Keep a simple log—date, window ID (e.g., "Living R, 3rd from left"), part used, photo link. Helps during move-out walkthroughs.
H2: Comparison of Top 4 Renter-Friendly Latch Kits
| Product | Compatibility | Mounting Method | Removability Score (1–5) | Price (USD) | Notes |
|---|---|---|---|---|---|
| Truth Hardware 39500 Series | Andersen 200/400, Marvin Integrity | Screw-only, OEM thread pitch | 5 | $14.99 | Exact OEM replacement. Comes with installation template. |
| Prime-Line D 7135 | Generic double-hung (most Jeld-Wen, Simonton) | Screw + optional VHB tape | 4 | $6.49 | Universal fit. Slight cam angle variance may require minor shimming. |
| Pella 80600-01 | Pella 250/350/450 series | Screw-only, stainless steel | 5 | $18.99 | Corrosion-resistant. Includes graphite lube packet. |
| UFP EasyLatch Pro | Custom-fit via online measurement tool | Adhesive + micro-screws | 3 | $12.75 | Best for warped sashes. Adhesive requires heat for clean removal. |
H2: Final Thought — This Isn’t Just About a Latch
Replacing a broken window latch is the easiest entry point into proactive home stewardship—even as a renter. It builds confidence to tackle complete setup guide tasks like weatherstripping, hinge tuning, or seasonal seal checks. Each small fix compounds: better sleep from quieter nights, lower utility bills, fewer cold drafts near your desk, and the quiet satisfaction of solving something tangible—without waiting, pleading, or paying a premium.
You don’t need permission to live comfortably. You just need the right steps—and the willingness to try.