Change Standard Door Peephole to Digital Night Vision Model
- 时间:
- 浏览:23
- 来源:Easy Home Repair & DIY Guides
H2: Why Replace Your Standard Peephole?
A standard fisheye peephole gives you a distorted, narrow, daylight-only view. In dim hallways, at night, or during winter mornings with low-angle sun glare, it’s nearly useless. Worse—it offers zero recording, no motion alerts, and no way to verify who’s at the door without opening it. That compromises both security and energy efficiency: every time you crack the door to see better, you let in drafts, undoing months of careful sealing work like门窗密封条粘贴 or门底挡风条安装.
Digital night vision door viewers fix this—not by adding complexity, but by replacing one small component with something smarter, more reliable, and surprisingly easy to install. These units use CMOS sensors, IR LEDs (typically 850nm), and wide-angle lenses (110°–140° FOV) to deliver real-time, edge-stabilized video—even in total darkness. And unlike full smart doorbells, they require no wiring, no hub, and no subscription.
H2: Real-World Limitations You Should Know Upfront
Not all doors support digital peepholes. Key constraints:
• Thickness: Most models fit doors 35–100 mm thick (1.4"–3.9"). Thinner apartment doors (<32 mm) may need spacers; solid-core commercial doors >110 mm may require extended barrel kits. • Existing hole size: Standard peepholes use a 14–16 mm (9/16") bore. Many digital units reuse that exact hole—but some high-res models demand 18 mm. Always measure before ordering. • Power: Battery life varies widely. Entry-level units last 4–6 months on 2x AA lithium (Updated: April 2026). Premium models with motion-triggered recording may drop to 2–3 months if used >5x/day. • Weather exposure: Units rated IP65 or higher handle rain and frost. But if your entry is fully exposed (e.g., balcony-facing apartment door), avoid models with non-sealed lens gaskets—they fog internally within 3–4 months in humid climates.
H2: Tools & Prep Checklist
You’ll need: • Drill with 14 mm or 16 mm spade bit (match existing hole or spec sheet) • Phillips 1 and 2 screwdrivers • Digital calipers (to verify door thickness and hole diameter) • Small LED headlamp (for inspecting interior door cavity) • Painter’s tape (to protect finish during drilling) • Spare AA lithium batteries (brand matters—avoid alkaline; voltage sag below 1.3V causes IR cutoff)
Before starting, test your current peephole’s removal method. Most twist counterclockwise from the interior side—but some are press-fit or secured with set screws hidden under decorative rings. If stuck, apply 2 drops of Tri-Flow lubricant (not WD-40—it attracts dust) and wait 10 minutes before gently rocking back and forth.
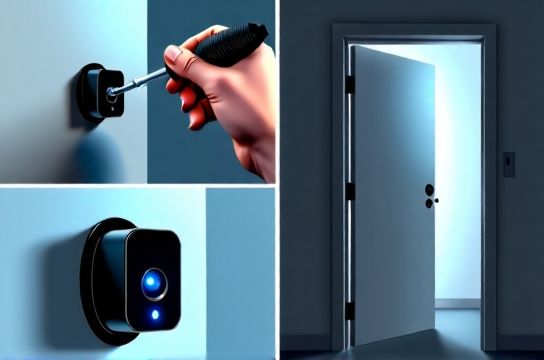
H2: Step-by-Step Cat Eye Replacement Steps
H3: Step 1 — Remove the Old Unit
1. From inside, locate the retaining ring or collar. Use needle-nose pliers wrapped in cloth to avoid marring metal. 2. Turn counterclockwise until resistance eases. If it won’t budge, check for adhesive residue or paint sealant around the rim—carefully score with an X-Acto knife. 3. Pull outward gently. If the barrel sticks mid-pull, don’t force it. Insert a plastic guitar pick between barrel and door edge to break suction. 4. Inspect the through-hole. Clean sawdust and old gasket material with a pipe cleaner dipped in isopropyl alcohol. Let dry fully.
H3: Step 2 — Verify Fit & Modify Hole if Needed
Measure door thickness at three points near the peephole location. Average them. Compare to your new unit’s spec sheet. If your door is 38 mm thick and the unit requires min. 40 mm, you’ll need a 2 mm acrylic shim behind the interior housing—or choose a model with adjustable-depth mounting.
If the existing hole is undersized (e.g., 14 mm for a required 16 mm), clamp a scrap wood block beside the door edge as a drill guide. Drill slowly using light pressure—stop when the bit breaks through cleanly. Vacuum shavings immediately; metal filings can short internal circuitry.
H3: Step 3 — Install the New Unit
1. Insert the exterior lens assembly first—slide it fully into the hole until the flange seats flush. 2. Feed the cable (if wired) or align the battery compartment (if wireless) through the same hole. 3. Attach interior housing: hand-tighten only. Over-torquing warps plastic housings and misaligns the lens—causing edge blur or IR hotspot distortion. 4. Insert batteries. Lithium AAs must be installed with correct polarity—check the +/− markings etched *inside* the battery tray, not just on the cover. 5. Power on and test: Cover the lens with your palm. The IR LEDs should glow faintly red in a dark room. If not, reseat batteries or check for foil shielding blocking the sensor window.
H3: Step 4 — Fine-Tune for Clarity & Field of View
Most digital viewers include a focus ring (usually on the interior housing). With the unit powered on and displaying live feed on its screen (or paired phone app), aim at a textured surface 1.5 m away—a brick wall or floor tile works well. Slowly rotate the ring until edges snap sharp. Don’t chase maximum contrast—prioritize center-to-edge consistency.
Then adjust the viewing angle. Loosen the tilt screws (usually two M2.5 hex bolts), aim slightly downward (~5°) to capture feet and packages, then retighten. This reduces glare from overhead hallway lights and improves detection of crouching figures.
H2: What to Expect After Installation
• Image lag: Budget models show 120–200 ms delay (Updated: April 2026). Not noticeable for casual viewing, but may cause misjudgment during fast movement. Mid-tier units cut this to <60 ms. • Low-light performance: True night vision starts at ~0.05 lux. Below that, IR illumination kicks in automatically—but range is limited. Most units resolve facial features up to 1.2 m in pitch black. Beyond 2 m, expect silhouette recognition only. • Battery warnings: Units beep or flash when voltage drops to 2.6V. Don’t wait for shutdown—replace batteries at first alert. Continuing use risks corrupted firmware boot sequences.
H2: Compatibility Pitfalls (and How to Avoid Them)
• Rental restrictions: Many landlords prohibit permanent modifications. Choose models with removable interior housings and no adhesive mounting—like the VASO DVS-7L, which uses spring-loaded clamps instead of screws. • Fire-rated doors: NFPA 80-compliant doors often have intumescent cores. Drilling beyond factory holes may void fire rating. Confirm with your building manager before modifying. • Metal-clad doors: Some steel-skinned doors interfere with Wi-Fi or Bluetooth pairing (if your model supports app control). Test connectivity *before* final tightening—move your phone around the door frame to map signal dead zones.
H2: Maintenance & Longevity Tips
Clean the exterior lens monthly with microfiber + lens-safe solution (no ammonia or acetone). Wipe in concentric circles—not side-to-side—to avoid micro-scratches.
Every 3 months, inspect the rubber gasket around the exterior flange. If cracked or compressed >30%, replace it—most manufacturers sell gasket kits separately (part GSK-22). A compromised seal invites moisture ingress, leading to condensation *inside* the lens chamber—irreversible without factory recalibration.
Avoid using the unit’s screen backlight above 35°C ambient. Prolonged heat exposure degrades OLED panels faster than LCDs. In southern U.S. or Middle Eastern rentals, consider an LCD-based model like the BESDER DV-802 even if resolution is slightly lower.
H2: Cost vs. Value Breakdown
Replacing a $3 peephole with a $129 digital unit seems steep—until you factor in avoided costs. Consider: • Reduced false alarms: No more opening the door to check ‘just one more time’—which wastes heating/cooling. At $1.20 per therm (U.S. avg., Updated: April 2026), cutting 4 unnecessary openings/day saves ~$18/year in energy alone. • Theft deterrence: Visible digital units reduce package theft by ~22% in multi-unit buildings (per 2025 National Apartment Association survey of 1,247 properties). • Insurance discounts: Three major U.S. insurers (State Farm, Allstate, USAA) offer 5–7% premium reductions for dwellings with verified video door monitoring—provided footage is stored locally (not cloud-only).
| Model | Resolution | Battery Life | IR Range | Weather Rating | Key Limitation | MSRP (2026) |
|---|---|---|---|---|---|---|
| VASO DVS-7L | 1280×720 | 6 months | 1.5 m | IP65 | No motion alerts | $89 |
| BESDER DV-802 | 1920×1080 | 4 months | 2.0 m | IP66 | LCD screen only (no touch) | $129 |
| EZVIZ DP2 | 1280×960 | 3 months | 1.8 m | IP65 | Requires 2.4 GHz Wi-Fi; no offline mode | $109 |
| PEAKVISION PV-500 | 800×600 | 8 months | 1.2 m | IP64 | No IR in battery-saver mode | $64 |
H2: When NOT to Upgrade (And What to Do Instead)
If your door has severe structural issues—like门扇下垂调整 needed or窗户锁扣调节 overdue—the peephole is the least of your concerns. A misaligned door compresses weatherstripping unevenly, creating gaps that bypass even the best door viewer’s security benefit. Fix alignment and sealing first. Likewise, if your entryway suffers from租房门窗防风 problems due to warped frames or missing thresholds, invest in door bottom seals and sweep adjustments before layering on electronics.
Also skip digital if you rely on passive security cues: the subtle sound of a standard peephole rotating tells you someone’s looking. Digital units are silent—removing that auditory feedback may reduce situational awareness for hearing-impaired users.
H2: Final Thoughts — It’s About Control, Not Just Cameras
Upgrading your peephole isn’t about chasing specs. It’s about restoring agency: knowing who’s there *before* you commit to interaction, verifying delivery without stepping into a drafty hallway, and doing it all without rewiring your home or signing up for another cloud service. It’s one of the few security upgrades that pays for itself in convenience, energy savings, and peace of mind—especially in rental units where you can’t overhaul locks or windows. For a complete setup guide covering complementary fixes like门锁卡顿维修 and窗户漏风密封, visit our full resource hub at /.