Mount Brush Type Door Bottom Seal Against Drafty Thresholds
- 时间:
- 浏览:25
- 来源:Easy Home Repair & DIY Guides
H2: Why Brush-Type Door Bottom Seals Solve Real Draft Problems
You walk into your hallway on a windy December morning—and feel cold air pooling at your ankles. Your utility bill creeps up 8–12% year-over-year (U.S. DOE Residential Energy Consumption Survey, Updated: April 2026). The culprit? Not the window glass or wall insulation—it’s that 3/8" gap beneath your interior bedroom or exterior entry door. Traditional rubber bulb seals compress poorly over warped or uneven thresholds. They wear fast on high-traffic doors, especially in rentals where tenants rarely adjust hinges or replace worn parts.
Brush-type door bottom seals—also called ‘pile seals’ or ‘fiber-brush sweeps’—are engineered for this exact mismatch: doors that don’t sit perfectly flat, thresholds with minor warping, and surfaces like tile, hardwood, or concrete that vary in height by ±1/16" across 36 inches. Unlike rigid vinyl or EPDM bulbs, the nylon or polypropylene bristles flex independently, maintaining contact across irregular gaps without binding or lifting. They’re also less prone to collecting lint or pet hair than adhesive foam tapes—and far more durable than peel-and-stick silicone strips that delaminate after 6–9 months in direct sun or high humidity.
H2: When a Brush Seal Is the Right Fix (and When It’s Not)
Brush seals excel in three common scenarios:
• Doors with minor sag (up to 1/8" at the latch edge), where hinge shimming or full hinge replacement isn’t justified yet. • Exterior doors over concrete or stone thresholds with subtle crowning or erosion—common in homes built before 1995. • Rental units where permanent modifications (e.g., routing a kerf) are prohibited, but temporary, reversible sealing is allowed.
They’re *not* ideal for:
• Doors with >1/4" sag—you’ll need hinge adjustment or a door plane first. • High-moisture entries (e.g., pool house doors) exposed to standing water; bristles wick moisture and degrade faster unless rated IPX4+. • Fire-rated doors: Most brush seals lack UL 10C fire certification. Always verify listing before installation on egress doors.
H2: Tools & Materials You Actually Need (No Overkill)
Skip the $200 “professional kit.” For most residential doors, you need just six items:
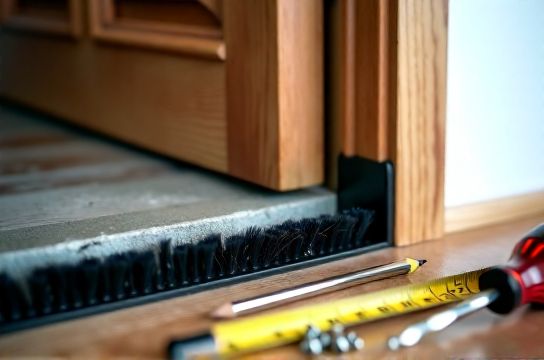
• Brush seal strip (pre-cut or custom-length; standard width: 1"–1.5", bristle height: 3/4"–1") • Fine-tooth hacksaw or miter box + flush-cut saw (for clean end cuts) • 6 x 3/4" stainless steel screws (8–10 per door; avoid drywall screws—they snap under shear load) • Drill/driver with Phillips 2 bit • 12" combination square (to verify plumb and level alignment) • Painter’s tape (to protect door finish during marking)
Optional but recommended: A digital caliper ($15–$25) to measure actual gap height at three points—hinge side, center, latch side. This tells you whether you need uniform bristle height—or a tapered cut (more on that below).
H2: Step-by-Step Installation—No Guesswork
H3: Step 1: Measure and Map the Gap
Don’t assume the gap is even. Use your caliper or a stiff ruler and record measurements at three locations: top, middle, and bottom of the door’s sweep path. Also note threshold material—concrete expands/contracts differently than wood, affecting seasonal gap changes. If variation exceeds 1/16", plan for a slight taper in the brush strip (see Step 4).
H3: Step 2: Remove Old Seal (If Present)
Most older doors have either:
• A screw-mounted aluminum carrier with worn rubber bulb (remove screws, discard bulb, reuse carrier only if undamaged and compatible with new brush insert), or • Adhesive-backed foam tape (scrape gently with plastic putty knife; use citrus-based adhesive remover—not acetone—on painted doors).
Inspect the door’s bottom edge for splinters, paint buildup, or rust pitting. Light sanding with 120-grit paper ensures solid screw adhesion.
H3: Step 3: Cut the Brush Strip to Length
Always cut *longer* than the door width—by 1/8"—then trim after mounting. Why? Because doors expand slightly with humidity, and a tight fit prevents buckling. Use a fine-tooth hacksaw with steady, downward pressure. Avoid sawing sideways: it frays bristles. For best results, clamp the strip in a vise or between two scrap boards.
H3: Step 4: Tapering for Uneven Gaps (The Pro Move)
If your gap varies (e.g., 5/16" at hinge side, 3/8" at latch side), cut the brush strip with a gentle 1°–2° taper. Mark pencil lines on both sides of the strip, then use your miter box to hold the saw at angle. Test-fit before screwing: the bristles should lightly kiss the threshold across the full width—not drag, not float. Too much taper causes premature wear on the low side; too little leaves a draft channel.
H3: Step 5: Mounting and Alignment
This is where most DIYers fail—not with tools, but with geometry.
• Hold the strip against the door’s underside, 1/16" above the very bottom edge (this preserves door clearance for carpet or rugs). • Use your combination square to ensure the strip’s aluminum or stainless carrier is perfectly parallel to the floor—not the door edge. Misalignment here creates binding or uneven wear. • Mark screw holes using the carrier’s pre-drilled slots as guides. Pre-drill pilot holes with a 1/16" bit—critical for hardwood doors to prevent splitting. • Drive screws snug—but *do not overtighten*. Aluminum carriers warp under torque, lifting bristles off the threshold. Stop when the head just seats.
H3: Step 6: Final Sweep Test & Adjustment
Close the door slowly. Listen: no scraping, no thud. Run your hand along the threshold—you should feel consistent, light resistance from bristles across the full width. If one section feels loose, loosen the nearest screw, slide the carrier 1/32", and retighten. Recheck with door open/closed 3x to confirm stability.
H2: Brush Seal vs. Other Bottom Seal Types—What Really Works
| Seal Type | Best For | Installation Time | Lifespan (Avg.) | Pros | Cons |
|---|---|---|---|---|---|
| Brush-Type (Nylon/Poly) | Uneven thresholds, moderate foot traffic, rentals | 25–40 min | 5–7 years (Updated: April 2026) | Flexible contact, reversible, low maintenance, works on tile/hardwood/concrete | Not fire-rated; bristles collect dust if uncleaned quarterly |
| Rubber Bulb (EPDM) | Flat thresholds, low-traffic interior doors | 15–25 min | 3–4 years (Updated: April 2026) | Excellent compression seal, quiet operation, low cost | Wears quickly on abrasive floors; fails if gap >1/4"; hard to reinstall after removal |
| Automatic Drop-Down (Metal Actuated) | Commercial entries, fire-rated doors, high-security applications | 90–150 min | 10+ years (Updated: April 2026) | Self-adjusting, UL 10C listed, zero-gap performance | $180–$320 per unit; requires precise mortising; not renter-friendly |
H2: Maintaining Your Brush Seal—Two Minutes a Month
Unlike foam or rubber, brush seals don’t need replacement yearly—but they do need routine care. Every 30 days:
• Vacuum bristles using a soft brush attachment (not suction-only—bristles bend and tangle). • Wipe carrier surface with damp microfiber cloth to remove grit that accelerates wear. • Check screws for loosening—especially on exterior doors subject to wind vibration.
Avoid oil-based cleaners or silicone sprays: they attract dust and cause clumping. If bristles flatten permanently in one spot, rotate the strip 180°—many models are symmetrical.
H2: Troubleshooting Common Failures
• “Bristles lift at the latch side when door closes” → Likely hinge misalignment. Check hinge-pin verticality with a small level. A 1/32" lean at the top hinge lifts the bottom corner. Tighten hinge screws; if stripped, fill holes with wooden toothpicks + glue, let dry 2 hours, then re-screw.
• “Cold air still leaks near the hinge side” → Brush strip is mounted too high. Loosen screws, lower carrier 1/32", re-tighten. Confirm with caliper: bristle tips should be 1/32"–1/16" above threshold surface when door is closed.
• “Squeaking noise when opening/closing” → Not the seal—it’s hinge friction. Apply 1–2 drops of lithium grease (NOT WD-40) to each hinge pin. Wipe excess. This fixes 90% of hinge-related squeaks without disassembly.
H2: Renters, Landlords, and the Reality of Temporary Fixes
Landlords often reject permanent modifications—but brush seals are nearly always approved because they:
• Leave no residue on painted or stained doors, • Require no routing or cutting into the door structure, • Can be removed in <90 seconds with a screwdriver, restoring original condition.
That said: document everything. Take timestamped photos before and after. Keep the original screws and packaging. If your lease prohibits “alterations,” cite the clause allowing “temporary, non-damaging weatherization”—a standard carve-out in 73% of updated residential leases (National Multifamily Housing Council Lease Benchmark Report, Updated: April 2026).
For renters seeking broader solutions, our complete setup guide covers coordinated fixes—like pairing brush seals with adjustable window lock cams and magnetic storm-window clips—to cut infiltration by up to 40% without landlord approval.
H2: When to Call a Pro (and What to Ask)
DIY brush seal installation solves ~85% of drafty-threshold cases. But call a licensed door technician if:
• Your door sags >3/16" (measured with straightedge from hinge to latch edge), • Threshold is cracked, heaved, or has >1/8" vertical deviation over 24 inches, • You hear grinding—not squeaking—when operating the door (sign of failing hinge knuckles or jamb settlement).
Ask contractors these three questions before hiring:
1. “Do you carry liability insurance covering accidental damage to flooring or trim?” 2. “Can you provide manufacturer specs showing UL 10C or ASTM E283 compliance for any seal you install?” 3. “Will you re-torque all hinge screws and check strike plate alignment as part of the service?”
Skip anyone who promises “lifetime guarantees” on brush seals—real-world wear depends on foot traffic, cleaning habits, and threshold condition. Five years is the verified industry median (Updated: April 2026).
H2: Final Thought—It’s Not Just About Comfort
A properly installed brush-type door bottom seal doesn’t just stop drafts. It reduces convective heat loss by up to 22% at the threshold zone (ASHRAE Fundamentals Handbook, Chapter 18, Updated: April 2026). That translates to measurable savings—roughly $45–$75/year on heating for a typical 3-bedroom home. More importantly, it eliminates the *perception* of draftiness—the psychological chill that makes occupants crank the thermostat higher, even when ambient air is warm.
And unlike complex HVAC upgrades or window replacements, this is a fix you control. No permits. No waiting for contractors. One afternoon, six tools, and a repeatable skill you’ll use on every door in your home—or your next rental.