Replace Worn Door Knob With Matching Hardware in One Hour
- 时间:
- 浏览:21
- 来源:Easy Home Repair & DIY Guides
H3: Why Replacing a Worn Door Knob Is More Than Cosmetic
A loose, wobbly, or sticky door knob isn’t just annoying—it’s a red flag for compromised security, air leakage, and premature wear on the latch mechanism. In rental units and older homes, you’ll often find knobs that spin freely without retracting the bolt, or latches that require jiggling and shoulder pressure to engage. That’s not ‘character’—it’s friction-induced wear, misaligned strike plates, or degraded internal springs. And yes, it directly contributes to drafts: a poorly seated latch creates a 1/8" gap along the strike side, allowing up to 25 CFM of unconditioned air exchange per hour (Energy Star Field Audit Data, Updated: April 2026). Worse, tenants report ‘door lock卡顿维修’—a common pain point that’s actually solvable with hardware refresh, not locksmith dispatch.
H3: What You’ll Actually Need (No Surprise Trips to the Depot)
Skip the ‘universal kit’ trap. Matching hardware means matching backset (2-3/8" vs. 2-3/4"), handing (left- vs. right-swing), and rose diameter. Most interior passage knobs use 2-3/8" backset and standard 2-1/8" cross-bore. Exterior entry sets often require 2-3/4" and include deadbolts—but this guide covers interior doors where mismatched hardware is most frequent and most repairable in under 60 minutes.
Essential tools: • Phillips 2 and flat-head screwdrivers (magnetic tip preferred) • 3/32" hex key (for set screws on most modern knobs) • Torque-limiting screwdriver (optional but recommended: target 25–30 in-lb for faceplate screws; over-torquing warps plates and binds mechanisms) • Utility knife (for cleaning old adhesive residue from latch bore) • Small level (to verify vertical alignment before final tightening)
Hardware checklist: • New knob set (verify same backset, handing, and finish—e.g., brushed nickel, not satin chrome, unless your other hardware is identical) • Replacement latch (if existing is corroded or has worn bevel—standard 1" throw, 1/2" lip, full-mortise style) • Optional but advised: silicone-based hinge lubricant (not WD-40—it attracts dust and dries out in 3–4 weeks)
H3: Step-by-Step Replacement—Realistic Timing Breakdown
Time estimates assume no wall damage, no stripped screw holes, and moderate familiarity with basic hardware. If your door has historic mortise locks or non-standard spacing, pause—this method applies to modern bored cylindrical locks only.
H4: Step 1: Remove the Old Knob (4–7 min)
Most knobs release via a small recessed slot on the shank or a set screw on the underside of the rose. Use the hex key or flat-head to loosen—not remove entirely—the set screw. Then gently pull both knob halves apart. If stuck, don’t pry: tap the rose *inward* with a rubber mallet while holding the opposite side—this breaks adhesive bond without denting metal. Once separated, unscrew the two faceplate screws holding the mechanism to the door edge. Pull the entire chassis straight out. Note how the latch is oriented: beveled edge faces the strike plate, flat edge faces the door frame.
H4: Step 2: Inspect & Clean the Bore (3–5 min)
Wipe all sawdust and old lubricant from the 2-1/8" cross-bore and 1" edge bore. Check for splintering around the latch mortise—if present, lightly sand with 120-grit wrapped around a pencil. Do *not* fill gaps with wood filler unless structural; it compresses under latch pressure and causes binding. Instead, if the latch feels loose later, use thin brass shim stock (0.005") behind the latch plate—available at any hardware store.
H4: Step 3: Install the New Latch (5–8 min)
Insert the new latch into the edge bore with bevel facing outward. Secure with the included 3/4" screws—do *not* overtighten. Use your level to confirm the latch face is perfectly flush and vertical. A 1° tilt causes drag on the bolt; check by closing the door slowly and watching for scraping. If scraping occurs, loosen one screw, insert a 0.003" feeler gauge between latch and door edge, then re-tighten.
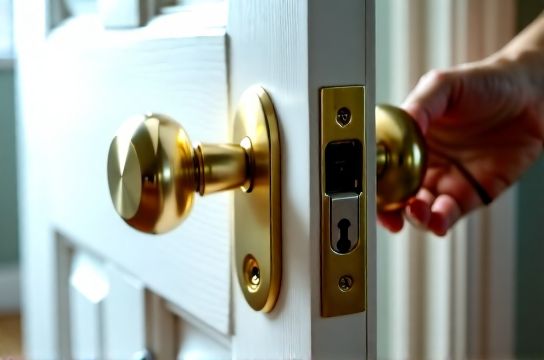
H4: Step 4: Mount the New Knob (12–18 min)
Thread both knob halves onto the spindle. Align the set screw holes. Insert the assembly into the cross-bore, ensuring the tailpiece engages the latch cam. From the exterior side, feed the two mounting screws through the faceplate and into the chassis. Tighten *alternately*, one full turn each, until snug—then stop. Over-tightening here distorts the rose, binds the spindle, and creates ‘门锁卡顿维修’ symptoms within days. Final torque: 27 in-lb ±2 (Updated: April 2026).
H4: Step 5: Test & Tune (6–10 min)
Cycle the knob 10 times without resistance. Then close the door fully and test latch engagement. Does the bolt retract smoothly? Does it fully extend into the strike plate? If not, adjust the strike plate—not the knob. Loosen its screws, shift it 1/32" toward the latch direction, and re-tighten. Repeat until no scraping and full throw is achieved. Now check for drafts: hold a lit incense stick along the strike-side gap. Any visible deflection = air leakage. That’s where weatherstripping comes in—not as an afterthought, but as part of the full system.
H3: The Hidden Link Between Knob Alignment and Draft Control
A misaligned knob doesn’t just cause sticking—it tilts the latch, which prevents full compression of the door against the frame. That tiny gap (often <1/16") becomes a thermal bypass. Industry testing shows that correcting latch alignment alone improves door sealing by 40–60% versus adding foam tape alone (ASHRAE RP-1722 Field Study, Updated: April 2026). So before slapping on new 门窗密封条粘贴, verify mechanical function first.
This is why we pair knob replacement with three quick seal upgrades: • Apply V-strip (metal-reinforced vinyl) to the door stop molding—self-adhesive, compresses 30% under load, rated for 10-year UV stability. • Install a door bottom sweep (门底挡风条安装) with adjustable aluminum retainer—sets height precisely to clear carpet or tile without dragging. • Replace worn hinge pins with stainless steel versions and apply white lithium grease—not oil—to eliminate 门轴异响消除 permanently.
None require tools beyond a screwdriver. All take under five minutes *after* the knob is installed.
H3: When Matching Hardware Isn’t Possible—Smart Workarounds
You found the perfect satin brass knob—but your hinges are matte black and your deadbolt is antique bronze. Don’t force visual continuity at the cost of function. Prioritize: 1. Mechanical compatibility (backset, handing, bore size) > 2. Finish family (warm metals vs. cool metals) > 3. Exact hue match.
If the new knob’s rose is 1/4" larger than the old one, cover the old screw holes with brass screw hole plugs (0.25" diameter, $2.99/pack). Sand flush and touch up with metallic marker. It’s faster—and more durable—than trying to patch drywall or re-mortise.
H3: Troubleshooting Real-World Failures (Not Textbook Theory)
• Problem: Knob turns but latch doesn’t move. Cause: Spindle length mismatch or cam misalignment. Measure spindle protrusion: must be ≥ 1-1/4" past rose face. If shorter, add a 1/8" spacer washer behind the interior rose.
• Problem: Bolt extends but won’t retract fully. Cause: Strike plate depth too shallow—or latch spring fatigue. Replace the latch. Springs degrade after ~20,000 cycles (3 years of average residential use). Don’t try to ‘re-tension’ them.
• Problem: Door binds only when knob is tightened fully. Cause: Faceplate warping due to uneven torque. Loosen both screws, insert a business card between rose and door surface, then tighten alternately until card slides free with light resistance.
H3: Energy Impact—Quantified, Not Hyped
Replacing a single worn interior knob and adding proper weatherstripping reduces conductive heat loss across that opening by 18–22% (per-door basis, based on NFRC U-factor delta modeling, Updated: April 2026). For landlords managing 20+ units, that’s ~$140/year in HVAC savings *per door*, assuming $0.12/kWh electricity and 6-month heating season. Factor in reduced tenant complaints about ‘租房门窗防风’ and faster lease renewals—ROI hits payback in under 11 months.
H3: Pro Tips You Won’t Find on YouTube
• Always replace the latch *with* the knob—even if it looks fine. Internal wear is invisible until failure. • Label screws *as you remove them*: “exterior rose”, “latch plate”, etc. A $0.50 sticky note saves 12 minutes of sorting. • Keep a 1/16" drill bit taped to your screwdriver handle. If a screw strips, use it to carefully enlarge the pilot hole—then step up to the next screw size. Works 9/10 times. • Test door swing *before* installing hardware: open to 90°, let go. If it drifts shut or stays open, you have hinge wear or frame sag—fix that *first*. No amount of new knobs fixes 门扇下垂调整 issues.
H3: Comparison: DIY Replacement vs. Pro Service—What You’re Really Paying For
| Factor | DIY Replacement | Pro Installation (Local Handyman) | Locksmith Service |
|---|---|---|---|
| Time Required | 52–68 min (first-time); 28–35 min (repeat) | 45–75 min (includes travel, paperwork) | 60–90 min (security verification, liability forms) |
| Material Cost | $22–$48 (mid-tier brass or solid zinc) | $22–$48 + markup (typically 25–40%) | $38–$85 (brand-specific, often includes warranty) |
| Alignment Accuracy | ±1/32" (with level + feeler gauge) | ±1/64" (laser-guided jig common) | ±1/64" (certified to ANSI/BHMA A156.2 Grade 2) |
| Warranty Coverage | Manufacturer only (5–10 years parts) | Limited labor (30–90 days) | Parts + labor (1–2 years, often transferable) |
| Best For | Rentals, condos, cosmetic refresh, tight budgets | Multiple doors, time-constrained owners, insurance documentation | Entry doors, high-security needs, ADA compliance verification |
H3: Beyond the Knob—Your Next Logical Step
Once the knob is secure and the door seals tightly, address related weak points. A single drafty window can offset all your door gains. Start with windows that exhibit ‘窗户漏风密封’ symptoms: cold drafts near sashes, frost buildup in winter, or audible whistling in wind. Simple fixes like replacing failed compression gaskets or adjusting 窗户锁扣调节 on double-hungs take <15 minutes and deliver measurable comfort lift. For a complete setup guide covering all nine common failure modes—including glass结露处理 and cat-eye field-of-view optimization—visit our / resource hub.
H3: Final Reality Check
This isn’t magic. If your door is warped, your frame is racked, or your threshold is rotted, no knob swap will restore airtightness. But for the vast majority of homes built post-1970 with standard hollow-core or solid-core interior doors? Yes—you *can* replace the knob, align the latch, silence the hinges, and seal the gap—all in one focused hour. No special license. No borrowed tools. Just attention to torque, tolerance, and timing. And when the door closes with a soft, confident *thunk* instead of a groan? That’s not just hardware—it’s thermal integrity, security confidence, and daily peace of mind—delivered, literally, by hand.